Showing posts with label Nested Stitched Eyelet Square Set. Show all posts

Monday, August 21, 2017

Holly Swag

Hi, Lois here with a little change of pace card.  It's 90 degrees outside, but I'm here to cool you off a bit with a Christmas card today.  I'm still playing with the new Nested Shapes release from CottageCutz -- this time the Nested Stitched Eyelet Square set, as well as one of the Expressions Plus sentiments.


A little twist to this card is that the "Happy Christmas" sentiment is actually on the inside of the card.  It shows through a strip of acetate on the front.

To start my card I cut the 8 1/2" x 5 1/2" card base from some heavyweight white cardstock.  In addition I cut two strips of red (1" x 5 1/2"), two strips of green (1/2" x 5 1/2"),  a white 2 1/2" x 2 1/2" square and a strip of clear acetate 2 1/2" x 5 1/2".


After scoring the card base at the 4 1/4" mark, I trimmed a 1 1/2" strip from the bottom and adhered it to the acetate strip.  I trimmed that same side of the card 1 1/4" from the top, adding Scor-Tape to the top of the acetate and the edge of the card.


After removing the Scor-Tape, I lined up the acetate/cardstock piece to the bottom of the card and pressed down on the taped sections -- creating the card base.


Next I cut the die-cut pieces from red and green cardstock . . .


. . . adding some darker color to the pieces.  I sponged around the edge of the white square with red distress oxide ink.


Using a scallop punch, I trimmed down the red strips, adding some 1/8" Scor-Tape to the backs.


I then constructed my holly swag, using small foam pop dots to give dimension to the swag.


I then stamped the inside of the card, making sure that the sentiment was placed so that it would show through the acetate strip.


I then added the red/green strips to the outside of the acetate and constructed the swag panel and glued it on either side of the acetate strip.  The "celebrate" sentiment was centered at the bottom of the card front.


CottageCutz dies used on this card are:

http://www.scrappingcottage.com/cottagecutznestedstitchedeyeletsquareset.aspx

http://www.scrappingcottage.com/cottagecutzhollybranchwbow.aspx

http://www.scrappingcottage.com/cottagecutzexpressionspluscelebratephrase.aspx


Sunday, August 13, 2017

Wedding Accordion

Hi!

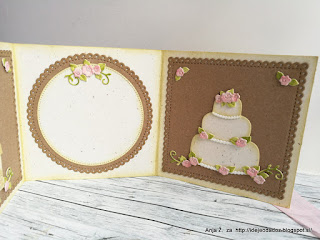
It's Anja here. Today I'm continuing the wedding theme. This time I made an accordion card in which you can write your good wishes for the bride and groom. But I could also be used as a wedding invitation. I think the chapel and the cake would be perfect to use with ceremony and reception information. 


For this card I used:
- Distress Inks (Antique Linen, Spun Sugar, Shabby Shutters, Peeled Paint),
- craft card stock (light and dark),
- ribbon,
- paper glue,
- double sided adhesive tape. 

I started with cutting the paper. I cut 30x10 cm piece from light craft paper. I scored it at 10 and 20 cm. I put some Distress ink around the edges. 


Then I adhere the ribbon the way it's shown on pictures below. 


When I had the card base I die cut all the other pieces, colored them with Distress inks and adhere them together. 


And this is the result.


Thank you for stopping by and see you again soon. 

Have a great Sunday.
Anja Z.


Cottage Cutz used in this project: