Showing posts with label Nested Stitched Eyelet Square. Show all posts

Tuesday, October 18, 2022

Sweet Gingerbread and Cocoa Card

Happy TuesDIE Cottage Cutz Friends!
Melinda here with you on this terrific Tuesday. Today I am sharing a cute Christmas card I created with some dies from the FABULOUS Part2 Christmas release!
Here is my finished card. It is an A4 sized card. It features one of the super adorable Ginger friends. I also included the phrase die, Cookies & Cocoa with those cute chocolate chip cookies and that adorable cup of cocoa. I mounted all of these onto the smaller Square Scalloped eyelet mat. 

Here's a closer look at the gingerbread guy. I cut him out of some gingery brown cardstock. I edged him with some chalk and then added the cute little stitch lines. I colored his ear muffs and scarf with some aqua markers and my spectrum noir glitter pen. The photo doesn't capture the subtle glitter on his scarf and muffs.

Here's a closer look at the adorable cup of cocoa and chocolate chip cookies. You can't see the glitter on the whipped cream on top of the cocoa, but it is there and adds a nice touch.

Here's a closer look at the title Cookies & Cream. As I mentioned, I mounted all the dies onto a piece of pretty patterned paper. All of that I mounted onto the larger scalloped eyelet square. I used some dark brown paper for the mat on that one.

Here is one last look at my card. I think it turned out super cute and they are easy enough that you could make several of them in a variety of color themes.

Don't forget to head over to the CottageCutz YouTube channel and check out all of the amazing projects on there. Our video team is doing a wonderful job of filling the channel with all sorts of creative content! You don't want to miss it!

Here's a look at the entire release. Be sure to head over and grab them while they last!

Well that about covers it for today! Until the next time, have a wonderfully craft-die day!
Melinda Beltran

Tuesday, September 06, 2022

Easy Birthday Card

Happy TuesDIE Cottage Cutz Friends!
Melinda here with you on another Terrific TuesDIE. Today I am sharing a fun and very easy card I created featuring dies that are part of the Great Labor Day Sale Happening Now!

Here's a look at my completed card. This is a shot of the outside and the inside.


Here is what it looks like when closed. It is a standard A2 side folding card. 

The base of the card is a piece of Kraft cardstock cut at 5.5 x 8.5. It is folded to make it a 4.25 x 5.5 size. I then cut two pieces of patterned paper at 4 x 5.25. I mounted them on to each side of the inside of the card. 

Next I cut a piece of Kraft cardstock to 1.75 x 8.5. I then folded it in half and then folded those two halves in half again. This made four equal panels. I then made sure the folds were valley, mountain and valley. I then cut a piece of patterned paper to 1 5/8 x 4. I folded that in half with a mountain fold. Once I did this, i adhered the patterned paper to the center of the Kraft paper strip. Mountain on mountain.


I then applied adhesive to the backs of the two end squares. I adhered one side down roughly in the center and about a half inch from the edge. I then held the folded squares down and closed the card. I burnished the card onto the square with the adhesive so that upon opening back up, it would be solidly adhered to the opposite flap.

I opened it back up and then decorated the flap. I added a scallop, eyelet stitched square from the die set to each end. To their centers I added a piece of matching paper and then a pretty butterfly from the Kayla butterfly die. To the center two squares, I added a smaller square in Kraft cardstock with two hearts from the Stitched heart die set.

Here is another photo of the card opened.

Here is a closer look at the front of the card opened. I added a mat of patterned paper and then two hearts, one white and one Kraft from the stitched heart set. I added another butterfly. For the butterflies, I started with plain white cardstock (actually one was Kraft cardstock) and then colored them with my markers to give them that gradient colored look. I adhered the butterfly to the center of the heart. I die cut the happy birthday in white cardstock and then used my markers to color them as well. For the happy, I just angled it around the heart as I adhered it. For the dot of the "I", I used some stickles.

Here is one last look at the finished card. This is a real easy and quick way to add a little extra something to your cards with minimal extra effort. Plus the sky is the limit on the sizing and style options for this. It is a real easy go to!


Don't forget to head over to the CottageCutz YouTube channel and check out all of the amazing projects on there. Our video team is doing a wonderful job of filling the channel with all sorts of creative content! You don't want to miss it!

Nested Stitched Eyelet Square Set

Stitched Heart Set

Happy Birthday W Shadow


Don't forget about the great Labor Day Sale Happening now!
Sale ends Thursday, September 8, 2022 at 9:00 PM Pacific Time.
Shop Now For Best Selection!!!!


Well that about covers it for today! Until the next time, have a wonderfully craft-die day!
Melinda Beltran


Tuesday, March 15, 2022

Hello Spring Chicken Pop Up Slider Treat Box

Happy Terrific TuesDIE Scrapping Cottage friends!
Melinda here with you for another fun Tuesday. My project features a couple of dies from the marvelous new SPRING RELEASE along with some others!  Here's what I created.


I decided to make a little Pop Up treat box! Check out this fun interactive box.
Here it is closed and standing on an angle.

Here's a look at it with the little "drawer" slightly opened.

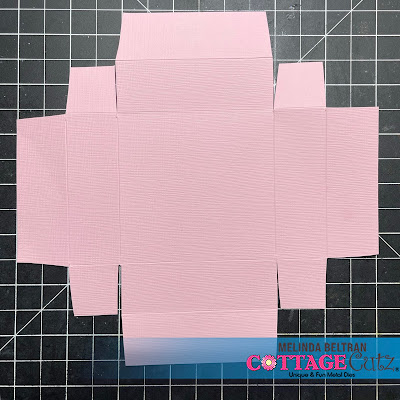
I started by creating the box base. It comes from a 7x7 piece of cardstock. I simply scored it on all four sides at 1" and 2" . I cut the squares and trimmed in the "flaps" just slightly.

I added adhesive and began to fold the sides up.

I made sure to add some ribbon around one of the two sides that has the flaps. This way the ribbon wouldn't pull out as I used it as a "pull" See photo above and below.

I turned in all four sides and that gave the interior of the box some sturdiness and gave it a finished off look.

Next, I turned to making the box "top" or belly band if you will. I used the largest die from the Slimline Stitched Rectangle set. I then scored it to match the top and sides.


I then added glue to the back side of the largest slimline scallop stitched die. I glued this to the pink "top" we just made. See photos above and below.


I scored the mats again once the white was adhered to the pink.


I then used the second smallest die from the double stitched rectangle set.

I ran it through my die cut machine a couple of times and it cut out fine. 


Next, I burnished the score lines and then ran a bead of glue along one of the seams and adhered the two ends together. 


I cut a strip of pink paper 1x4". Scored it and that is the base for the easel part.
Once I attached it to the under side 

Here's what it looks like with nothing in the box and once it was adhered to the inner top of the top and the center of the inside of the box. Here are some additional photos at varying stages of it opening.


Here is a pic of it closed.


I proceeded to decorate one of the square scallop eyelet stitched dies with the cute Spring Chicken Die. I added the word Hello from the Hello Spring Bunny Cottage Die.

Here is another photo of the sweet little box open. Inside is a bunch of sweet "chewy" little (bubblegum) eggs.


The Dies I used to create this project:


In case you didn't hear, The CottageCutz YouTube channel is up and running.  Head over and check out the latest video! There is a giveaway for subscribing too!

Well that about covers it for today! Until the next time, have a wonderfully crafty day!
Melinda Beltran