Showing posts with label Nativity w/Donkey. Show all posts

Saturday, December 14, 2019

Nativity with Donkey

Hello Scrapping Cottage friends! Thanks for taking the time to stop and visit with us today. It's Mary Marsh here bringing you the Friday edition of the Blog. 
The new release of Artic Animal dies are in the online store. There are 13 new designs in this release and they are currently on sale. You can get these super cute dies at 25% off for a limited time. These new dies are so versatile, and can be used for a variety of occasions. 

The baby Artic animals  would make a cute congratulations card,  baby shower invitations, a welcome new baby card, a child's birthday card or cards for our animal loving friends. The other dies are great for a winter birthday, thinking of you, thanks and let's not forget our Christmas cards. 

Today, I am featuring Nativity w/Donkey die. It's part of the Christmas Part 2 collection. I actually do a combo of religious and whimsical for my Christmas cards. Today, for your viewing pleasure, I am going religious with this beautiful die. My design is on the clean and simple side because I wanted the die to be the center focus on the card. I cased this layout from fellow DT member Anja. 

Steps 1:  This week I started my card with the card colors. Jeanne is hosting the color challenge on Splitcoaststampers and she wants us to use so saffron (yellow), pretty peacock (blue) and rococo rose. I thought this nativity die would work. These are different colors for a Christmas card but I always like the chalenge of making a Christmas card with non-traditional colors. 
pretty peacock, so saffron, rococo rose
Initially I was going to sponge a nighttime sky with the challenge colors. But, then I decided to use the peacock cardstock, cut a circle (largest stitched circle die) and stencil the sky with stars. I use blue painters tape to hold my stencil in place. 
This is the finished stenciled work. 
Next, I cut the Nativity and Donkey images. I used an ivory cardstock for the stable and sponged with walnut stain distress ink. For the straw, I used so saffron (yellow) cardstock and sponged with so saffron ink and dried marigold distress ink. The donkey is cut in 2 shades of gray cardstock. 
I stamped my sentiment in pretty peacock ink on white cardstock. The white panel measures 4 1/8" x 5 3/8". I didnt have room for all the words because of the size of the starry circle. So I taped off everything after the word Savior, inked up the stamp, removed the tape and then stamped.
Step 2:  Now that all the card elements are cut, colored and stamped, I am ready to start card assembly. 
The images are attached to the starry circle with dimensional adhesive. I wanted them lifted slightly off the background.
Added the image panel to the white sentiment panel with double sided tape. I also used 3 rococo rose enamel dots to cover that color in the challenge. 
Finished off my card by attaching the image panel to the peacock card base (4 1/4" x 5 1/2"). I hope I have given you an idea of a way to use this new die. This one would be easy to make multiples of for this Christmas. 

That's it for me for this week. See you next Saturday!

dies I used to create card:


Monday, November 18, 2019

Group Post Samples

Hello Scrapping Cottage friends! Thanks for taking the time to stop and visit today. We are sampling DT cards for the next several Mondays using dies from the Christmas Part 2 release.

There are 34 new designs in this release. This release has something for everyone. So if you prefer a more religious tone to your cards- we have you covered. If you like a more whimsical design featuring Santa, reindeer, gnomes, moose or even a hot chocolate theme you will find some really cute dies.

We thought you might like to have some new and creative ideas for your Christmas cards using the Part 2 dies. So let's get started with the cards for today.

Sample 1: Our first sample for today is from Anja Zurga. She used the Nativity w/Donkey die to create this beautiful card that represents the meaning of Christmas. The nighttime sky was created by cutting a circle and coloring it with distress oxide inks, and for the stars she sprinkled a mixture of perfect pearls and water. It gives the appearance of looking out from the stable into the night sky.  To give the die cuts a bit more dimension, she popped them up on brown foam.

Sample 2: Our next sample is from Pam MacKay. She used the Christmas Cardinal die to create her card.  It's a classic style Christmas card that incorporates the cardinal, plaid and doily. The oval doily gives it such a retro vibe and for added interest she raised the cardinal off the background to give it a bit of dimension. If you haven't started on your cards as yet, this one would be easy to mass produce and the die is available. 
Sample 3: Our last sample for today is from Sukie Dhillon. She used the Santa Workshop die to create this whimsical card. The bright and cheery die cuts pop against the embossed snowflake background.  The snow mound was perfect for anchoring the sentiment pole.  This card is perfect to tuck in with a toy gift for the special kiddo in your life.
Well, that's our samples for today. I hope the team has given you some fresh ideas on ways to use these dies.

dies used to create cards:
http://www.scrappingcottage.com/cottagecutznativitywdonkey.aspx

http://www.scrappingcottage.com/cottagecutzsantasworkshop-2.aspx

http://www.scrappingcottage.com/cottagecutzchristmascardinal.aspx


Tuesday, November 05, 2019

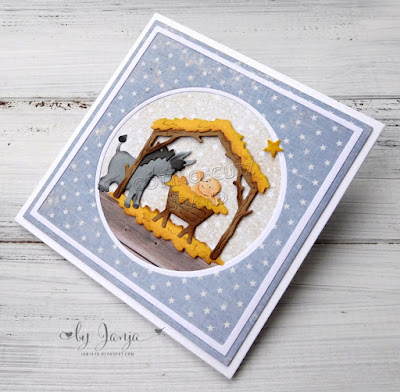
Starry Night

Hello Scrapping Cottage creative friends. Janja is here to share another Christmas card.


- Cottage Cutz dies: Nativity w/ Donkey, Stitched Circle Set, Circle Set
- blank card: 5.3 x 5.3" (13,5 x 13,5 cm), folded
- patterned paper: 5 x 5” (12,7 x 12,7 cm)
- colored cardstock
- colored ink pads
- glue, double-sided adhesive tape, self-adhesive foam pads

Cut individual pieces of the main motif from colored cardstock. Use color pads for more depth.


Trim selected patterned paper and cut a circle in the middle.
Now cut another circle in the middle of the white cardstock that is slightly smaller than the patterned paper.
Attach both parts together so that the openings fit nicely.


Trim a smaller square of patterned paper and paste it on the back.


Stick it all to the front of the blank card. Attach the main motif with self-adhesive pads.


To make the card look layered, and motif even more in the foreground, I added a white narrow frame. I cut it out with two square dies and glued it to the background.


Visit the online store to see the full range of Christmas dies.

Have a  nice day.
Janja