Showing posts with label Mouse with Cake. Show all posts

Friday, August 30, 2019

Celebrate You!

Happy Friday!  It's Jeanne today with an easy, fun birthday card featuring the Mouse with Cake die from the new birthday release.  I love  this release; the dies make adorable birthday cards.
For this card I started with the color challenge colors on Splitcoaststampers this week.  They were chosen by none other than our own Mary Marsh!  She chose Lovely Lipstick, Gorgeous Grape and Coastal Cabana.  Just perfect for a festive card.
I cut the pieces from the Mouse with cake and Party Favors dies using the colors plus the neutrals Very Vanilla, Sahara Sand, and Mossy Meadow (my cherry stem.)  I used just a touch of the Lovely Lipstick ink to color the mouse's ears.
For my card layout I chose to use a sketch challenge that was on Splitcoaststampers awhile back.  A hint to make cards go faster - I download the sketch challenge each week from SCS, print it out and keep in a file.  I may not use it then, but I have it for future use.
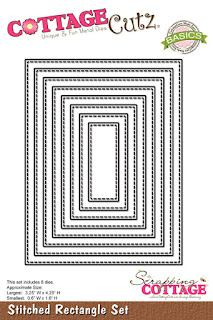
I flipped this sketch and used two of the third smallest Stitched Squares in white, one of the largest Stitched Square in Grape and one of the fourth smallest Stitched Rectangles in white.
I glued them to an A2 card base.
I heat embossed the sentiment on Lipstick card stock and trimmed it close to the embossing.  I glued all the die cuts to the card, popped up the sentiment using foam dots and added a few glitter enamel dots in the corner.  Super easy!

Dies used:
http://www.scrappingcottage.com/cottagecutzmousewithcake.aspx

http://www.scrappingcottage.com/cottagecutzpartyfavors.aspx
http://www.scrappingcottage.com/cottagecutzstitchedrectanglesetbasics.aspx
http://www.scrappingcottage.com/cottagecutzstitchedsquaresetbasics.aspx

Thanks for stopping by today.  I hope you have a fun and creative weekend!

Sunday, August 25, 2019

Cheesy Birthday


Hi!

It's Anja here. I have a little bit bigger project for you today. I made a larger birthday card, using all the cute mice from the birthday release.


For this project I used:
- Cottage Cutz dies (Ballerina Mouse, Mouse With Cupcake, Birthday Mouse Cupcake, Mouse With Cake, Circle Set),
- Distress Inks (Spun Sugar, Worn Lipstick, Barn Door, Mowed Lawn, Pumice Stone, Brushed Corduroy, Vintage Photo, Black Soot, Mustard Seed, Spiced Marmalade, Wild Honey) and Oxides (Wild Honey, Fossilized Amber),
- white card stock for die cuts,
- water color paper for background (29,5x14,5 cm),
- yellow/orange card stock for background (30,5x15,5 cm) and cuts,
- black pen,
- white pen,
- white pigment ink,
- water spritzer,
- heat gun,
- black pigment ink,
- scissors,
- adhesive foam pads,
- paper glue.

First I colored all four mice. I used black pen for the eyes and white to add some dimension to the cuts.


Next I colored the water color paper for background. I used Oxides to color and Distress Ink for the edges.


Next I cut the holes. I used Circle Set dies (the smallest three) for the cuts.


Next I cut orange card stock and used white pigment ink to color the cuts in the middle so the middle would look a bit lighter.


I decided to add a bit more interest to previous paper with some water drops. I dried the paper with the heat gun.


And last I made the sentiment. I stamped it on the orange paper and cut it out with the scissors.


And when I had all the pieces I glued the card together. I used adhesive foam pads to glue both parts of the background and paper glue for the sentiment and the mice. And my project was done.


Have a nice Sunday and see you again next week.

Anja Z.


Cottage Cutz dies I used for this project:


Saturday, July 27, 2019

Never to Old for Cake

Hello Scrapping Cottage friends! Thanks for taking the time to stop and visit with us today. It's Mary Marsh here bringing you the Saturday edition of the Blog. 

We have a brand new release of Birthday dies in the online store. There are 25 new designs and they are currently on sale at 25% off. This release is filled with cute little whimsical animals, birthday cakes, cupcakes and birthday phrases. Everything you need to create some outstanding birthday cards.

Today, I am featuring the Mouse with Cake & Festive Birthday Greeting dies. So let's get started with some details on how I created my card. Looks like the Mouse with Cake die has been really popular and not in stock right now. It will be back in stock around August 10th. 

Step 1:  I found this interesting sketch #759 on Splitcoaststampers this week. I thought it would be a different layout to feature this new die and allow me to use designer paper, a birthday phrase and a stamped sentiment. 
This was a work in progress for me as I figured out how to make the curved shapes and other elements of the sketch. For the curved border I used the largest stitched oval die and that is also currently out of stock but you could use the largest double stitched oval which is the same size. 
I laid the die cutting side down on my paper. I only wanted to  cut just a little of the designer paper and the cardstock. 

I started with the designer paper layer at the size of 3 5/8" x 4 7/8" and then I made my cut. 
I cut the  apple green cardstock with the same die for element 2 of the sketch. This is just a layering panel so after I cut the curve I trimmed the cardstock down to about 2" and layered underneath. For elemnt 1 of the sketch, I used a small piece of striped designer paper and cut it 1" x 3 5/". Adhered these panels using double sided tape.
Step 2: I cut the cute little mouse with a light gray cardstock for his body and a bright pink for his ears. On the cake I used an ivory cardstock and sponged with wild honey distress ink. The icing is a light purple cardstock. 
I had the perfect sentiment for this image, It is a one line stamp and too large for my panel so with the help of my MISTI I turned it into a 2 line sentiment. I used painters tape and taped off the part I didn't want for each line. The sentiment is tamped in grape ink. 
I wanted the Birthday phrase above the stamped sentiment. It's from the new Festive Birthday Greeting die and I cut it in the apple green cardstock. I cut it 2x for a bit more dimension and used Ranger multi matte medium to secure. I used the phrase for the bow that is part of the sketch. 
Attached the mouse and cake image using dimensional adhesive. He is just the cutest little thing. 
Step 3: To complete my card I adhered the Birthday phrase. I decided to add some small streamers and a couple of glitter enamel dots. That's my sample for this week. Hope I have given you a bit of inspiration on a way to use this die.

See you next Saturday!

dies I used to create card:


Tuesday, July 23, 2019

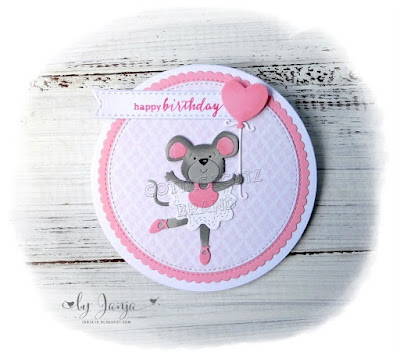
Round birthday cards

Hi! Janja is here. My summer holidays are over and I'm with you again.
For my today post I prepared 4 cards with a new release - Birthday.
Let's see how they are made.


- round card bases
- white and colored cardstock
- colored ink pads
- self-adhesive foam pads, glue

Cut out all the pieces from a colored cardstock. Color them around the edges with colored ink pads. Then assemble all mouses.


Prepare white round card bases. Cut circles from patterned papers and colored cardstock. Paste all circles on card bases.


Attach the mouses to the background with glue and self-adhesive foam pads. Stamp a sentiment and we're done.


Thanks for stopping here and happy crafting.
Janja