Showing posts with label Merry Christmas w/Deer Family. Show all posts

Saturday, September 03, 2022

Ho Ho Hoooot Holiday!

Hello CottageCutz friends! Thanks for taking the time to stop and visit with us today. It's Mary Marsh here bringing you the Saturday edition of the Blog.

It's new release time!!! We have new dies in the online store. It's time for our Christmas release and we have 21 new designs for Christmas Part 1. You can pick up the entire bundle at a 50% off retail. It's just for a limited time so don't delay. You can also get the individual dies for 30% off retail.

There is a great selection of religious, whimsical and some super cute birds and animals. All of your Christmas card making ideas are covered in this release. Today for your viewing pleasure, I am using the new Christmas Owls die. I have a friend who loves owls so this one will go to her for Christmas. So, let's get started on some details of how I created this card. 

Design Steps:
Since I knew the die I was going to use, I looked for a Christmas themed designer paper in my collection. I found one with snowflakes and gold accents. I thought it would work perfectly. 

Green Card Base: 4 1/4" x 5 1/2" 
Designer Paper Layer: 5 1/4" x 5 3/8"
White Image Panel: 2nd largest Stitched Rectangle (2 7/8" x 3 7/8") die 
Next, I cut the owl images in different shades of cardstock. The Merry Christmas phrase is from a 2018 Christmas release - Merry Christmas w/Deer Family. It's part of the Labor Day sale and is 50% off
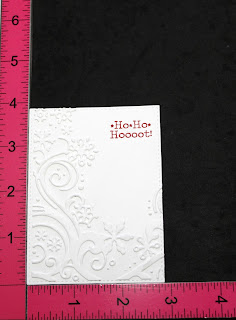
For added interest on the image panel I used a swirling snow embossing folder. The sentiment is stamped in red ink.  
Now that my card elements are prepared, I am ready to start card assembly. I attached the designer paper and the image to the card base with double sided tape.
Next, I attached the owl images with clear drying glue. 
To finish off my card, I added the Merry Christmas phrase.  And I have a Christmas card finished with the new dies of the season. That's it for me for this week.
We are having a huge Labor Day sale with savings of up to 65%. It runs through Thursday, September 8. Shop early for some great buys on dies that may be on your wish list. 

Reminder: Our YouTube Channel has a new video from Jen Hartsgrove. There is a giveaway for being a subscriber, liking the video and leaving a comment. Click here.


Saturday, October 05, 2019

Santa & The Red Nose Reindeer

Hello Scrapping Cottage friends! Thanks for taking the time to stop and visit with us today. It's Mary Marsh here bringing you the Saturday edition of the Blog. 

We have the new release of Christmas Part 2 in the online store and they are all in stock and available for delivery. There are 34 new designs in this release. 

This release has something for everyone. So if you prefer a more religious tone to your cards- we have you covered. If you like a more whimsical design featuring Santa, reindeer, gnomes, moose or even a hot chocolate theme you will find some really cute dies. The DT will begin showing card samples using these dies shortly.

I actually do a combo of religious and whimsical for my Christmas cards. Today, for your viewing pleasure, I am going whimsical with the new Santa & Reindeer w/Sleigh. It's from the Christmas Part 1 release. So let's get started with some details on how I created my card.

Step 1: I started the card with a layout this week. I had this sketch saved on Pinterest and thought it would work well to showcase Santa, some designer paper and ribbon. I like using ribbon on my Christmas cards. I think it adds a nice touch. 
I changed the dimensions on my card panels from what they are using in this sketch. I needed a larger oval die to accommodate the Santa image so I made all the panels larger. 
Red Card Base: 5 3/4" x 4 1/2"
Coastal Cabana Layer: 5 1/2" x 4 1/4"
Designer Paper Layer: 5 3/8" x 4 1/8" 

For the oval, I used the 2nd  largest stitched oval die. It's approximately 4" x 3 1/8". I embossed it with a snowfall embossing folder.
  

Next, I cut the images in a variety of cardstocks. 
Step 2: I am ready to start card assembly. I attached Santa to the white oval embossed piece with a combination of double sided tape and Ranger multi medium matte. 
My designer paper is attached to the cardstock layer with double sided tape. 
For the center long panel, I used a red ruched ribbon. I attached the ribbon with glue dots. 
Next up I added the oval image panel to the designer layer panel.I did use dimensional adhesive on the oval to lift it slightly off the ribbon.  I scattered a few red enamel dots for added interest.
I wanted a sentiment on the front of the card but I didn't want to stamp directly on the cardstock. So I decided to use this Merry Christmas sentiment from an older CottageCutz die. It's the Merry Christmas w/Deer Family.

I added the image panel to the card base and that completed my card.

I hope I have given you a bit of inspiration for a way to use this new die. I know it's been a popular one in this release. 
I will be posting a card on Monday using another of the dies from the Part 1 release.

Dies I used to create card:


Saturday, November 17, 2018

Merry Christmas w/the Deer Family

Hello Scrapping Cottage friends! Thanks for taking the time to stop and visit with us today. It's Mary Marsh here bringing you the Saturday edition of the Blog. 

You can still pick up the Autumn 2018 dies with 10 new designs at 25% off in the online store. There are some dies in this release that could be used for some cute outdoor scene cards that aren't fall related. And, if you need some card ideas for the dies look back on the blog because the DT has posted some beautiful cards for inspiration. 

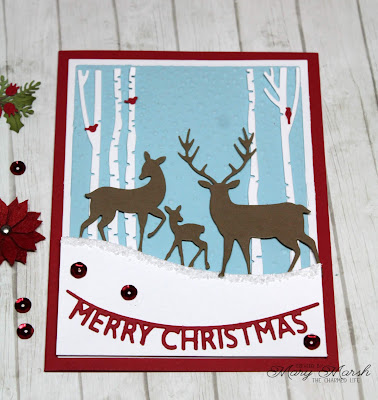
My card this week is featuring the Merry Christmas w/Deer Family die. It is part of our Christmas Part 2 release. I like making Christmas cards that feature an outdoor type scene. This one is relatively simple and would be easy to make multiples of. So let's get started with some details on how I created my card.

Step 1: I knew I was going to create a snowy scene with the deer, so I picked my card colors accordingly. I also wanted to get some red in there for a more traditional Christmas card.
Red card base: 4 1.4" x 5 1/2"
White layering panel: 3 7/8" x 5 1/8"
Blue embossed panel: 3 5/8" x 4 7/8"
I used a snow fall embossing folder on the blue layer. I was looking for a quick way to get the snow fall look on my card. You could use a stencil and embossing paste, or even a snowflake stamp.
Step 2:  I cut the birch trees from white cardstock. The deer are cut in a medium brown and the Merry Christmas phrase in red.
I decided I wanted a snowbank for the deer to stand on. So I cut one from white cardstock and added glue to the top edge and sprinkled on some chunky glitter.
Step 3:  Now that all the card elements are cut, I am ready to start card assembly. I attached the birch trees to the embossed panel first. I rolled up glue dots to give a slight lift off the background.
The snowbank is attached with dimensional adhesive. I attached the deer in the same way.
T decided not to hang the Merry Christmas banner across the trees. I attached it with Ranger multi matte medium. I like this adhesive because it dries clear.
To finish up my card I secured the image panel to the red card base. Scattered a few sequins on the snowbank for a more finished look there. To get a little color in the birch trees, I cut 3 small birds in red cardstock. The birds are from the Woodland Friends die. They are the perfect size and added just the subtle touch I was looking for.
Well that's it for me for this post. I hope I have given you an idea for using this new die.  See you next Saturday!

dies I used to create card:

http://www.scrappingcottage.com/cottagecutzmerrychristmaswdeerfamily.aspx

http://www.scrappingcottage.com/cottagecutzwoodlandfriends.aspx