Showing posts with label Magical Unicorn Dreams. Show all posts

Friday, February 23, 2024

Magical Unicorn Dreams Shaker

Hello friends,

Kris here to share some Friday inspiration with you.  I've created a fun Unicorn Shaker card that is perfect for a young girl.  The inside says "Birthday Wishes"


DESIGN STEPS:

I die cut the Flying Unicorn and the Rainbow with Clouds from white cardstock and colored with Copics.


Next, I cut (2) pieces of white cardstock at 4-1/4" x 5-1/2".  From one of those, I die cut the largest Double Stitched Rectangle die from the middle, creating a frame for our card front. 


From the Double Stitched Rectangle that was cut out, I die cut one of the Clouds Slimline dies.


On the other A2 piece of cardstock,  I ink blended Distress Oxide inks over the whole background, then repeated it onto the frame.    


I used Scor Tape to adhere a piece of acetate to the backside of frame, and also to the backside of the clouds border for the front.  Before removing the tape backings, I inset the clouds and glued the rainbow so the ends are tucked under the clouds. 


Once I got my clouds adhered on the front, I flipped it over to the back and added 1/8" foam strips around the opening, then added my shaker elements.  I then placed my ink blended layer (back of shaker) upside-down onto the foam strips.


I die cut "Magical" from the Magical Unicorn Dreams die from lavender c.s. and adhered to bottom of clouds, then I popped up the unicorn with foam strips.  

I cut a white A2 top folding card base and attached my shaker to the front and done!  


Head over to Cottage Cutz and do a little shopping today!

Get Social With Cottage Cutz


Thank you so much for joining me today! 
 I hope you are inspired to get crafty with your favorite CottageCutz dies!  

~Kristine

Wednesday, April 24, 2019

Have a Magical Day Card

Hello!  This is Sukie and today I'm sharing a project for my design team post.  The new Magical Fantasy dies are perfect for making all kinds of unique creations.  I love all of the whimsical designs from this release.
I found this scrap of confetti paper left over from another project in my scrap box which inspired the colors of my card.
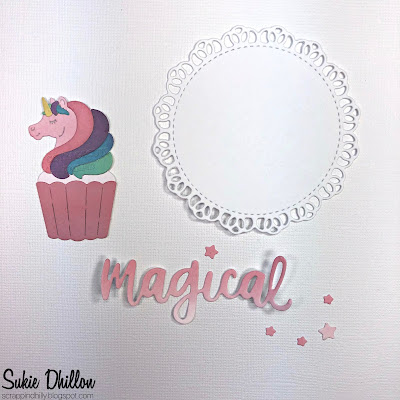
I die cut the Unicorn Cupcake in white card stock and shaded it with my Oxide Inks and adhered all of the pieces.  I die cut the sentiment from the Magical Unicorn Dreams set and shaded it to coordinate with the cupcake.  The gorgeous doily is from the Nested Stitched Doily set.
I created my A2 sized card by layering the tiny checkered pattern with the confetti strip and white card stock.
Next, the doily was placed on the top half of my card with the unicorn centered on top of the doily.
The oversized sentiment was anchored on the white card stock along with the tiny stars from the same die set.
To finish off my card I stamped a partial sentiment from the Scrappy Moms (retired) Countless Occasions stamp set and pop dotted the pieces to create the phrase.
Here are the dies I used on my card available in the shop:


Friday, April 19, 2019

DT Samples w/Spring & Magical Fantasy Dies (Day 3)

Hello Scrapping Cottage Friends! Thanks for taking the time to stop and visit today. We are sampling cards from our Spring and also our new Magical Fantasy release.

There are 27 new designs in the Magical Fantasy release. And for a limited time the individual dies are on sale at 25% off. We want to give your some ideas for your own card making. So let's get started with our samples for today.

Card 1:  Our first sample today is from Jeanne Knobbe. She created a card in a box using the new Princess Dress Up, Sweet Unicorns and Magical Unicorn Dreams dies. A card-in-a-box card is a wonderful way to give the recipient an extra "gift" that can be displayed long after the birthday is over.
She also used some older dies  - Spring Window, Spring Grass, Easter Bunny and Chicks. Jean said working with the Princess Dress Up dies reminded her of playing with paper dolls only better. So much fun choosing the dress and hairstyle for the princess.  This card would be perfect for any little (or big) girl who loves unicorns and all things fairytale.
Card 2:  The next sample is from Sukie Dhillon. She used the super cute Frog Prince die to create a creative special occasion card. She used doily dies as a backdrop for her "prince" and surrounded with a few sprigs of greenery and coordinating flowers.  The happy couple who receive this card are sure to live happily ever after.
Card 3: The next sample is one that I (Mary Marsh) created. I used the new Unicorn Cupcake  + Fairytale Birthday dies and designed a whimsical birthday card. A card like this along with a Unicorn stuffed animal would be an ideal birthday gift for any little girl. It would definitely bring a happy smile as she opened it.

Card 4:  Our last sample for today is from Anja Zurga. She also created a card with a cupcake using the Spring Lamb Cupcake die. The distress ink and white paint splatters are a beautiful backdrop for the sweet little lamb. You could use this card for a variety of occasions- Easter, Birthday, Thank you or even a thinking of you. Thinking out of the box gives you more use of your seasonal dies.
Well that's our samples for today. I hope the team has given you some fresh ideas for creative ways to use the new dies. Stop by the Blog again tomorrow for our final day of DT samples.

dies used to create today's cards:


Saturday, April 13, 2019

Magical Unicorn Birthday (new die)

Hello Scrapping Cottage friends! Thanks for taking the time to stop and visit with us today. It's Mary Marsh here bringing you the Saturday edition of the Blog.

We have a new release of dies in our online store. If you haven't seen the Magical Fantasy release yet, you have to drop by the store and check it out. These new dies are all so cute and whimsical. There are 27 new designs and I am in love with everyone of them.

My good friend asked if I could make a birthday card for a little girl who loves unicorns. I was happy to oblige her request. I decided to use the Princess Pony die and turn it into a unicorn. There is a horn included with the die.  So let's get started with some details on how I created my card.

Step 1: As I have said so many times before, having a layout in mind at the start of my card is always a big boost for me. It jump starts my creative thought process. I love working with the sketches that are out there in the online world. That way I just choose the colors and designer paper and I am good to go.
I liked this week's sketch #744 from Splitcoaststampers.
The center panel was perfect for the unicorn pony and also would allow my designer paper to be seen. I found this paper the other day at Hobby Lobby and thought it would be perfect for any of these new dies. The swirl pattern seemed a bit magical to me. I also used white mesh ribbon for element 3 of the sketch.

Pink Card Base: 4 1/4" x 5 1/2"
Pink Designer Paper Layer: 4 1/8" x 5 3/8"
Pink Stitched Scallop Rectangle Panel: 2 7/8" x 4 7/8" (2nd largest die)
White Image Panel: 2 5/8" x 3 5/8" (Rectangle Set 2nd largest die)
White Mesh Ribbon:  1 1/2" x 4 1/2"(Element 3 on sketch)

Next I moved onto cutting the unicorn. I liked the colors on the packaging so I stayed with those. The detail is amazing, and I think she has the cutest face and eye.
I stamped my sentiment in the upper corner of the image panel. I was just looking to use only the "magical" word so I taped off everything else. Stamped in grape ink and cut my unicorn word from matching grape cardstock.
To cover element 6 of this sketch, I decided to use a cloud. I cut in the same pink cardstock as the unicorn and I used the Clouds & Sun die. I stamped my birthday word in grape ink.

Step 2: Now that all my elements are cut, I am ready to start card assembly. I started by securing the mesh ribbon to the designer paper panel and then attached that to the card base.

Next up is the image panel. I attached the unicorn phrase with Ranger multi matte medium. This phrase is part of the new Magical Unicorn Dreams die.On the cloud, I used double sided tape. Then for the unicorn, I used dimensional adhesive to lift it somewhat off the background.
I finished my card by adding some light and dark purple stars. They are part of the Magical Unicorn Dreams die. I hope I have given you an idea for a way to use this new die. Starting next Wednesday we will have 4 days of group posts using these new dies as well as the Spring dies. So make sure you stop by to see all the beautiful cards. 


Dies I used to create card: