Showing posts with label Lil Bluebird Designs Llama Love. Show all posts

Monday, February 12, 2024

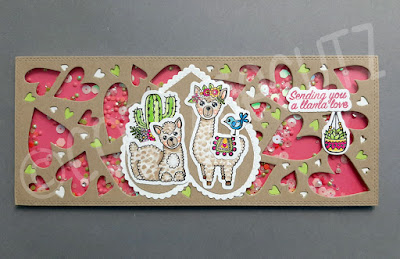
Llama Love Slimline Shaker

Happy Monday friends!

Kris here, sharing one more Valentine card idea for you!  It's a cute & punny SHAKER card!  Who doesn't love a shaker, right?!  

For this one I used the Whimsical Hearts Slimline die and the Llama Love stamps and coordinating dies from Little Bluebird Designs.  I also used the scalloped heart from Be My Valentine Puppies die.


Slimline cards can be hard to photograph, but I just had to sneak in my llama plant stand for this one!  ☺ Also, you may notice my heart focal point is upside down... but I think it totally works with the random whimsical hearts and the placement of my llamas.  However if that bothers you, feel free to turn the heart right side up.

CUTTING & SCORING:

CUT white card base at 7" x 8-1/2" and SCORE along the 7" side at 3-1/2".

CUT a backing from dark pink cardstock cut at 3-1/2" x 8-1/2" and cut a sheet of acetate the same size.

Die cut Whimsical Hearts Slimline die from Kraft c.s., // *Optional:  cut it out of White, and Lime Green c.s.. as well if you want to piece some of hearts back into the die cut front.  Set the white and green ones aside.

Die cut just the scalloped heart from Be My Valentine Puppies die from white and Kraft c.s.

DESIGN STEPS:

1.  Create a shaker by adhering the acetate to back of Kraft heart layer, then add 1/8" foam strips on top of acetate all around the outside border and a few tiny pieces in center.  Add shaker elements inside the foam strips then carefully place the dark pink backing on top, lining up the outer edges.

*Optional:  I inserted some of the white and green tiny hearts back into the die cuts, (adding glue directly to the acetate then inserting hearts.)


2.  Stamp, color and die cut as pictured using the Llama Love stamps and coordinating dies

3.  Using scissors, trim the Kraft heart on the inner stitched line as shown. 


4.  Glue the Kraft heart onto the White scalloped heart.  Turn it upside down (if you wish) and adhere the llamas and other elements as shown below. 


5.  This next part is *Optional... but I wanted a scalloped border but didn't have one larger than my Whimsical Hearts card front, so I die cut (3) of the 2nd largest Scalloped Rectangles dies (currently out of stock). 


As you can see in the finished photo, this size rectangle will leave gaps in between, so I adhered the 2 outer ones first so I could get equal amount of border around the sides, and then I added the middle one. 

*Tip:   I placed it on wax paper below because I put tape all over the back of shaker and didn't want it to stick to my table.  

6.  Adhere to card base and done!  


I hope you liked this tutorial and are inspired to create something FUN with your favorite stamps and CottageCutz dies!  

Hope you have a wonderful Valentine's or Galentine's Day friends!

~Kris


Thursday, September 23, 2021

Llama Love

Hello Scrapping Cottage Friends

It is Pam creating with you on the blog today!

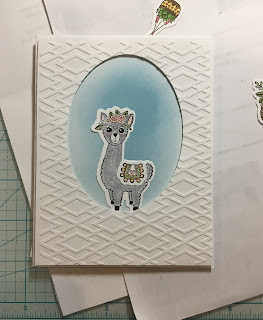
Today, I am making a fun little card that is sure to bring a smile!  I am using the Lil' Bluebird Llama Love stamp set.  The dies and stamps are still at a 25% savings so hop on over to the store and check them out!

Design Steps:

1.  Stamp your images using Memento Black ink and the Llama Love stamp set.  Color the images with copics.  The copics I used are in the picture above
2.  Use the coordinating die set to cut out the images
3.  Use an A2 white card base and a piece of white card stock cut to 4 x 5 1/4.  I used the second from the largest Pierced Oval die to cut the oval from the center of the piece of white card stock.  Then I ran it through an embossing folder.  Next I used a blue ink and blending brush to create the sky behine the oval
4.  Take the embossed piece of card stock and place dimension tape on the back
5.  Place the embossed piece onto the A2 white card base and then glue down the llama as shown
6.  Glue down he remaining stamped images and then stamp your sentiment and glue it between the cactus and basket of flowers and your card is complete

Lil' Bluebird Stamps and Cottagecutz Dies


Thanks so much for stopping by today and don't forget the stamps and dies are still at a wonderful savings of 25% off!  They make great Christmas gifts for all of your crafty friends.  So check them out HERE!

Take Care and Blessings
See you next Thursday
Pam


Saturday, August 21, 2021

Another Birthday - No Prob-llama

Hello Scrapping Cottage friends! Thanks for taking the time to stop and visit with us today. It's Mary Marsh here bringing you the Saturday edition of the Blog.

IT'S NEW RELEASE TIME! The Scrapping Cottage has just added a new brand to the company line. Lil' Bluebird Designs is being introduced with 16 new Photopolymer Clear Stamp Sets and 16 coordinating dies. There are stamps for so many of your card making occasions and then some. The coordinating dies just make it a perfect fit for your card making designs.

They are currently on a great bundle price at 40% off and the individual dies are 25% off. And speaking of sales there is currently a sizzling summer sale with savings of up to 65% on selected dies. It's time to get those dies you have on your wish lists.

Also just introduced are some new Sentiment Phrases with Shadows. You can pick up this bundle at a 51% savings and or the individual dies at 25% off. The shadow dies are so popular right now and they coordinate so well with the new Lil' Bluebird Stamps and dies that were just released. 

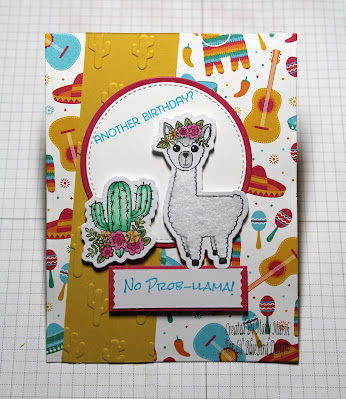
Today for your viewing pleasure I am featuring the new Llama Love stamp & die set. I used it to create a birthday card. I like to have birthday cards on hand to send out to my family and friends. I have a large extended family so I am always in need of cards. So let's get started with some details on how I created my card. 

Design Steps:

Having a layout in mind at the card start is always a big boost for me. That way I can just choose the card colors and designer paper and I am good to go. I liked this week's sketch #867 on Splitcoaststampers because of the somewhat simplistic design. The circle was also a good resting spot for my llama image. 

I looked through my designer papers for a fun and festive designer paper. I found this one with a fiesta theme and I thought it would be a good background for the llama. I also embossed the angled rectangle panel with a cactus folder. 

Turquoise Card base: 4 1/4" x 5 1/2"
Designer Paper Layer: 4 1/8" x 5 3/8"
Crushed Curry (Yellow) Angled Rectangle Layer: 1 1/2" x 5 3/8"
White Image Circle: - Stitched Circle Set (4th largest)
Melon Layering Circle: -  Circle set (3rd largest die) 
Next, I stamped, colored and die cut the llama and cactus images. For my coloring mediums,  I used a combination of alcohol markers and Prismacolor pencils and Gamsol. 
For the llama body I decided to use some Stampendous fun flock. It gives a fuzzy texture and is adhered with a 2 way glue pen. You press it into the image and let it dry. IRL it looks great on my card. The recipient will love the added touch. 
The photos below show what makers and pencils I used.
I stamped the first sentiment on the white circle with a turquoise ink. I placed it at an angel for added interest. This sentiment is not part of the Llama Love stamp set. 
 
Now that my elements are prepared, I am ready to start card assembly.  I attached the embossed panel first because it needed to be trimmed once I angled it. 

Next, I attached the circles to the panel with double sided tape. The images are attached with dimensional adhesive. 
For the flag element below the circle, I used a white flag I had in my stash and stamped my 2nd sentiment in turquoise ink. This sentiment is part of the Llama Love Stamp set. I layered it with a strip of melon cardstock and attached with dimensional adhesive. 
To complete my card I added the turquoise card base to the image panel with double sided tape. And, that's my card for this week. I hope I have given you another idea for a way to use this new stamp set. See you next Saturday! 


Stamps & Dies I used to create card:


Friday, August 13, 2021

A Whole Llama Love

Happy Friday!  It's Jeanne bringing you a card featuring a llama from the new Lil' Bluebird Designs available in the online store.  This set has adorable llamas with fun coordinating designs and sentiments.  The new line has sixteen wonderful stamp sets in a wide variety of themes.  And there are coordinating dies available for each set!

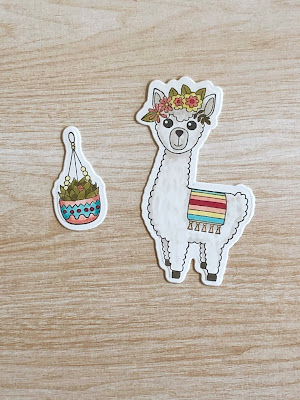
I started by coloring my llama and hanging plant with alcohol markers.  The llama comes bare backed but there are two blankets which can be stamped to give her a more festive look.  I used a warm gray for her fur and soft squiggly strokes to make her nice and wooly.

I used both Copic markers and Spectrum Noir Tri-Blends.

For the card base I cut an A2 panel from white.  Then I used the largest of the stitched rectangles to cut a top panel.  I place the second largest of the heart dies 5/8 inches from the to of the rectangle and centered side to side to cut the window.My embossed panel is 3 inches wide by 2 3/4 inches high.

Next I glued my embossed panel 1 inch from the top of the base and 5/8 inches from each side.

Using thin strips of foam tape I popped up the rectangular panel.

I glued the llama and planter to the front, overlapping the heart window.

Finally I added a few enamel dots in coral.  This card is a wonderful way to say "I love you" to someone far away!

Be sure to visit the online store where this set and the other new designs are on sale for a limited time!

Products used:


Thanks for visiting today!  I hope you have a fun and creative weekend!