Showing posts with label Lattice Slimline. Show all posts

Friday, December 22, 2023

Gingerbread Cottage Birthday Wishes

Happy Friday crafty friends!  

Kris here sharing a "Sweet" birthday card featuring the Gingerbread Cottage from our Christmas 2023 Release!  All the dies in this release are 30% off for a limited time, so a great time to pick some up for those last minute holiday cards for this year OR to get a head start on next year's cards!  The Black Friday Release is also on sale for a limited time! 


DESIGN STEPS:

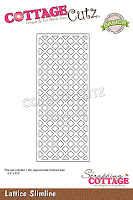
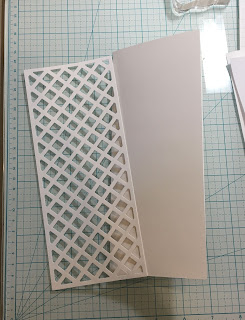
I started with an A2 pink card.  I then die cut the Lattice Slimline die in white.  Then, with the card horizontal, I placed it on top and cut the bottom off a li'l short as shown below. 


Next, I cut a piece of white cardstock to an A2 size, then I cut it diagonally following the stripe on the lattice.  

I placed it into my Misti as shown below and stamped my sentiments (from the Hey Sugar stamp set from La-La Land Crafts) in Pink and Green.  


I decided to add a bit of light blue (Tumbled Glass) ink around the house so the snowy roof doesn't blend in with the white background.  


I adhered this piece to the card front. 

Next, I die cut a piece of light pink glittery cardstock with one of the Hills Slimline set and attached to card front. 


I die cut my Gingerbread Cottage  from white cardstock then colored with Copics and Distress Oxide inks, then adhered to card. I tucked the lollipop behind the snow, I glued the chocolate swirled candy to snow and popped up the strawberry, tree and house with foam dots.


Thanks so much for stopping by today! 
 Be sure an check out our YouTube channel
for more inspiration and giveaways!

Christmas Blessings to you all ♥

~Kristine


Thursday, July 27, 2023

Birthday Flowers

 Hello Friends

I am catching up with my Birthday cards.  I don't have any birthdays in August so I thought it would be a good time to restock.  I get a little over whelmed in September because I have 8 birthdays.

I am using the Folk Art Tulip  This die is from our Folk Art release!  There are 19 wonderfully detailed dies in this collection.  Each die can be used together or separately.  They are perfect for people's birthdays of all ages!

Design Steps:

1.  Begin by using the Folk Art Tulip to cut out the flowers on the following colors of card stock: red, yellow, black, green and orange.  Assemble with a fine tip glue
2.  Next using Sentiment w/ Shadows Happy Birthday cut on black and white card stock.  Glue together

3.  For the card base use a white slimline 8 1/2 x 3 1/2.  Use the Lattice Slimline die and cut it out of white.  Glue the lattice to the front of the white slimline card base
4.  Glue the flowers as shown above and add the sentiment as shown.  I also added a few silver sequin
5.  To add a little to the inside of the card I glued a flower to the right and then stamped the sentiment.  My card is complete


We have more inspiration on our YouTube Channel check it out HERE

Thanks so much for stopping by!  And I will see you next Thursday.

Blessings and Take Care


Thursday, May 19, 2022

Birthday Cupcakes

Hello Scrapping Cottage Friends

Pam sharing with you today and it is NEW RELEASE TIME!!

It is our Sweet Treats release!  There are 13 different designs and everyone of them can be used for a variety of occasions especially Birthdays!! The individual dies are 30% off.  This sale price won't last long so click HERE to hop on over to the store!

Today, I am using three of the new cupcake dies. This card is going to a friend who has a real sweet tooth just like I do!!

Design Steps:

1.  Use an A2 card and cut the front flap leaving a 1 3/4 inch flap.  Cut a 1 1/4 x 5 1/2 inch white strip, 2 5 1/2 x 1/2 green strips and using the Lattice Slimline cut a piece 5 1/2 x 3
2.  Glue one green strip to the top flap and the other green strip to the top of the white strip leaving about 1/8 showing on top and bottom strip
3.  Stamp happy birthday to the top of the card flap and attach the lattice piece as shown above
4.  Cut all the pieces out of the 3 cup cakes using Cupcake w/flowersCupcake w/swirls and Cupcake w/twists.  Card stock colors are blue, light purple, dark purple, green, pink, yellow and brown
5.  Ink the pieces and then assemble with a fine tip quick drying glue
6.  Glue the background cupcake flat and then pop up the two foreground cupcakes.  Add the shear pink bow and your card is complete

CottageCutz Products


We have more inspiration on our YouTube Channel check it out HERE
Thanks so much for stopping by!  And I will see you next Thursday.

Blessings and Take Care


Thursday, November 18, 2021

Christmas Poinsettia

Hello Scrapping Cottage Friends

The design team is continuing to use our two new Christmas release dies.  The two releases are at 30% off but this great sale won't last long.  So make sure to take a peek before the prices go up.  I am using one of the very versatile dies the Woodland Christmas Set.  There are a number of great designs on this one die.  I am using the beautiful Poinsettia for this card.


Design Steps:


1.  Use a white slimline base measuring 3 1/2 x 8 1/2.  Cut a piece of white card stock using the Lattice Slimline die for the cards background.  Glue the Lattice to the front of the white slimline base card

2.  Next using the Woodland Christmas Set die cut out the red flowers, green leaves and the gold centers.  For the gold berries I used the Christmas Floral #2

3.  Use a stylus to give the flowers and leaves a little bend.  Rub the back of the petals and then flip over and make a circular motion in the cener of the flower.  For the leaves just rub the back of the leaves

4.  Make your arrangement just slightly below the center of the card.  I used glue dots for the flowers and tucked the leaves and gold berries in with glue
5.  Stamp your sentiment and layer with red card stock.  Glue the sentiment to the front of your card and your card is complete

CottageCutz Products


I want to remind everyone that the CottageCutz You Tube channel is up and running once again. We have new videos every Wednesday.  Check it out right HERE!

Take Care and Blessings

Pam


Monday, August 02, 2021

Live Laugh Love

Happy Monday!  It's Jeanne with today's edition of the blog.  I have a tonal card featuring a wonderful new background slimline die and an older seasonal die.  I am enjoying these new slimline dies because they are allowing me to use dies I already have in fresh, new ways!  The new slimline release is also on sale right now for a limited time.

This card was quite easy to make and would look lovely in any color.  All you need are three shades of the same color.  I chose a light, medium and dark green.

I used the lightest of the greens as my base and cut the trellis from the Lattice die in white.  I used self adhesive backing paper on this as I thought it would be easier to adhere than trying to glue it down.

The sentiment used three shades, each word becoming progressively darker.

For my flowers I used a Christmas die - Seasons Floral 2!  I love that this die can be used for other occasions by switching out the colors.  You would never guess that these flowers are for Christmas when cut in white and light green!  This card would make a lovely engagement or wedding card.

Dies used:


Thanks for visiting today!  I hope you have a wonderful week!