Showing posts with label Holiday Wreath. Show all posts

Saturday, December 10, 2016

Holiday Wreath

Hello Scrapping Cottage friends! Thanks for taking the time to stop and visit today. It's Mary Marsh here bringing you the Saturday edition of the Blog.

Well, it's 2 weeks until Christmas. I can't even believe it as I am typing this blog post. Are you in panic mode yet? I am so behind with all I want to do and I am still making Christmas cards. This one is on the CAS side and would be very easy to create about 10 of them quickly. Are you getting a hint here on how many I need (lol)?

So if you still need some cards here is an idea for you. Let's get started with some details on how I made this one.

Kraft Card Base: 4" x 5"
Kraft Pierced Wide Rectangle: 3 3/4" x 4 3/4"
Vanilla Sentiment Layer: 3 7/8" x 4 7/8"

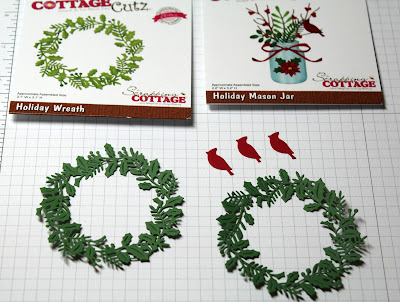
I wanted to make a card with a wreath and the Holiday Wreath was just perfect for what I had in mind for my card. I cut it out 2x in a ivy green textured cardstock. This cardstock is a lighter weight and I thought it needed a little more dimension. I layered the 2 wreaths together with Ranger multi-matte medium. 
Next I cut my frame from Kraft cardstock with the pierced wide rectangle set.  I decided not to use the smaller cardinals on the above picture but I did use the bow from the Holiday Mason Jar die set for my wreath. I went for the bigger cardinal from the Cardinals & Birdhouse die set. I stamped a seasons greetings sentiment in red ink and that took care of all the pieces I needed for my card.
 
 
Now that everything is cut I started the assembly of my card. I was going for the tone-on-tone look so I used dimensional foam tape on my frame to lift it off the card base. It gives it a little more depth since the card base is also Kraft. I attached the vanilla layer to the back of the frame with double sided tape.
 
On my wreath I used some red half pearls for berries. I used foam tape just at the top of the wreath to attach it. I didn't want it to be flush against the vanilla layer. The cardinal was placed in the center to complete this card. This close up shows the detail on the wreath as well as the cardinal. If you click any of the photos it will give a bigger image.
 
That's it for me for this Saturday. I hope I have given you some inspiration using the holiday wreath die. So until next time........inky hugs!!!
 
http://www.scrappingcottage.com/cottagecutzcardinalsandbirdhouse.aspx

http://www.scrappingcottage.com/cottagecutzholidaymasonjar.aspx

http://www.scrappingcottage.com/cottagecutzpiercedwiderectangleframesetbasics.aspx

http://www.scrappingcottage.com/cottagecutzholidaywreathelites.aspx


Thursday, September 15, 2016

Shine wreath with greetings

Hi, Vladka here!

I have another CAS Christmas card for you. So, let's take closer look to how I created it.


Basics:

White cardstock for the card base: 5 x  inches (cut 5 x 10 inches, fold in half)
Additional piece of white and kraft cardstock and some white and red cardstock for die cuts

Other Supplies:

CottageCutz Dies: Listed Below
Distress Ink:  Aged Mahogany, Peeled Paint, Forest Moss
Other: perfect Pearls, Scissors, Paper trimmer, Sizzix machine, Scor-buddy, Water, spray bottle, red paint

1. First use the biggest Cross-Stitched Square die and cut the square out of white and kraft cardstock. In spray bottle, mixed also water with Perfect Pearls. Spray it on both squares (and also on card base). This will give some shine to the finished card.


2. Cut the Holiday Wreath out of white cardstock and color it with green distress ink. After that spray some previous prepared mixture on it and let it dry:


3. Apply some red paint on berries and give it a side to let it dry.


4. Cut also greeting out of red cardstock. Distress the edges with Aged Mahogany distress ink and also spray it with mixture of perfect pearls and water. Let it dry.


Now put all pieces together as shown on my finished card. Quick and easy :) It is hard to see all the shine here on the photo but in real live is beautiful.


I hope you like it. Have fun creating. And don't forget, sixth CottageCutz challenge is waiting for you. This time theme is HOLIDAY. You can linked your project here. And please, use only Scrapping Cottage dies.

Tuesday, September 06, 2016

In traditional colors

Hi, Janja here!

Today I share with you a holiday card in traditional Christmas colors. The card layout is simple and will not take us a lot of time.


For the card we need:
- white card base: 4.5 x 5.8" (11,5 x 14,7 cm), folded
- gold mirror paper: 4.25 x 5.5" (10,8 x 14 cm)
- patterned paper: 4 x 5.25" (10,2 x 13,4 cm)
- white cardstock
- red paint with blow-up effect
- Distress ink: Festive Berries, Moved Lawn

We prepare cutouts with the dies: elegant deer & wreath, Merry Christmas Santa, tea time doily, holiday wreath and the largest die from circle set.


Shadow both wreaths with Distress inks. For a super blow-up effect apply an inflatable red paint with handy pen on holly berries.


Fasten red patterned paper on to gold mirror paper and mat them together on to white card front. Add all the cut-outs as shown in the photo.


This luxurious gold paper has a highly reflective surface of the mirror. When taking photo, I had quite a few problems. Wherever I set up, I saw my reflection.


Thank you for watching.