Showing posts with label Ho Ho Friends. Show all posts

Tuesday, November 01, 2022

Santa in His Cadillac!

Hello Scrapping Cottage Friends

It is Pam sharing with you today!

We have Part 2 of the Christmas release available today! This amazing release has 36 designs!  This time we have Gingerbread Cookies, Gnomes, Santa in a Cadillac and much much more!!  Check it out HERE.  The best part about this new release is that it is on sale now!!

The die I used to create my card today is Cadillac Santa!  I decided to make it a small tent fold card so I could stand it up!


Design Steps:

1.  Use your Cadillac Santa die and cut the following colors of card stock: red, green, silver, white, brown, black, tan and vellum (for the window, headlight and taillight in case you can't see it!).  Using the HO HO Friends die cut out Ho Ho twice once in white glitter card stock and the other in plain white card stock.  Glue the two together with the glitter letters on top
2.  Assemble all the pieces using a fine tip glue
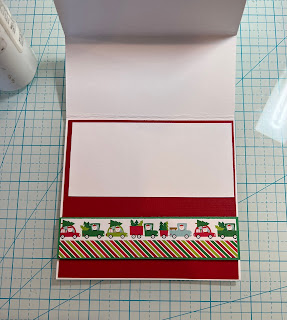
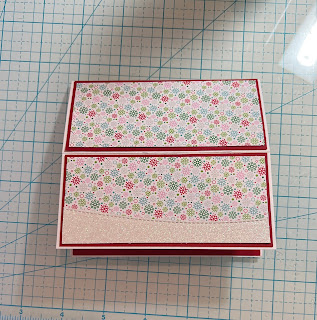
3.  For the base of the card cut a white piece of card stock 8 1/2 x 4 1/2.  Fold the white base in half and then fold the front flap in half toward the inside of the card.  For the inside cut a piece of red card stock 4 1/8 x 4 3/8, a piece of white 4 1/4 x 2, a strip of green 1 1/8 x 4 1/2, and a strip of DP 1 x 4 3/8.  For the front of the card 2 pieces of red 4 3/8 x 2, 2 pieces of DP 4 1/4 x 1 7/8 and a piece of glitter white card stock 1 x 4 1/4 cut with the Hills Slimline die for the snow 
4.  Working on the inside of the card glue the large piece of red card stock down first add the white strip of card stock to the top of the red piece. Layer the green with the DP and pop it up to the bottom portion of the card
5.  Close the card to work on the front of the card.  Glue the one of the red strips to the top of the fold.  Glue the other red strip to the bottom of the fold BUT do not glue to close to the top because you will have to slip in the HO HO. Then glue the DP to the red card stock.  Glue the glitter snow bank to the bottom of the front panel as shown

6.  Glue your HO HO together and then place a little line of glue on the bottom of the letters and tuck them under the lower red panel right at the fold.  Glue down your santa and your card is complete


CottageCutz Products


Please take a peek at this Cheery Christmas collection!  I promise you will want every single one of this incrediable release!!! Click HERE to see all the cuteness!!

We have more inspiration on our YouTube Channel check it out HERE

Thanks so much for stopping by!  And I will see you next Thursday.

Blessings and Take Care


Tuesday, September 13, 2022

Ho Ho Ho

Hello Scrapping Cottage Friends

It is Pam sharing with you today!

We have a NEW RELEASE FOR AN EARLY START ON YOUR CHRISTMAS CARDS!!   The collection is Christmas Part 1 and has 21 fantastic dies. The release includes everything from Gnomes to Reindeer!! Check it out HERE it is on sale now!!

The die I am creating with today is Jolly Santa Gnome!  I made a mini Slimline with this cute little guy!  My inspiration come from a card created by Francine Vuilleme. I loved her idea and had to give it a try!


Design Steps:
1.  Cut out all the pieces using the Jolly Santa Gnome and card stock in the following colors: red, green, brown, black, and flesh.  For the Ho Ho I used the Ho Ho Friends die and cut 2 Ho's in white card stock
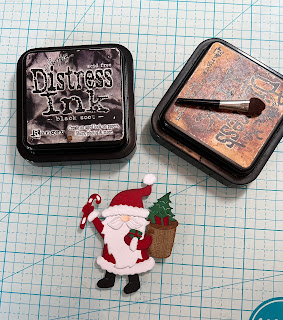
2.  Before assembly shade the pieces in black for the Santa and brown for the little shoulder basket.  I added a little blush to the nose.  Glue the pieces together using a fine tip fast drying glue  
3.  The card base is white card stock measure 3 1/2 x 6 1/2 when folded.  To add a little contrast in the background I used light blue ink with a soft blending brush.  Just enough ink to pop the HO HO

4.  Glue the HO HO to the background as shown above then add the gnome santa using pop dots.  Your card is complete

CottageCutz Dies


We have more inspiration on our YouTube Channel check it out HERE

Thanks so much for stopping by!  And I will see you next Thursday.

Blessings and Take Care


Tuesday, June 01, 2021

Ho Ho Ho

Hello Scrapping Cottage Friends

It is Pam on the blog creating with you today!

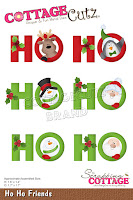
Today is Throw Back Tuesday so I am taking advantage of this fun day by getting a head start on my Christmas cards!!  I am using a super cute die from the 2019 Christmas Release Part 2.  It is called Ho Ho Friends.  I decided to make two versions one horizontally and one vertically.  Not sure which I like better maybe you can help me decide!!


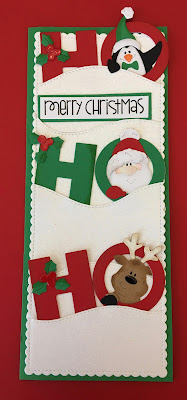
For the vertical card I used a green slimline base and for the horizontal card I used a white slimline base.  For both versions I used the Hills Slimline die for the snow which is cut out of glitter paper.  For the top card after I glued the hills to a piece of white card stock (only glue down the very bottom of the hills so I could tuck in the Ho Ho Ho). I ran it through my die cutting machine using the Scallop Stitched Rectangle Slimline. For the bottom I just glued the layers directly to the card base and added some DP for sky.

After I got the base done I cut out 2 of each of the reindeer, penguin and Santa shaded them with inks and glued them together.  I also cut out 6 of the holly and lettering using the Ho Ho Friends die
I added the holly to the letter H and tucked them into the snow.  Next I added the characters to the letter O and tucked them into the snow.  The last step is to add glossy accents to the holly berries, penguin beck and reindeer nose stamp the sentiment and glue to card and it is complete

CottageCutz Products


Thanks so much for stopping by for our Throw Back Tuesday.  I hope I was able to jump start your Christmas card ideas!
Blessings
Pam


Monday, November 11, 2019

Group Post Samples


Hello Scrapping Cottage friends! Thanks for taking the time to stop and visit today. We are sampling DT cards for the next 6 Mondays using dies from the Christmas Part 2 release.

There are 34 new designs in this release. This release has something for everyone. So if you prefer a more religious tone to your cards- we have you covered. If you like a more whimsical design featuring Santa, reindeer, gnomes, moose or even a hot chocolate theme you will find some really cute dies.
  
We thought you might like to have some new and creative ideas for your Christmas cards using the Part 2 dies. So let's get started with the cards for today.

Card 1:  Our first sample is from Sukie Dhillon. She used the Let's Bake Cookies die and combined it with the Winter Window die to create this festive card. The embossed brick background serves as the backdrop for the bake shop window.  The cookie bowls are stacked with the adorable reindeer nestled inside.  The utensils and shaped cookies make for the most adorable embellishments.  The tiny tag is the perfect finishing touch on a card designed for the baker friend or family member.
 
Card 2: Our next sample is from Anja Zurga. She used the new Ho Ho Friends die and combined it with the Happy Holidays Polar Bears to create this fun and cheerful Christmas card. This die is perfect for a long and thin card and it will fit in a #10 business envelope. The Ho Ho phrase is colored with distress inks. The polar bears are a cute addition to the "o" part of the phrase. She added a few snowflakes with gemstone centers to complete her card.
Card 3: The last sample for today is one that I (Mary Marsh) created using the Holiday Hedgehog die. I chose my card colors based on the Splitcoaststampers color challenge #763. Our own Jeanne was the hostess for the challenge. I placed the hedgehog on a circle die that I sponged with a cloud stencil, added some ribbon where the designer paper panels meet and stamped a sentiment to complete this whimsical card.
Well that's our samples for today. I hope the team has given you some fresh ideas for a way to use these new dies. 


dies used to create cards:


Friday, November 01, 2019

Ho Ho Ombre

Happy Friday!  It's Jeanne with a clean and simple card today.  My favorite style of card is CAS.  When I saw the Ho Ho Friends die I loved its bold, graphic style and knew it would be perfect for this style of card.
To start I chose three reds that were a progression in color and intensity to create an ombre effect. 
I die cut one set of letters from each red, along with the green holly leaves and the reindeer out of Crumb Cake and black.
Next I added shading to the deer using Distress Oxide inks in Vintage Photo and Tattered Rose.  I purchased inexpensive cosmetic sponges in bulk and these work great for coloring small spaces.
I assembled my reindeer.
For the card base I used an A2 base of white and cut one white panel and three green panels using the largest of the Nested Wacky Stitched Rectangle dies.  I'll use the green ones under the white panel to give dimension and color.
Next is the part that took a bit of concentration.  Clean and simple cards need to be pretty  precise, but a bit of planning is all that is needed.
The key to a card like this is to work from the middle out.  I made very light pencil marks at the halfway point on each long side of the white panel and also at the halfway point on the long sides of the middle red "H".  I erased these later.
I applied snail adhesive to the back side of my "H".  Using a saved backing from a piece of an adhesive sheet, I placed it from tick mark to tick mark.  The backing to these adhesive sheets are handy to have around as they are non-stick.  I was able to position the top of my "H", line up the mid points, then slip the backing out and burnish down the letter, being assured the position was correct.
Then I glued down the middle "O" leaving the top unglued so I could slip in the lightest "O".  The rest went very quickly.  I simply aligned the other letters.
To finish the card I stacked the three green panels underneath and added  my reindeer and holly with berries.
I chose the reindeer to peek out of my card, but this set also comes with Santa, a snowman and penguin.  All wonderful choices for an adorable CAS card!

Dies:
http://www.scrappingcottage.com/cottagecutzhohofriends.aspx
http://www.scrappingcottage.com/cottagecutznestedwackystitchedrectangleset.aspx

Be sure to stop by the online store to see all of the new Christmas dies!

Thanks for stopping by today.  I hope you have a fun and creative weekend!