Showing posts with label Hills Slimline. Show all posts

Monday, January 01, 2024

Winter Ski Trip Slimline Card

Happy New Year crafty friends!!

Tomorrow is the LAST DAY of our huge After Christmas Sale where you can save up to 80%!!   If you hurry, you can stock up on your favorites for some crafty fun in the new year!

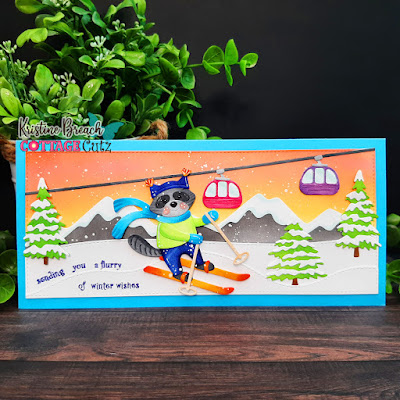
Kris here with a winter wishes slimline card that I think is fitting for this time of year!  We actually got our first snowfall of the season on Christmas Eve.  While I'm not hoping for a ton of snow this winter, I enjoy creating snowy themed cards like this one.  ☺


I've used the Winter Ski Trip die the cute Winter Raccoon on Skis.  I've also used the Hills Slimline die and the Stitched Rectangles die.

DESIGN STEPS:

I die cut the Winter Ski Trip die 2x and the Winter Raccoon on Skis 1x in white cardstock, then colored with Copic Markers.


I then used the largest of the Stitched Rectangle dies to cut a slimline panel using the extended die method.  I repeated this method for a 2nd panel, then used 2 of the Hills Slimline dies to cut 2 hills from the 2nd panel.  

On the 1st slimline panel, I used Distress Oxide ink pads in Wild Honey, Abandoned Coral and Crackling Campfire and ink blended a sunset to the top half.  I then attached the 2 sets of mountains.

Before adding my decorative elements, I used white acrylic paint mixed with a li'l bit of water to spatter "snow" onto my scene and raccoon.  


Next, I stamped a sentiment onto the snowy hills in Starry Sky ink then attached them to card front, followed by my decorative elements. 

I cut a piece of turquoise cardstock at 7-1/2" x 8-3/4" and scored the 7-1/2" side at 3-3/4" for a top folding slimline card base.  I mounted my card front to the base and done!


Thanks so much for talking a peek today!  I hope you'll take advantage of the huge SALE going on thru Jan 2 (tomorrow night!)  and get your craft on with some of your favorite dies.  

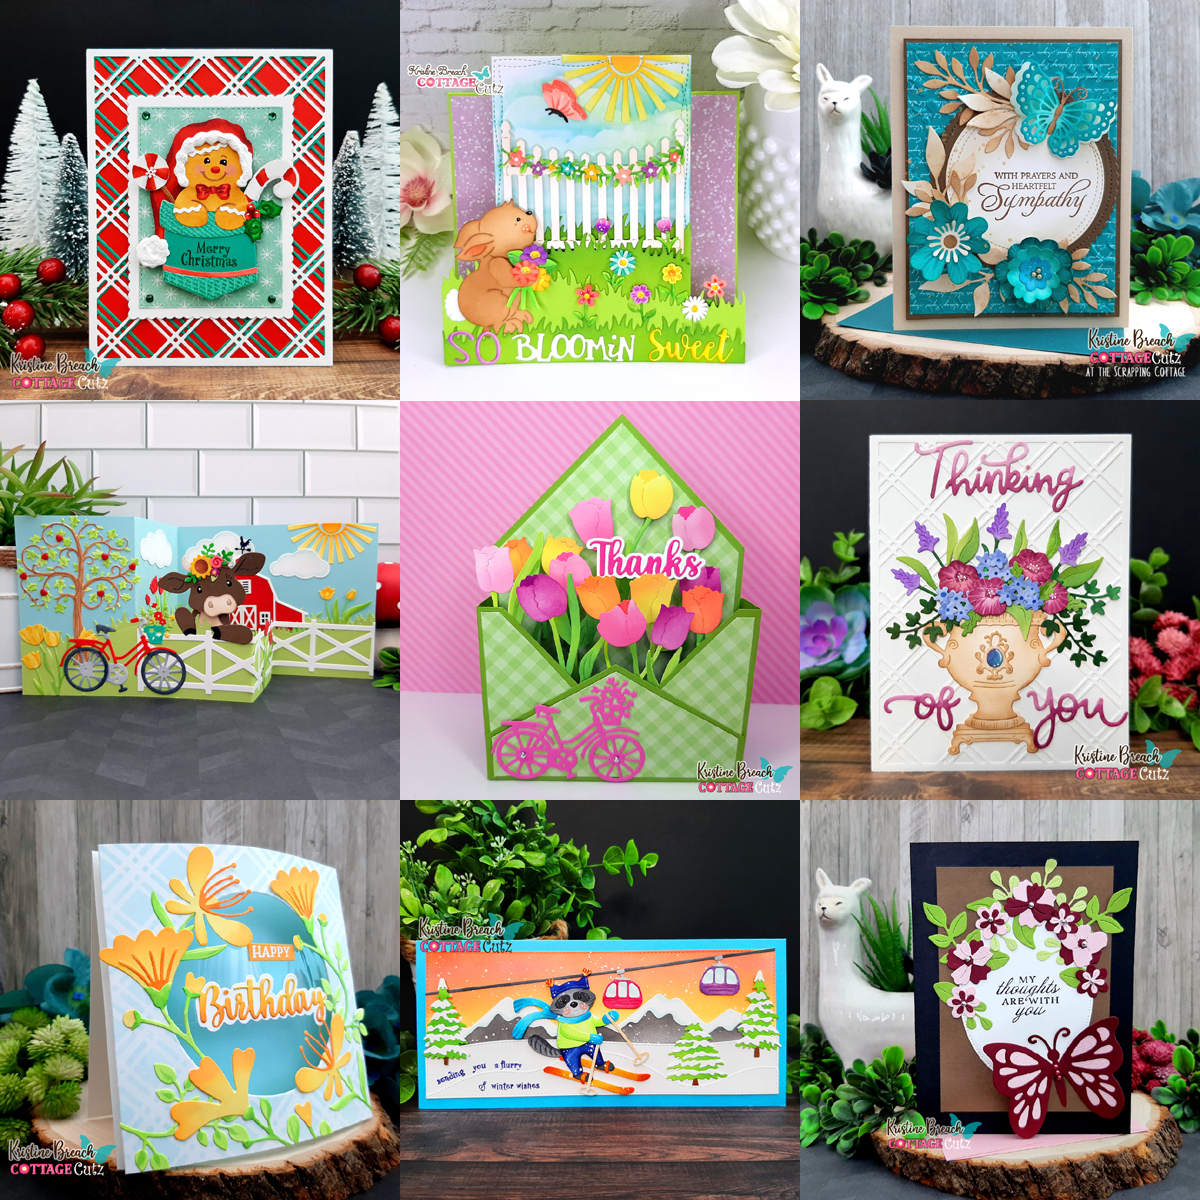
Speaking of favorites, I thought I'd share my 9 favorite cards I've made from 2023 --- super hard to pick just 9, but here's just SOME of my faves ☺


Check out our YouTube channel for more inspiration and giveaways!

Wishing you all a healthy, happy and CRAFT-tastic 2024!

~Kristine

Friday, December 29, 2023

Anniversary in the Pines

Happy Friday crafty friends!  

I hope you all had a wonderful Christmas ♥ 

We have an after Christmas sale going on right now with savings of up to 80%.  The sale runs through January 2 so stop over and visit to get some dies you may have on your wish list. 


Kris here sharing an anniversary card featuring the Pine Tree, Full and Pine Tree, Slim from our Christmas 2023 Release All the dies in this release are 30% off for a limited time.  

I'm also showcasing the beautiful Garden Bride & Groom die and Stitched Hearts set to make this heart window cutout card for my husband for our anniversary.  We got married a few days before Christmas and had white flocked (and lit) trees in the sanctuary, so I left the top layer of my tree dies white to resemble snow.

Below is the inside of my card.  


I followed the Color Challenge CC979 at Splitcoast Stampers 


Sweet Sorbet
Daffodil Delight
Lemon Lime Twist
Petal Pink
Neutrals of your choice

DESIGN STEPS:

I die cut my Garden Bride & Groom from black cardstock.  Then I die cut my trees and cut a piece of 5-3/8" x 4-1/8" from white cardstock.


I used Twisted Citron, Scattered Straw, Abandoned Coral, and Kitsch Flamingo Distress Oxide ink and blended onto the white panel as shown.


I used Mowed Lawn and Vintage Photo D.O. ink and blended onto tree bases and trunks.  I left the top layers white to resemble snow. 


Next, I spattered white paint with a paint brush dipped in water then paint and hit the handle using another paint brush handle as shown below. 


I cut my card base from black cardstock at 5-1/2" x 8-1/2" and scored at 4-1/4" and then with card open, I die cut the largest  Stitched Hearts set  from the center of card front. 


I added a sheet of scrap paper to cover the back 1/2" of my card, then spattered white ink onto the front to resemble snow.  


I mounted my silhouette to the ink blended panel and then I cut a white mat at 5-1/2" x 4-1/4" and taped to inside of card.


Next I stamped and die cut my Happy Anniversary sentiment from a Divinity Designs stamp set and glued to the inside bottom where it won't show thru the front when card is closed. 


For the front, I put a sheet of wax paper inside to cover my silhouette panel, then I added glue to back of trees where it would touch the black card front.  The wax paper prevents any excess glue from ruining your ink blended panel inside.  


My daughter insisted that I needed a snowy bank at the bottom of my card, so I cut a pc of black c.s. at 5-1/2" and die cut the top with the Hills Slimline die.  I then added puffy snow with my Snow Writer.


Thanks so much for taking a peek today!  

~Kristine


Friday, December 22, 2023

Gingerbread Cottage Birthday Wishes

Happy Friday crafty friends!  

Kris here sharing a "Sweet" birthday card featuring the Gingerbread Cottage from our Christmas 2023 Release!  All the dies in this release are 30% off for a limited time, so a great time to pick some up for those last minute holiday cards for this year OR to get a head start on next year's cards!  The Black Friday Release is also on sale for a limited time! 


DESIGN STEPS:

I started with an A2 pink card.  I then die cut the Lattice Slimline die in white.  Then, with the card horizontal, I placed it on top and cut the bottom off a li'l short as shown below. 


Next, I cut a piece of white cardstock to an A2 size, then I cut it diagonally following the stripe on the lattice.  

I placed it into my Misti as shown below and stamped my sentiments (from the Hey Sugar stamp set from La-La Land Crafts) in Pink and Green.  


I decided to add a bit of light blue (Tumbled Glass) ink around the house so the snowy roof doesn't blend in with the white background.  


I adhered this piece to the card front. 

Next, I die cut a piece of light pink glittery cardstock with one of the Hills Slimline set and attached to card front. 


I die cut my Gingerbread Cottage  from white cardstock then colored with Copics and Distress Oxide inks, then adhered to card. I tucked the lollipop behind the snow, I glued the chocolate swirled candy to snow and popped up the strawberry, tree and house with foam dots.


Thanks so much for stopping by today! 
 Be sure an check out our YouTube channel
for more inspiration and giveaways!

Christmas Blessings to you all ♥

~Kristine


Thursday, December 07, 2023

Puppy Carolers

Hello Friends 

I can't believe I am finishing my Christmas cards!  I have to send many cross country so I need to complete the handmade ones. 

I am using our new Christmas Release which is available at a wonderful 30% off.  This collection has over 40 different dies.   It has everything you will need for your holiday paper crafting. Make sure to stop by the online store and check out all the fantastic new designs!

Today, I am using the Puppy Carolers and the Pine Tree Slim.  These pups are so sweet and make a perfect card for all those dog lovers in our lives!


Design Steps:

1.  Using the Pine Tree Slim die cut out the following colors of card stock: green, brown and white (I made three of these trees).  Using the Puppy Carolers die cut out the following colors of card stock: white, brown, red, green, blue, black, and mustard yellow.  Glue the pieces together with a fine tip glue
2.  Use a white A2 card base, cut a piece of navy snowy DP 4 1/8 x 5 3/8, use the Hills Slimline and cut the white bank of snow (cut it down to 4 1/8) and use the Picket Fence Slimline and cut it on white (cut the fence down to 4 1/8)
3.  Glue the navy DP to the white card base.  Next add the trees then fence and finally the snowy ground
4.  Glue the brown and black dogs down flat as shown above then put dimension squares on the yellow dog and pop him in the middle as shown below.  Add the sentiment layered on red and your card is complete


We have more inspiration on our YouTube Channel check it out HERE

Thanks so much for stopping by!  And I will see you next Thursday.

Blessings and Take Care