Showing posts with label Hello w/ Shadow. Show all posts

Monday, September 04, 2023

Farm Cow Peeker Pocket

Happy Labor Day friends!

We are having a HUGE LABOR DAY SALE going on right now -- save up to 65%!  Great time to stock up on your favorite basic dies or nab some of the uber CUTE CottageCutz dies... even the Li'l Bluebird stamps/dies are on sale!!

Hello ~ Kris here to share some MOO-velous Monday inspiration with you!  


Have you seen these adorable pocket peekers?!  I've used this cute Farm Cow Peeker, and the Peeker Pocket along with the Hello w/ Shadow die.

I've used the Splitcoast Stampers Color Challenge #964 for this week which is

Copper Clay
Moody Mauve
Misty Moonlight

The colors in my photos below do look a bit off from the color challenge, but I did use Misty Moonlight for my card base, and I substituted Pecan Pie for the Copper Clay.  

DESIGN STEPS:

 I cut my card base at 6" x 8-1/2" and scored at 4-1/4" for a side-folding card.

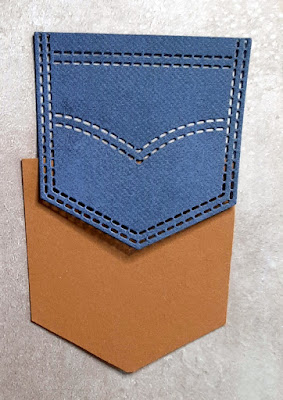
I used another piece of MM cardstock and stamped a denim looking background stamp onto it with some grey ink (as I didn't have the Misty Moonlight ink and it gave it a more subtle effect).  Then I die cut it using the Peeker Pocket 

To back my pocket and to resemble the brown/tan stitching on jeans, I put a piece of Pecan Pie c.s. behind the pocket and cut it slightly smaller and then glued it behind the denim one.


I cut a piece of patterned paper (from the SU! Earthen Elegance pack as it reminded me of a sort of rustic cowboy print) at 5-3/4" x 4"and adhered to card front.  

I cut a piece of Pecan Pie ginham (from the Glorious Ginghams pack) at 5-3/8" x 3-5/8" and adhered to card front.

Next, I punched 2 small holes at top of pocket and added some rustic metal brads, then glued the sides and bottom of pocket to the lower gingham layer.
 

I die cut my Farm Cow Peeker from White, Sand, and Pecan Pie and then I cut small pieces of the Moody Mauve, Blackberry Bliss, and Mossy Meadow and die cut just the flowers and leaves.  


I added some coloring/shading with Distress Oxide inks and Copic markers and added white highlights on flowers & eyes with a white gel pen.  Then I assembled the cute cow with glue and tucked her head/body behind the pocket and her legs on top.


How stinkin' adorable is she?! ☺


I had this li'l buckle with some engraved detail and some braided twine that I thought would be cool on here, so I attached it with some double-sided tape behind the cow's head.


And lastly, I die cut a 'Hello' from the Moody Mauve c.s. and adhered to the pocket.  


Thanks for taking a PEEK!  Go check out these adorable PEEKERS and grab your favorites or take advantage of this AWESOME LABOR DAY SALE going on to stock up!!




Ink Something Crafty!
~Kris


Monday, August 14, 2023

Hello Crocodile

Hello crafty friends!

It's Kris here to share some Monday inspiration with you! 


For my card today, I combined 2 challenges from Splitcoast Stampers:

Our very own DT Leader here at CottageCutz, Mary Marsh, was the Color Hostess for CC960 and I LOVE this pretty combo, so I played along:


I actually substituted the Lost Lagoon with Just Jade (closest I had to it)

and then I also played with this week's sketch challenge -- turned vertically


I had the idea to make the front a split diagonal fold card, so the focal image is only attached to the upper left of card front.  INSIDE you get the upper left half of card to write or stamp your message ☺


Design Steps:

I started by cutting my top folding A2 card base (4-1/4" x 11" - scored at 5-1/2"

I then opened the card and cut diagonally from the top right corner (at score line) down to the bottom left corner.

I then cut (4) different patterned papers at 4" x 5-1/4" -- although I only used 3 of them.  I just couldn't decide which I wanted.  Then cut all of them in half diagonally.  

*Tip:  use the other halves to make a 2nd card!


I then cut the green patterned paper in half (line up the SHORT edge and cut at 2") as shown.


Next, I repeated that process with the pink/white/green striped pattern then attached all 3 pieces as shown below.


I then die cut the largest of the Nested Stitched Doily dies, and the Crocodile from white cardstock.

I die cut the Tropical Bouquet from Bubble Bath and Berry Burst cardstocks.

I die cut the Crocodile and [leaves from the] Safari Adventure Gang from Just Jade and Mossy Meadow cardstock.


I glued just half of the white doily circle to the top (left) of card front, and then popped the Croc in middle with foam dots.  This allowed me to tuck the flowers and leaves in under and around him (some I glued, some I popped up with more foam dots).  

I decided to die cut the Hello w/ Shadow from the Bubble Bath and Berry Burst and glued to left right corner (which is inside the card!  ☺


I would be done, however I was not following a tutorial on this, and noticed this style of card does not stand on it's own for displaying ... SO, I remedied that by adding a "kick stand" to the back of my card.

I used the left-over triangle piece from my card base, and trimmed it down to 2-3/4" x 3-1/2" and scored it at 3/4" as shown.


I should probably also tell you, that if you glue this now to the middle back of your card, it still won't stand well because the front is "top heavy" with all the die cuts.  SO... to remedy this, I turned the piece so the 3/4" score line is horizontally at the bottom, then I measured 1/2" in from the top right corner, placed a mark, then with scissors, I trimmed from the bottom right corner up to that 1/2" mark.  


I glued the tab to the back of card to that the bottom of tab is flush with bottom of card.  That slight angle allows the card to tilt back a li'l bit and counters the heaviness of card front.  ☺  Win-Win!!!


PRODUCTS USED:


I hope you enjoyed this tutorial!  I really enjoy working with the cute CottageCutz dies!  
For more inspiration and tutorials, see our YouTube channel here.  Happy Crafting!

~Kristine


Friday, August 27, 2021

Hello My Finned Friend

Happy Friday!  It's Jeanne bringing you the Friday edition of the blog.  My card features one of the new stamps from Lil' Bluebird Designs and one of the new sentiment with shadows dies.  Right now both of these releases are on sale for a limited time!

I started by coloring the cat and fishbowl from the Kitty Love stamp set and cutting the Hello using the Hello with Shadow die.

I used mostly Spectrum Noir Tri-Blend markers with a few Copic markers.


Next I cut an A2 panel from patterned paper and a scalloped circle using the second largest of the dies and a stitched circle also using the second largest of the dies.

To get my ombre panels I first colored the whole circle using Distress Oxide ink and a blending brush.

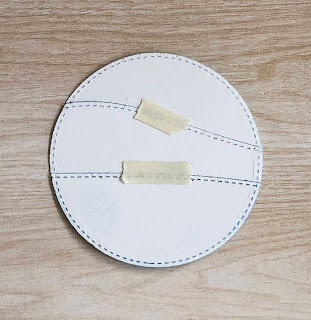
I then used the Hills Slimline die to cut a curve about 1/3 of the way from the top.  Setting the top portion aside, I inked the rest of the circle.  Then I cut another curve, set the upper portion aside and inked the bottom portion. This gave me three gradated panels for my circle.


I turned them over and used double sided tape to hold them together.  This allowed me to flip them over  and glue them as one piece to the scalloped circle.


 I used a coordinating ribbon on the left side of the panel.

Using foam tape I popped up the circle over the ribbon.

I added my kitty, the sentiment and a few enamel dots to finish it off!  I hope you've enjoyed my card today.  Be sure to visit the online store to check out these and other stamps and dies from the new releases!

Products used:


Thanks for visiting today!  I hope you have a fun creative weekend!