Showing posts with label Harvest Scarecrow. Show all posts

Wednesday, September 11, 2019

Scarecrow Card

Hello!  This is Sukie and today I have a fall card to share.  I'm excited for fall which is just around the corner.  It is definitely my favorite time of year and I absolutely love crafting for the holidays!
When I selected the papers for my card, I wasn't sure how well they would work together even though they were in the same paper stack. However, with the coordinating die cuts, everything pulled together perfectly for a cheerful fall theme.
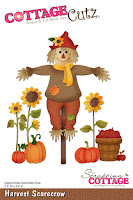
I used the Harvest Scarecrow, Double Stitched Rectangle Set and the Circle Set dies to cut out all of the elements for my card.  I inked the circle with some Fossilized Amber Oxide Ink.  Each of the die cuts were also inked on the edges for added dimension.
I built my card base by layering the rectangle frame at an angle.  The inked circle was placed over the rectangle to break up the pattern.
The scarecrow was centered on my card base and surrounded by the large sunflowers.  All of the details in this die set created the perfect fall scene.
The plump pumpkins were the finishing accents.  I opted not to add a sentiment on my card so as to not distract from all of the details on my card.
Here are the dies used on my card, available in the shop:

Monday, September 11, 2017

Pop-Up Pumpkin . . . and Toad

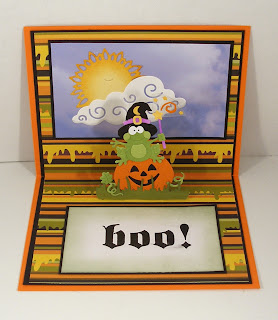
Hi, Lois here in the throes of Hurricane Irma.  But I do have a card for you today.  Halloween  is right around the corner, and I've got another card made with a new CottageCutz Halloween die.  This was a fun card to make.  When you look at the front, it's not very exciting, BUT . . .


. . . all the fun is on the inside!


To start my base card, I cut cardstock as follows:

Orange - 8 1/2" x 5 1/2"
Black - (1) 4" x 5 1/4", (1) 5 1/4" x 8 1/4", cut in half
Patterned Paper - (1) 3 7/8" x 5 1/8", (1) 5 1/8" x 8 1/8", folded in half


After folding  the orange base in half, I glued down the black mat piece and the smaller patterned paper piece on the front.

I cut all the die cuts from white, orange, black, or green cardstock . . . 


. . . and colored them with either ink or markers.  Then I constructed the frog/pumpkin piece.  Note that the small stars and curly-cue are glued to a small piece of acetate, which was then glued to the large star on the wand with a glue dot.


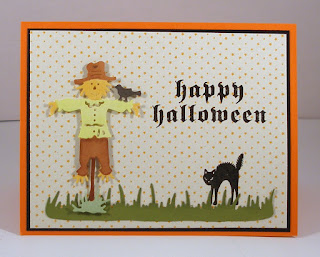
On the front I stamped the sentiment and the cat in Versafine Black Onyx ink and embossed them with clear embossing powder . . .

. . . and added the scarecrow and strip of grass.


Now came the fun part!  To make my pop-up support on the inside, I cut two 2" slits 1" apart on the patterned paper across the scored center and scored at each end of the strips.


I glued the two pieces of black cardstock to the inside of the card, getting them close to the fold line, but not touching.  This allows the card to close without bending up the edges.  I didn't want to adhere one large piece of black cardstock to the inside because that would tend to "bind" when the card was closed.  Then I added the patterned paper, being careful not to apply glue to the support section in the center.  This section will fold OUT when the card is closed -- with the pumpkin/frog glued to the front of it.


Because the paper is very "busy," I wanted to tone it down a bit by putting a panel on each side of the card.  I cut two pieces of black cardstock, one piece of white, and one piece of "sky" paper.  (These could be any size you wanted.)


I stamped the sentiment on the white piece and sponged a bit of green ink around the edges.


I then cut out the sun and cloud, sponged on some darker color to the sun, and (using a Copic gray marker) added some shading to the under side of the cloud.


I put the pieces together and adhered them to the upper and lower panels of the card.


This photo shows how the frog sits on the pop-up support piece.


CottageCutz dies used on this card are:

http://www.scrappingcottage.com/cottagecutzharvestscarecrowelites.aspx


http://www.scrappingcottage.com/cottagecutzsunandcloud.aspx


The new Halloween die (Happy Toad Wizard), as well as several new series of Christmas dies, will be available for purchase in the CottageCutz store starting September 20th.  Because of the support of their wonderful customers, it has become necessary to move into a larger warehouse.  Because of the move, the store is temporarily on hold.  But that gives you lots of time to decide what you want next!  LOL!


Friday, October 14, 2016

Autumn Seasonal Tree

Hello Scrapping Cottage friends! Thanks for taking the time to stop and visit today. It's Mary Marsh here bringing you the Friday edition of the Blog. The fall season is about 3 weeks old now and tonight may be the first frost of the season here in Pittsburgh. If that happens it's the end of our flowers and tomatoes.

But, we still have the beautiful fall leaves to enjoy, and they have not reached their peak beauty yet. Here in this area anyway. So I thought  I would go with a fall card for today's post. I used this super cute seasonal tree die to create it. Let's get started with some details on my card for today.

Rust Card Base: 4 1/4" x 5 1/2"
Chocolate Layering Panel: 4 1/8" x 5 3/8"
Patterned Paper Panel: 3 7/8" x 5 1/8"
Tilted panels: 2 7/8" x 2 1/2"

I used this week's sketch from Splitcoaststampers for my layout. It's a basic sketch but I liked the tilted panels. I added a couple of extra layers to the sketch just for some additional interest.
Once I decided to use this layout, I went looking through my stash for some autumn themed patterned paper. I found this paper and matched it up with the corresponding cardstock and ribbon. I used the ribbon for layer #2 in the sketch.
I used the chocolate and rust cardstock for my tree and mustard & sage for the tree leaves. That picked up the background colors of my patterned paper. I also cut a couple of pumpkins from the Harvest Scarecrow die. Layered the tree and pumpkins on some white cardstock. To ground the images, I sponged some olive ink.
To complete my card, I stamped a sentiment in chocolate ink. I hope I have given you some ideas for this cute new die. I think it makes a great card for Thanksgiving or a Fall theme.
 
Also, don't forget about our current challenge #7 for October. The theme this month is Fall. This new die would work great for the challenge.
Well, Blogger friends that's it for me for this week. So until next time.........inky hugs.
 
http://www.scrappingcottage.com/cottagecutzseasonaltree.aspx
http://www.scrappingcottage.com/cottagecutzharvestscarecrow.aspx


Friday, October 07, 2016

Autumn Tree + Distress Crayon technique


Hello Scrapping Cottage friends! Thanks for taking the time to stop and visit today. It's Mary Marsh here bringing you the Friday edition of the Blog.
 
I went to a garage sale recently and the person holding it was selling some Ranger Distressed  Crayons. She had 18 of them for $5.00. They were brand new and she just didn't like working with them. What a find for me!!
 
So I watched some YouTube videos to see what to do with them and the idea for the background on this card was born. I am also using some new dies from the Autumn 2016 release. These ones are the autumn tree w/ swing and the give thanks die set. So let's get started with details on my card for today.
 
Chocolate Card Base: 4 1/4" x 5 1/2"
Kraft Layering Panel: 4 1/8" x 5 3/8"
Image Panel: 3 7/8" x 5 1/8"
 
Distressed Crayon Technique:
Step 1:  Used watercolor distressed cardstock and applied a layer of Gesso to prepare the paper. Set aside to dry.
Step 2.  After that dried I applied the distress crayons in fossilized amber, spiced marmalade, mustard seed and peeled paint. Used my finger and a little water to spread the color around. The finger method is what Tim Holtz recommended in of his videos. I set this aside to dry. You could use a heat tool to dry it as well. I used this time to start making my die cuts.
 
 
Step 3. Once this was dry I took a sun-ray stencil laid it over top of the color and used a wet (but not soaking) paper towel. I followed the stencil layout and started to remove color. I was really pleased how this turned out. Especially since it was my first attempt with these crayons. I did make another one and didn't use the Gesso layer. The color is much subtler without the Gesso.  Just depends what you are looking for with your color.
 
Step 4: Now that my background is prepared, I am ready to make my die cuts. I used various shades of fall cardstock and cut my autumn tree with swing, the leaves pumpkins and sunflower. I used some distress ink to highlight the colors.  The Give Thanks word I cut 2x in chocolate cardstock for dimension.  I attached it to the right side of the card and took it just slightly off the card for added interest. I didn't want to completely cover up the stenciled sun image.
Step 5:  Now my card is ready for assembly. I used a combination of Ranger multi-matte medium, glue dots and double sided tape on all the die cuts. 
 
Step 6: The image panel is layered on kraft cardstock. I then used foam adhesive for added dimension to attach to the chocolate card base. And with that, my card is completed. I hope I have given you some inspiration on a way to create a fall scene using a couple of different die sets.
 
We are also underway with our challenge for October. The theme this month is Fall. Get all the details here as well as the winners from Challenge #6.  So until next time........inky hugs!
 
http://www.scrappingcottage.com/cottagecutzautumntreewswing.aspx
http://www.scrappingcottage.com/cottagecutzgivethanks.aspx
http://www.scrappingcottage.com/cottagecutzharvestscarecrow.aspx