Showing posts with label Garden Wheelbarrow. Show all posts

Thursday, February 16, 2023

Thank You Flowers

Hello Friends

It is Pam sharing with you today!

IT'S NEW RELEASE TIME!  The collection is called Flowers and More.   The unique thing about this release is that there are fewer pieces in each of the dies.  So they go together really quickly and easily! 

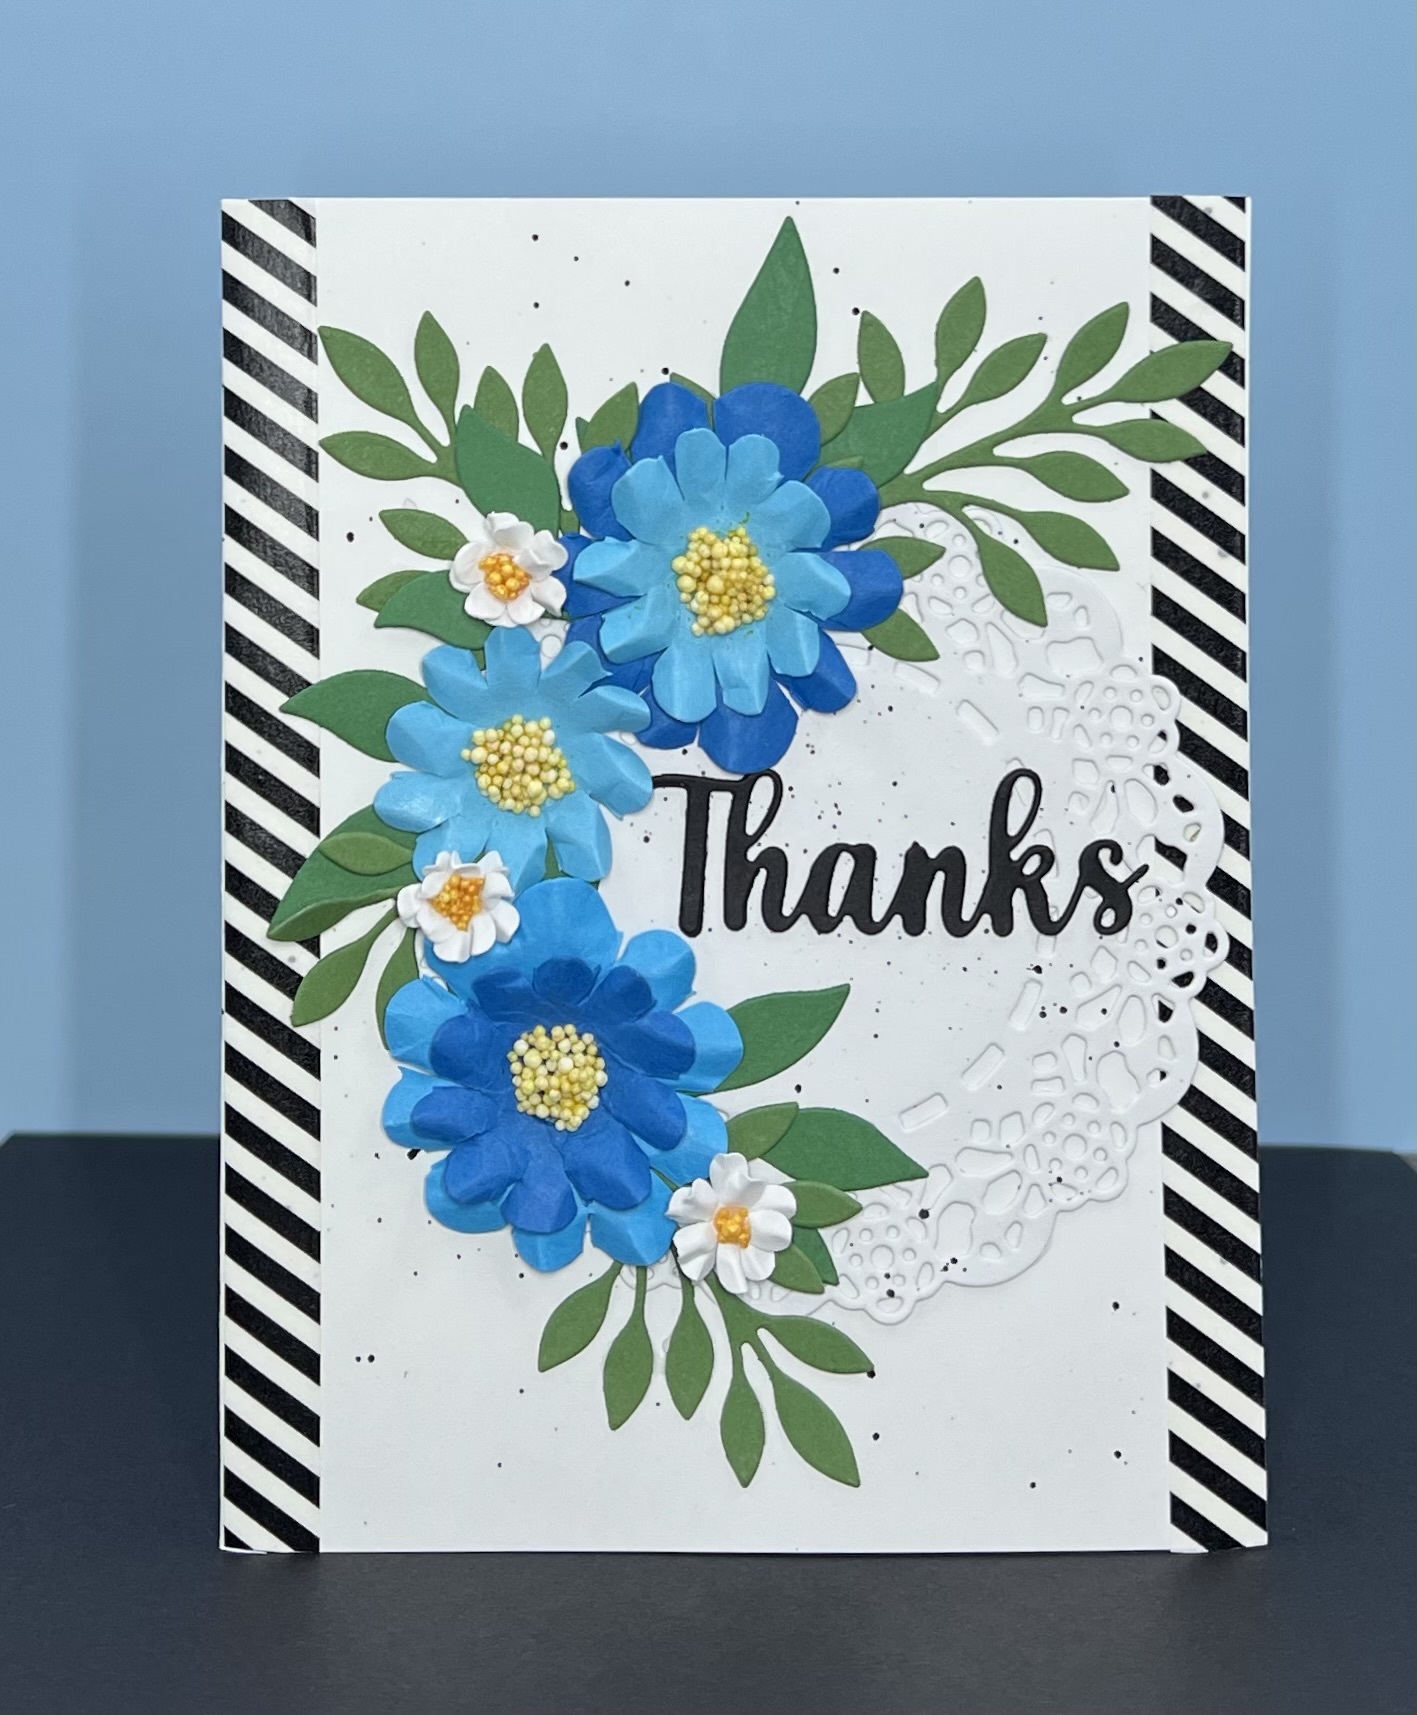
I noticed I was getting low on Thank you cards. So I decided the flowers in this release are so pretty they would make a beautiful thank you! I used Flower 5 and Leafy Branches 12 and 3.  My inspiration for this card was one by Barbara Anders that I found on Pinterest.

Designer Steps:

1.  Using an A2 white card base splatter the card with black.  I used a watered down black acrylic paint
2.  Cut out a white doily with the Tea Time Doily then splatter it with the same black mixture as the card base


3.  Use a black striped washi tape to line each side of the card

4.   Using the following dies Leafy Branch 12, and 3 cut out the leaves in 2 different shades of green card stock.  Using the Flower 5 cut out the large and small flower in 3 shades of blue card stock.  Using the Garden Wheelbarrow cut out 6 of the small white flowers
5.  I cut a slit in the blue flowers between the petals and then cupped then with a stylus.  After I cupped them I pinched the petals to give them a little shape.  I also did this with the white flowers only on the small white flowers I glued 2 together for a little more strength
6.  For the centers I used white Prills which I dyed yellow with some distress ink

7.  Cut two Thanks in black using the Thanks Expression die.  Glue the two Thanks toghether.  Glue the doily slightly to the right of center as shown above and then glue down the Thanks as shown

8.  Arrange the blue flowers and glue dot then down.  Tuck the leaves in and around the flowers.  Then add the small white flowers and your card is complete

CottageCutz Supplies


We have more inspiration on our YouTube Channel check it out HERE

Thanks so much for stopping by!  And I will see you next Thursday.

Blessings and Take Care


Thursday, June 04, 2020

Tulips!

Hello Scrapping Cottage Friends,

It is Pam designing with you on the blog today!

I love tulips!  They are usually one of the first flowers to pop up in the spring! Signaling that the cold winter months are coming to an end.  My favorite tulips are yellow but the red come in a close second!


Background Photo by Wynand van Poortvliet on Unsplash

Design Steps:
1.  I used a black A2 card base, red card stock 4 x 5 1/4, and polka dot DP  3 3/4 x 5.  Glue the red card stock to the polka dot DP and set aside 

2.  Next cut out a piece of green card stock using the Spring Grass die.  Cut out a white rectangle using the Double Stitched Rectangle die 3rd from the largest.  Use a cloud stencil and blue ink to create the background.  Glue the cloud stitched rectangle onto a red rectangle layer

 3.  Using the Garden Wheelbarrow die cut out the pieces in red, black, silver, dark and light green, red and yellow

4.  Shade the pieces and then assemble them using a fine tip glue
5.  Next pop the cloud panel onto the polka dot DP add the grass then the wheelbarrow.  Then carefully arrange the tulips and glue them into the wheelbarrow.  Add the sentiment and glue to the black card base and your card is complete
 CottageCutz Products


Thanks so much for stopping by today.  I appreciate it so much.

Blessings and See You Soon!
Pam

Wednesday, June 03, 2020

Happy Happy Days

Hello!  This is Sukie and today I'm sharing this cheerful card for my design team post. I used a couple of fun dies from the Gardening release.
I selected the Garden Wheelbarrow for the focal point of my card and opted to use the accessories from the Gardening Cat die set.  The grass is from the Spring Grass die set. I went with a rustic theme for all of my die cuts, inking the edges with some Vintage Photo Distress Ink.
I created my own background with a brick themed stencil and some Oxide Ink.  Then I used more Vintage Photo Distress Ink around the edges of my card panel.  I fussy cut a couple pieces of kraft card stock to replicate shelves.
The sentiment was stamped on a piece of card stock and embellished with an extra die cut flower.  I also inked the sentiment tag on the edges.
To create my gardening scene, I placed the strip of grass along the bottom edge of my card base and added the wheelbarrow.  The 2 shelves were floated at the top half of my card.
Each of the shelves were accessorized with the watering can, rain boots, apron and basket of flowers.
The shovel was tucked into the grass.  The sentiment tag was the final finishing accent on my card.
Here are the dies used on my card, available in the store:

Tuesday, May 26, 2020

For a gardener

Hi Janja here. Welcome to the blog.
I have another card on the topic of gardening to share with you today.


- card blank: 4 1/4 x 5 1/2" (10,8 x 14 cm)
- patterned paper: 4 1/4 x 3" (10,8 x 7,6 cm)
- different colors of cardstock
- different colors of ink pads
- cloud stencil
- glue, double-sided adhesive tape, self-adhesive foam pads

Start making a card by cutting all the elements out from different colors of cardstock. Overshadow them with ink pads for more depth.


Cut out the grass border twice. Glue the lawn to white cardstock which is the same size as the card blank.


Create a cloudy sky with a stencil and a light blue ink. Paste the background on a blank card.


Gradually paste all the cutouts as shown.


Thank you for stopping by. And don't forget to check the Memorial Day Sale!
Janja