Showing posts with label Fresh Lemonade Phrases. Show all posts

Wednesday, May 24, 2023

Mini Lemonade Stand Shadow Box

Hello Cottage Cutz friends,
Melinda here with you on this wonderful Wednesday. Today I am sharing a cute little shadow box I created for my entrance table decor. I love making tiered tray and themed little decor pieces for that front table. It is a treat to come home and see the seasonal decor. Here in Florida it is hard to feel the four seasons. We just get varying degrees of HOT...lol!

Here's a look at my finished little shadow box. I started with a shadow box from the dollar tree. It had another image in the center but I took that out to start with a flat surface.

I started by decorating the inside of the shadow box with some paper. I used some black cardstock for the base. I then added a white mat and some diagonal plaid patterned paper that I created and printed from my home inkjet printer. I cut it to size and then added all that to the shadow boxes inside.


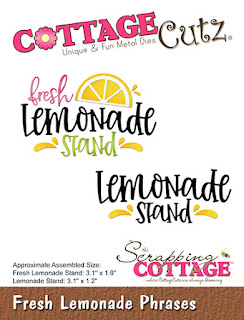
I created a little sign for the top by adding the word fresh and one of the lemon wedges from the Lemon phrases die set. I cut the lemon wedge down. For the black base of the sign, I cut out the lemonade stand in black cardstock and cut the top and sides off. I used just the bottom piece.
I then cut out two banners in white cardstock and then used my markers to color the pennants of the banner in yellow and green. 

Next I went to work creating that sweet little lemonade stand. I cut the base out in kraft cardstock. I then added some brown marker to bring out the wood grain look. I used my black marker to darken the word Lemonade. It cuts out with the die cut to make things real easy! I then cut and colored the banner and added my pitcher, glass, lemons and stand sentiment. I added all that to a square scallop stitched mat with a green polka dot patterned paper.

Next, I needed to make something to give my little lemonade stand some lift off the base of the shadow box. I didn't want to layer a bunch of foam tape. So instead I made a little 3" x 3" box. 


Here are some .75" x 11" strips that I scored and folded at 3". I did this so I could adhere them to the inside of the box or riser as I like to call it. It makes it super sturdy.

Here is my little riser after I have added the extra layers. Nice and strong. It will keep my little lemonade stand nice and sturdy and flush. I adhered this to the base of the shadow box and then added my little lemonade stand.


Here is a view with a slight angle. You can see how much lift the stand mat and sentiment have off the base. But it is nice and sturdy and the edges won't collapse in. The shadow box is 1" thick so making my riser .75" thick still kept the mat inset enough.


Here is one last look at my completed shadow box. I am making a few more items for my decor that I will be sharing and then I will share a final photo of how it all comes together. 

Dies Used


Nested Scallop Square Set
The stitched one I used is unavailable at the moment.
This one would be a great alternative.


Don't forget to also check out the Cottage Cutz YouTube Channel for some great crafty videos!

Well that about covers it for today! Until the next time, have a wonderfully crafty day!


Saturday, May 20, 2023

Lemonade Tiered Tray Sign

Hello crafty friends,
Melinda here with you today. For my project today, I am sharing a cute sign I created with a lemon theme for my tiered tray decorations. Here is my sign.
My little sign is the perfect topper for the top tier of my tray. I used a variety of super cute dies from CottageCutz.com to create my sign. I have always liked this saying, so I decided to use it.


Here is a view of my sign. For my base I used a scallop stitched rectangle die. I cut it from white cardstock. I then used some diagonal plaid paper I created for a mat.
 I then set out to create all the cute lemon slices, the Lemonade title and more.  
For the upper portion, I used a scallop oval from white cardstock. For the mat, I used some wood paper I created and cut out a double stitched oval. 


Here's a closer look at the top portion. I printed out the "When Life Hands You" sign. I attached it to the top portion of the lemonade stand sign in black cardstock. 
I cut out the word Lemon from black cardstock. I cut the word Stand in black as well. I used the "S" from stand to make the word plural.

For this lower section, I cut out a white fence for the base. I then cut out the leaves and lemon slices all in white cardstock. I then used my markers to color in my lemon slices and my branches. I assembled my slices and then layered them onto my piece with the branches. I also cut and assembled the cute little glass and pitcher from the lemonade stand. I also cut out the word Lemonade in black and white. I layered the black title onto a couple of layers of the white title and offset them to create a pseudo shadow layer. I did this so that it would stand out a little more from the fence and branches. I also printed out the word "make" and trimmed it out. I added it to my piece and used a cute little gem for an extra touch.  I lastly scattered some sequins for a little extra bling.

Here is one last look at my sign. I think it turned out super super cute and it is the perfect touch to my tiered tray decor.


I hope you are inspired to create your own cute little signs with some fun lemony themed projects. 

Don't forget to also check out the Cottage Cutz YouTube Channel for some great crafty videos!

Well that about covers it for today! Until the next time, have a wonderfully crafty day!


Monday, February 27, 2023

Sweet as Lemonade

Happy Monday crafty friends!

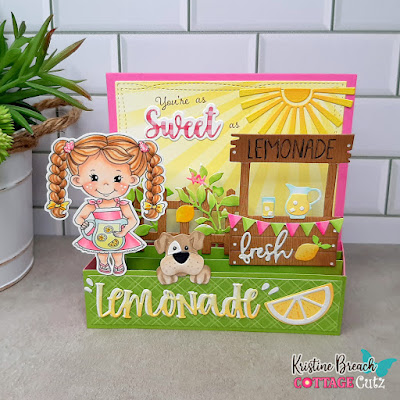
Kris here with a cute Box Card!  I really love to make box cards like this because they are easier than they look and you can fit more dies/images on them to create cute scenes and really gives your recipient a fun surprise!  ☺ 

I've used several brand new sets from the Flowers & More Release -- which are all 30% off for a limited time!


*The girl is an image I drew as part of my own  digital stamp collection (2015) and is not currently available, however this boxcard would also be cute with only the CottageCutz dies listed or add your own favorites from the shop!


Design Steps:

1.  I cut all my cardstock and patterned paper pieces:

Pink Cardstock:
• 4-7/8" square
• (2)  2-1/2" x 1-1/4" - scored 1/2" in on each end;  mitered top flaps

White Cardstock:
• die cut the largest Nested Wacky Stitched Rectangles

Lime Green Cardstock:
• 1-1/4" x 4-7/8"
• (2) 5-5/8" x 1-1/4" - score 3/8" in from each end; miter top flaps

Patterned Paper (green):
• 4-3/4" x 1-1/8"

Patterned Paper (pink):
• 1-1/8" x 1-3/8"


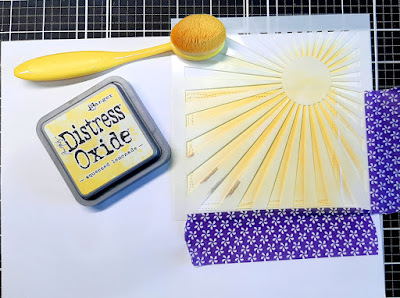
2.  I stenciled sun rays onto the Wacky Stitched Rectangle with Squeezed Lemonade Distress Oxide ink.


3.  I mounted my patterned papers and sun rays to their corresponding pieces as shown below.


4.  To assemble the shelves, I used the same technique as my cow box card HERE (follow steps 8-14).


5.  I die cut all my decorative pieces, then colored and assembled them.  

*Note:  I die cut 2 of the lemonade stand, one in a wood pattern and one in white and glue together to make it more sturdy.  

6.  I attached all my pieces!  

*Note:  I stamped "You're as" onto the sun rays panel.  Then glued the Sweet w/ Shadow in place.  I attached the stand, fence and my stamped girl with a piece of heavy acetate that extended an inch below the die cut/image and attached that to the shelves.  You could use cardstock, but the acetate I used is sturdier than c.s.  Here's a couple of process photos.


One more look at my finished card.


It folds to the side and fits into a 5" x 7" envelope.


Products I Used: