Hi everyone! Linh here and I have a new video up on the Cottage Cutz YouTube channel. This is a really fun 2-for-1 technique. The diagonally cut pattern papers are hand-cut without any special dies. It's really easy and you can quickly make two backgrounds. Today I'm making a couple more Mother's day cards that are a bit more understated compared to my last Mother's Day card.
Showing posts with label Flower 2. Show all posts
Showing posts with label Flower 2. Show all posts
Friday, March 10, 2023
Thursday, March 09, 2023
Hello Flowers
Hello CottageCutz Friends,
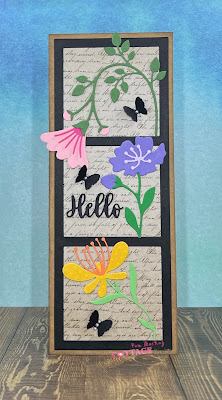
I like to send cards to family and friends with no special occasion. So today I thought I would make a card just to say hello and I am thinking of you!
The dies I used for today's card are from the new collection. They are Flower 2, Flower 6 and Flower 7. I decided to make a slimline to display these pretty flowers.
Designer Steps:2. Use a Kraft slimline base measuring 3 1/4 x 8 1/4
- Use the Window Slimline and cut it out in black
- Use the Hello w/Shadow and cut out the hello in black 3 times
- Cut a piece of script designer paper 3 x 8
4. Glue the Hello and the purple flower in the middle window as shown above
5. Glue the pink and yellow flowers as shown above
6. Ink the edges of the kraft slimline card base in black
7. Glue the flower panel to the kraft card base. Using the Spring Meadow die cut out 3 black butterflies. Place 3 small pearls on each butterfly and then attach to the card front as shown below and your card is complete
CottageCutz Products
We have more inspiration on our YouTube Channel check it out HERE
Monday, February 13, 2023
Partial Front Birthday Card
Happy Monday crafty friends!
Kris here with a super easy floral birthday card using Flower 1 and Flower 2 from the new "Flowers & More" Release! I do love the larger size of these flowers as they are super easy to color and assemble so this card came together very quickly!
The individual dies in this release are all 30% off! ☺ They are FANTASTIC for birthdays, weddings, sympathy... you name it! A great staple to have in your stash of dies!
This is an A2 top folding card, but with part of each side cut off the front for a li'l bit different look.
CUTTING & SCORING:
Yellow Cardstock = 4-1/4" x 11"
- score at 5-1/2" (card base)
- Cut 1" off each side of the card front, just up to the score line.
White Cardstock = 5-1/4" x 2" (inside panel)
- die cut a circle using 4th largest Pierced Circle Set
*Tip - this would look great using ovals instead of circles - I used what I had.
Coral Cardstock = die cut a scalloped circle using the 2nd largest from the Nested Stitched Scalloped Circle Set
Patterned Paper Green (center panel) = cut at 2" x 5-1/4"
Patterned Paper Floral (sides) = cut (2) that are 3/4" x 5-1/4"
DESIGN STEPS:
1. Open your card and attach the 2 floral pieces to each side, leaving equal border all around.
2. Stamp a sentiment if you wish on the white panel and attach to the center inside of card.
3. Close card and attach your green patterned paper to the front center panel.
4. Stamp on white circle if you wish and glue to the coral scalloped circle, then onto the center panel of card front.
5. Die cut your flowers from white cardstock and add Distress inks with a blending brush. (I used Mustard Seed, Wild Honey, Abandoned Coral, and Candied Apple for the flowers, and I used Old Paper, Shutters, and Mowed Lawn for the stems/leaves.) Assemble the pieces.
6. *Optional: Next, I spattered some metallic gold paint (mixed with a tiny bit of water) for a shiny distress look.
7. And attach to your center panel. Embellish with enamel dots or gems if you wish, and done!
These make quick and pretty cards that are always nice to have on hand.
PRODUCTS I USED:
Thanks so much for looking! Happy crafting!
~Kristine
Subscribe to:
Posts (Atom)


