Showing posts with label Fall Leaves. Show all posts

Tuesday, November 14, 2023

Fall Leaves Jewelry DIY

Happy Tuesday crafty friends,
Melinda here with you on this terrific Tuesday. Today I am sharing a fun project I created with one of the cute die cutz from the new fall Cottage Cutz release. Here is what I created.
I made this pretty jewelry set with the beautiful fall leaves die. It includes the gorgeous "skeleton" shapes (outlines) of the leaves. ere is how I made my set.


I started by cutting out my leaves several times on various colors. I wasn't sure which color was going to be my base colors. I ultimately landed on the black cardstock.

I went to work gluing all the layers together. I ultimately decided to use black as the base colors. 


I made one of the maples leaves and two of the, I will call them Oak leaves.

Here are the two Oak leaves layered and set aside to dry.


Once I finished gluing them all together, I needed to color the sides in.  I colored it all in black so that it would be cohesive. Here is a pic of one colored and one still not.

After combining all of the paper layers together, I set them aside to dry. I then took some of the Cricut Premium Vinyl in a Brushed texture. I chose the "copper" looking color. See photo above.

I then cut out some of the leaves with the brushed vinyl. They cut out very well. They did not cut through the backer paper which makes getting tghem seperated was pretty smooth.


Here is where I decided to use the outline with the veins image.

I then used the solid pieces and laid them onto the back pieces. You can see that the mirror image is not an exact match, but pretty close. If you really wanted to be spot on, you would just need to flip the vinyl with the top vinyl layer face down. You may have to use a shim to make sure you can cut all the way through including the backing paper.


Here is a view of the maple back. The flip side is pretty symetrical with the exception of the stem. It is going in the opposite direction. To remedy that, I simplty cut it and released it from the full leaf shape, you can just put it on the stem and position it to go the opposite way. The material is overall pliable.

After I finished layering and covering all three leaves, I set about to make the gem pieces. Here is a shot of the smaller dangles for the earrings.

Here are the gems for the maple. I made them and used a jump ring to wrap around the stemp.

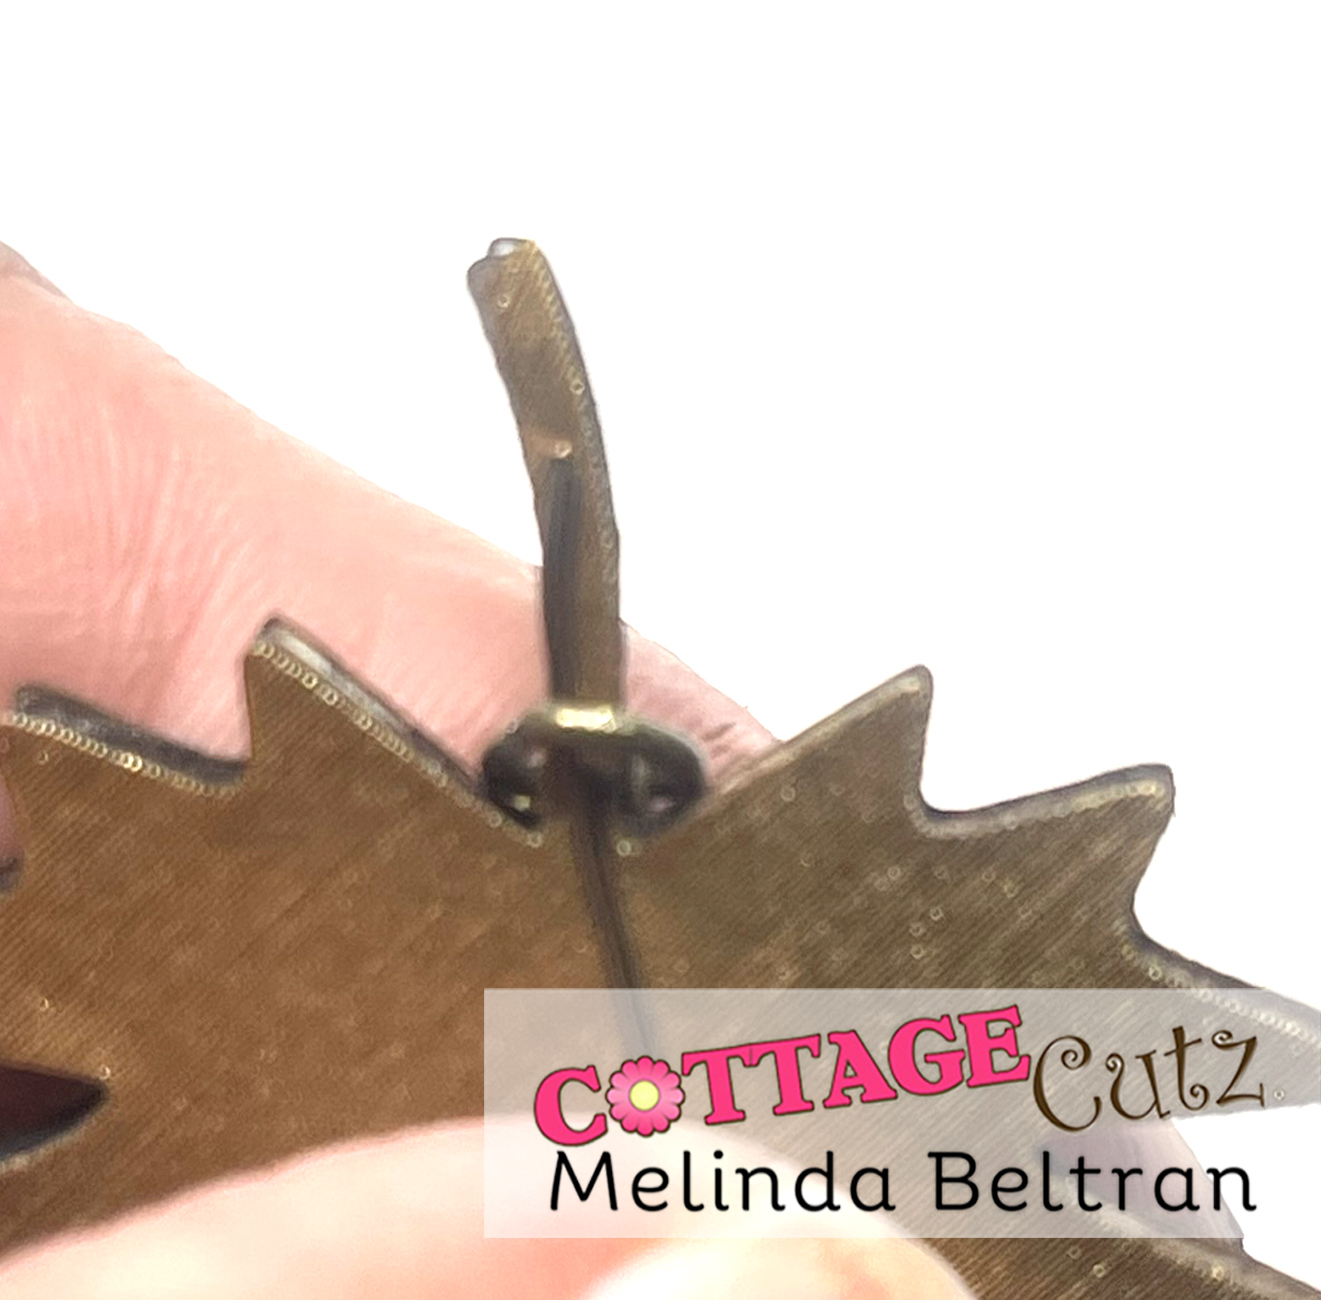
Here is a shot of the back of the jump wring. It is simply wrapped around the stem.


Here is what it looks like with just the gem dangles around the jump ring.
Here is what the maple leaf looks like. To get the jump ring to stay and not fall off, I wrapped some wire around the stem and then made a simple loop at the top. This gave me a way to connect this to a necklace. By wrapping the stem, it also strengthens it.


Here are the finished earrings. I wrapped the wire and made a small loop. I then used some earring hooks to add the leaves to.


Here is one last look at my completed set. I think it turned out very pretty. I made a matching bracelet and think it all turned out super cute!

Dies Used
Fall Leaves


I hope you enjoyed this project. Please make sure and head over to CottageCutz.com and pick up some of these wonderful dies. They will not disappoint.

Well that about covers it for today. Be sure to come back by again.
Until the next time, have a wonderfully crafty day.
-Melinda

Friday, October 13, 2023

Fall Pumpkin Trio

Hi Friends,

Welcome to this Friday edition of our blog ☺  It's Kris here, sharing a Fall card with watercolored pumpkins using the Harvest Pumpkins and Fall Leaves from the NEW FALL RELEASE!  The individual dies in this release are 30% OFF for a limited time!


I followed the color challenge at SplitcoastStampers this week which was

Pebbled Path
Lost Lagoon
Wild Wheat
*I substituted Pretty Peacock for Lost Lagoon

Dessert Option is to Add a Border! I added a top and bottom border to the Plaid paper with the Wild Wheat cardstock... and I also added a Wacky Stitched Die border to the smaller white focal piece.
 
 DESIGN STEPS:


I cut the following from Stampin' Up! colors:

• Pretty Peacock = 5-1/2" x 8-1/2" scored at 4-1/4"
• White = 5-1/2" x 4-1/4" 
• Wild Wheat = 3-1/4" x 5-1/2"
• Plaid paper = 3-1/8" x 5-1/2"

I stamped a sentiment in bottom right corner of my white panel and then I dry embossed it.  


I die cut the Harvest Pumpkins from a watercolor cardstock, and the Fall Leaves from the 3 challenge colors.  I then watercolored my pumpkins with Pretty Peacock classic ink and Peacock Feathers Distress Oxide Inks, and the leaves in Vintage Photo D.O. ink.  


I cut my main focal piece from white cardstock at 2-1/2" x 4-1/2" then I dry embossed it with the same folder as the larger white panel.  I then decided I wanted to create a border and flatten out the leaves a bit for a more subtle texture, so I used the largest Nested Wacky Stitched Rectangle and cut it as shown, then cut just the other long edge.


I glued my largest white embossed panel to my card front.  Then I centered the Wheat and Plaid papers  and then the smaller white die cut panel on top.  

I then cut the stems off of my leaves and glued them to the bottom half of my card center, then added my pumpkins and sunflower.  Done!


I hope you are inspired today to get crafty with your favorite CottageCutz dies!

There's more inspiration and giveaways on our YouTube Channel!

~Kris


Thursday, November 01, 2018

Fall Color


Good Morning Scrapping Friends!

Hello it is Pam creating on the blog with you today!

Thanksgiving is such a wonderful holiday.  It gives us time to stop and reflect on how blessed we are.  And after giving our thanks we get to enjoy a yummy meal with family and friends.

I am almost finished with my Thanksgiving cards but I could not resist making one more card with some gorgeous Fall Leaves on it.

Design Steps:
 1.  Cut all pieces out of white card stock using the Fall Leaves dies
 2.  Sponge the leaves with TH Distressed inks
 3.  After sponged take the leaves and coat them with Versa Mark ink.  After you coat them with ink dip them into clear embossing powder
 4.  Heat set the leaves with your heat gun.  The colors will really pop!
 5.  Use an A2 white card base, cut a slightly smaller piece of black card stock.  Then use a piece of DP and cut it slightly smaller then the black.  Glue the black and DP to the front of the white card base
 6. Cut a dove tail black banner 5 x 2 3/4 inch and then a slightly smaller piece of burlap to layer over the black

7.  Begin to layer the leaves onto the banner working from the bottom to the top.  Cut out the brown twigs using the Cardinal & Bird die tuck them into the leaves as shown.  Add the sentiment and button then your card is complete
CottageCutz Products


Let us all be extremely thankful for all that we have especially when we have time to create and have a little fun!

Blessings
Pam

Friday, October 26, 2018

Autumn Leaves

Happy Friday Cottage Cutz fans!  It's Jeanne posting today.  I love these new leaf dies!  I decided to use a card sketch from CAS Colours & Sketches because it allowed me to concentrate on the technique instead of the layout.
 Here is the challenge:
https://cascoloursandsketches.blogspot.com/2018/10/design-team-call-and-challenge-295.html
I used my Distress Oxide inks and what I call a "splat" technique.  I swipe the ink pad on a plastic mat and spray with water, then I dip my paper into the mess.  I do this with several colors, most of the time using my heat gun to dry between layers.  I used Fossilized Amber, Wild Honey, Peeled Paint, Fired Brick, Spiced Marmalade and Gathered Twigs ink colors.
When the paper was nice and dry, I die cut the leaves.  This technique gives a randomness to the leaf colors - just like in nature!
I tipped the edges of the leaves in the brown and brick inks.  This gives a bit more realism to the leaves.

I cut a rectangle 2 1/2 x 3/1/4 inches from Early Espresso card stock and three strips of Copper Foil card stock 1/4  x 4 1/4 inches.  I also cut an A2 panel from white card stock and tipped the edges in the brick and brown since white edges seemed too stark for this card.
The brown panel is 7/8 inches from both the top and sides and I placed the top copper strip 1 3/4 inches from the bottom.  Each strip is 1/4 inch from the one above it.


Finally, I added some epoxy dots as "dew" drops.

This card is actually quite easy to make although it looks intricate and time consuming.  Because of the technique there will never be two cards alike, but that is the beauty of nature!

Dies:
http://www.scrappingcottage.com/cottagecutzfallleaves.aspx

Thanks for visiting today!  I hope you have a fun and creative weekend!