Showing posts with label CottageCutz Victorian Window. Show all posts

Friday, March 04, 2016

Victorian Window with Roses

Hi, Vladka here! Today we will travel back in time with this vintage card. Are you interested in how you can create it? Let's start!


Basics:
Card base: 4 1/4 x 6 inches (cut 4 1/4 x 12 inches, fold in half)
Additional piece of kraft cardstock: 3 3/4 x 5 1/2 inches
Some kraft cardstock scraps to cut out the die cuts and strip for sentiment

Other Supplies:
CottageCutz dies: listed below
Cardstock: kraft cardstock
Distress Ink: Brushed Corduroy, Gathered Twigs, Fired Brick, Aged Mahogany, Peeled Paint
Other:  brick embossing plate (optionally), scissors, paper trimmer, Sizzix machine, scor-buddy, brush, light blue and white watercolor paint from a tube or white acrylic paint, piece of sponge


Let's prepare everything first:

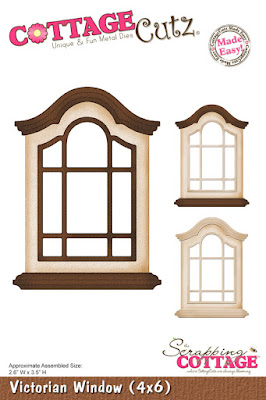
1. With the Victorian Window die cut the window out of some kraft cardstock. Use a sponge to color die cut pieces with white watercolor paint straight from the bottle but you can use white acrylic paint. After they are dry, distress all of them with brown Distress Ink. When putting the window together, tear apart some pieces to give it an old and damaged look.
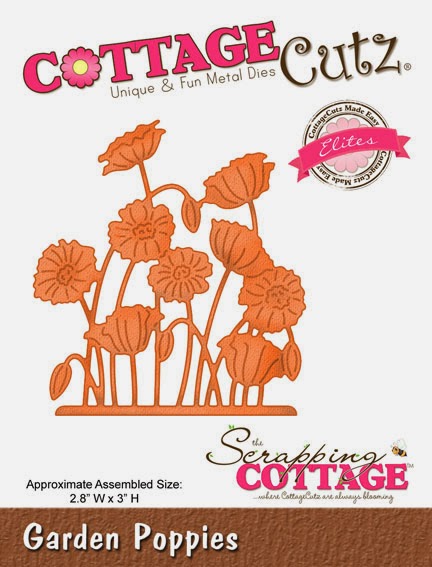
2. With the Floral Spray die cut flowers and greenery out with some kraft (or white) cardstock. Color flowers with red Distress Inks and greenery with green ink.
3. With Stitched Square die cut the second biggest square (eight from the center). Put it together with the same Stitched Square die on the cutting plate (as shown on the photo) and cut it out again. This will give you the perfect stitched strip to stamp the sentiment on.


4. Run the other piece of kraft cardstock through your die cutting machine with your brick embossing plate. This step is optional. You can use any other embossing plate or none at all. Color the surface gently with blue paint on a sponge first then after it is dry use white paint. For a finishing touch, carefully distress the whole surface with brown Distress Ink.
5. Use white paint on the base of the card as well.

Finally, preparations are finished. Let's make the card!

Apply adhesive on the back side of additional piece of cardstock (the embossed one) and add it on the card base. On the front of the card, glue the window, flowers and greenery. Stamp sentiment on the strip and glue it under the window.


Card is finished and you can enjoy the view :)))


Sunday, March 02, 2014

Garden Poppies & Butterflies

Happy Sunday!

Kathy with you and today I have a slider card to show you using some pretty pastel colors for spring and 4 beautiful CottageCutz Dies.  I used 2 new dies from the  Garden Delight ReleaseGarden Poppies and Garden Delight Butterflies and 2 dies from previous collections, Victorian Window and Laundry Line.


Here's a view from the side so you can see it really is a slider card!  (It's hard to tell from the first photo!)


The card base and all the die cuts were done with white card stock and the pieces were colored with VersaMagic Chalk Inks and make up applicators.  I used Thatched Straw and Spring Pansy on the window, bird, and butterfly.  The flowers and stems were colored with Spring Pansy and Aloe Vera.

This is a 4 1/4" x 4 1/4" slider card.  I used an embossing folder border for the lower front.  I added the window die with pop dots using a piece of lace under it to show through the window to look like a curtain.  I cut the flower piece in half so I could put some on each side of the window.  I added a second layer of flowers on the "open" ones glueing them at their center and then added Lemon Chiffon Mini Prills.  The bird was added with a pop dot.  Then I added ribbon and trim below the window using Scor-Tape.

For the inside of the card, I stamped the sentiment on a piece of white card stock and added it with pop dots to keep the card open.  I then glued the butterfly down it's center with glue and added Lemon Chiffon Mini Prills.

These are the dies I used:


Wednesday, January 08, 2014

View through Victorian Window

Hi, all! Vladka here with you!
 I will start this year as I finished it - with Christmas card. Woodland Pine Trees die is just perfect for such cards and when I saw it, I decided to make card with window. 
So I cut out Victorian Window and made this winter wonderland view. For festive touch I added one part of the biggest bow, which you can find in Homemade Christmas Gift Set. For 3D look I glue everything together with foam tape, added also white tempera and card was finished. 
This is all for today, enjoy your day!

Saturday, May 18, 2013

White Victorian Window

Hi everybody, Vladka here!


I'm taking you from the door to the window. This Victorian Window die is so beautiful and other girls form our DT already made beautiful projects out of it.  I used kraft paper for the whole card and created also "stone" out of it. Tempera and Distress Inks were really helpful here :)


When I was thinking what to create, I got the picture in my mind: an old house made from stone with old white window. Look through the window inside the house open the view on old wallpapers with flower pattern. A little greenery around the window shows that no one lives here for a long time, because everything is so overgrown. That was my picture in my mind and it is up to you to decide if  I managed to recreate this with my card. I was really enjoying when making this project.


Find or make yourself a little place of your dreams, inside or outside of the house and enjoy there.

Sunday, May 05, 2013

Victorian Window

Hi, Friends!
We have a new project to share with you today!
Inspired by the Cottage Cutz
New Collection-This and That,
I created a card and a hanging decoration
Take a look:


Another view:


For the hanging decoration I cut the 2 of the 
the small piece in the middle I created
the top tag in which I placed my sentiment.


Closer look:


 Here's the die used:


Other material used: Bazzill cardstock, flowers,
twine, ribbon , a paper doily and some beads.

Hope I inspired you to get crafty!
Hugs, 

Saturday, April 20, 2013

Victorian Window /Video On "This N That" Release


Hello everyone, Cheryl here with a Victorian Window Card I created using CottageCutz Dies. The Victorian Window is from the NEW "This N That" Release


I absolutely LOVE this CottageCutz Victorina window and the way it turned out. I thought hmmmmm what to do with this window, and as soon as I picked my design paper I knew instantly what to do. I took, the flowers from the CottageCutz "Tree of Nature" die, and layered them to create little flowers, perfect size for this window. Next I wanted some greenery,so I used the CottageCutz "Ornate Circle Frame" Die, it has some greenery in it, perfect size as well for my window.
COLORS-
Flowers-Colored with copicRV11
Leaves-Dusted with Distress Ink Peeled Paint
Window Trim-Dusted with Brushed Corduroy Distress Ink


You can CLICK on any of my PHOTO's to ENLARGE :) so you can see CLOSE UP!

CottageCutz Used:


USTREAM?????

My window is 3-D and I was thinking of doing this for my 1st class! Please let me know if you would LIKE to see this done on USTREAM, I will set a date and time :)


Video Showing "This N That" Release


Thank you for looking and have a wonderful weekend!!
Hugs to all,
Cheryl