Showing posts with label CottageCutz Nested Stitched Scallop Rectangle Set. Show all posts

Friday, October 23, 2020

Baking Spirits Bright

Happy Friday!  It's Jeanne today with a card that was very hard to make - but only because it made me hungry while making it.  All I could think about were freshly baked cookies! 

Gingerbread is one of my favorite Christmas themes and although these are snowmen in this die they fit that general idea.  I had some gingerbread themed patterned paper and knew that combined with this die it would make the perfect stand up card!

To begin I cut my pieces from white, red, crumb cake and a small patterned paper and cardstock.

I used Copic markers to color the nose and holly leaves and I shaded the snowman, cookies and cupcake with Distress Oxide inks.

Next, I cut a piece of crumb cake cardstock to 4 1/4 x 11 inches, then scored and folded it at the 5 1/2 mark (in half, top folding).  On the top flap I scored at the 2 3/4 mark and folded this, essentially folding the top of the card in half.  This will become my easel for the image.  I cut a piece of patterned paper to 4 x 5 1/4 inches and folded it in half at the 2 5/8 inch mark.

I cut two white rectangles using the 2nd largest of the Stitched Scalloped Rectangle dies, one red rectangle using the 3rd largest of the Stitched Rectangles, one white oval using the 2nd largest of the Stitched Scalloped Ovals and one crumb cake oval using the 4th largest Stitched Oval.  I like the Stitched dies but the plain, pierced or double stitched dies work too!

To build the easel, I glued the patterned paper to the top of my card matching up the folds.

I stacked the two white rectangles and adhered the red to the top.  The two pieces of cardstock allow the folded front to have a barrier to stand against when you open the card.

Using a fine tipped glue pen, I glued down my sentiment and a few extra sweets and baking tools.

 I glued my completed sentiment to the inside of the card, about 1/8 inch from the bottom.

I assembled the medallion for the front of the card...

and glued the bottom of it to the lower half of the front of the card.  I left the top free to pop up when the card is opened as an easel.

Finally, I tied a narrow ribbon behind the medallion on the upper part of the card for a little bit of interest when the card is closed.

I hope you enjoyed my card today!  This card would be perfect for someone who loves baking! Be sure to visit the online store where the new Christmas Release (Parts 1, 2 and 3) and the new Halloween release are on sale for a limited time!

Dies:


Thanks for stopping by.  I hope you have a fun and creative weekend!


Friday, May 01, 2020

Flower Pots Thank You

Happy Friday!  It's Jeanne today with a clean and simple card for you.  This card was created for two card challenges this week -  a sketch and a color challenge.
The sketch is at CAS Colours and Sketches:
http://cascoloursandsketches.blogspot.com/2020/04/challenge-368-sketch.html
and the colors are from the weekly challenge at Splitcoaststampers - Poppy Parade, Cajun CRaze and Mango Melody.
https://www.splitcoaststampers.com/forums/color-combinations-f43/cc789-parade-crazy-melodies-04-28-20-a-t633225.html
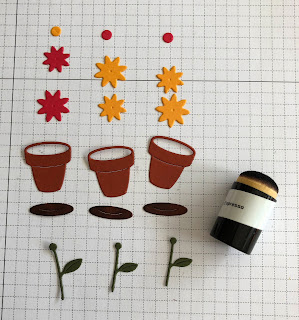
To begin my card I cut the pieces using the flowers from Mouse w/ Garden Wagon and the pots from Potted Plans in the appropriate colors of cardstock.  For the dirt color I used Early Espresso ink to color the pieces that were cut in Cajun Craze.  I used Mossy Meadow for the stems.
I assembled the pots.
I cut a top fold A2 card base in white, a strip of Poppy Parade 5 1/2 x 1 inches and a Mango Melody patterned piece 5 1/2 x 2 inches.  For the box on the sketch I used the second smallest die from the Stitched Scallop Rectangle set.
I used white embossing powder to heat emboss my sentiment.  Then I cut the strip so it was about 5/8 inches high.  I usually emboss or stamp my sentiments on a strip larger than what I want to use so that I can adjust if I don't stamp quite in the center.
Next, I glued the posts to the rectangle leaving the tops of the flowers hang above the box.  If you start with the center first it is much easier to get the placement right.  Then you just need to center each side.
I adhered my patterned piece to the bottom of the card and added my strip 1 3/4 inches from the bottom.
Using foam tape, I added the box with the pots to my card.

Dies used:
http://www.scrappingcottage.com/cottagecutzmousewgardenwagon.aspx
http://www.scrappingcottage.com/cottagecutzpottedplants.aspx

http://www.scrappingcottage.com/cottagecutznestedstitchedscalloprectangleset.aspx

Thanks for visiting today.  I hope you have a fun and creative weekend!  Be sure to visit the online store to check out the adorable new Gardening release!


Friday, February 07, 2020

Love Ewe

Happy Friday!  It's Jeanne today with a Valentine using the new Spring dies.  These dies are adorable and very versatile (and on sale right now!)  I made this card for my oldest daughter.  She loves puns, so I know she'll love this.
To start I cut all the pieces in various colors using the Spring Lamb & Chick and the Hello Spring Bloom dies.  The lamb is cut from vanilla cardstock to contrast a little with the white panel.
Then I assembled the pieces.  I use a silicone mat when gluing so my pieces don't stick to the surface.
For the base I cut a panel 4.25 x 5.5 inches from patterned paper.
Very often when I know I will be layering other panels on top of a patterned paper that I like, I cut a rectangle from the center of my panel.  This gives me a panel to use elsewhere and saves my paper!  It's not like I'm a paper hoarder (LOL), but I will admit to being afraid of running out of retired paper that I love.  This is one way to maximize its use.
I used the largest of the Nested Stitched Scalloped Rectangles to cut a white panel and stamped the sentiment in the lower left.
I centered that panel on my patterned paper and added the lamb and flowers.  My striped paper was dotted on the other side and I decided that I liked that better with the fluffy lamb and scallops.  To finish the card I adhered everything to an A2 top folding card base.

Dies:
http://www.scrappingcottage.com/cottagecutzspringlambandchick.aspx
http://www.scrappingcottage.com/cottagecutzhellospringbloom.aspx

http://www.scrappingcottage.com/cottagecutznestedstitchedscalloprectangleset.aspx
http://www.scrappingcottage.com/cottagecutzstitchedrectanglesetbasics.aspx
Thanks for visiting today!  Be sure to stop by the online store where the new Spring dies are on sale for a limited time!

I hope you have a fun and creative weekend!

Thursday, December 12, 2019

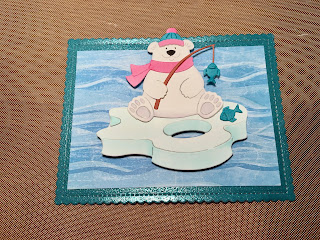
Polar Bear Fishing

Hi Everyone!

We are less then 2 weeks from Christmas and I am finishing up a few more cards.  I have mailed most of my cards out because they go cross country!!  As soon as I finish up a few things we pack up and head up to Ohio for Christmas.  We spend most of our Christmases there because my brother and sister still live in my home state.  I have one other sister who lives in New York and I am hoping she will make it down to Ohio for our celebration!

Today,  I am continuing to use our little critters from the Arctic Animals release.  They can be used in so many different ways.
Design Steps:

 1.  Cut all of the pieces out of white card stock using Polar Bear Fishing die
2.  Color the pieces using your favorite markers.  I used my Copics
3.  Assemble the pieces using a fine tip quick dry glue such as Combo
4.  Place dimension square on the back or you can use dimension tape also
5.  Using the Nested Stitched Scallop Rectangle die (the largest one) cut out a piece of glitter blue card stock and a piece of water DP 3 x 4

6.  Glue the water DP to the glitter rectangle and then pop on the fishing polar bear
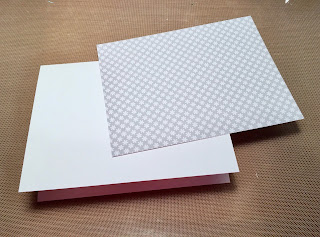
7.  For the base use a white A2 piece of heavy card stock and cut a piece of snowy DP just slightly smaller then the base.  Add the scalloped rectangle with the polar bear plus your sentiment and your card is complete
CottageCutz Products


I hope you are enjoying the days before Christmas and not letting it get to stressful.  Remember crafting is a wonderful way to relax!!

Blessings
Pam