Showing posts with label CottageCutz Fancy Victorian Frame. Show all posts

Thursday, January 23, 2020

You Moose Be Mine!

Hello Scrapping Cottage Friends

It is Pam creating with you today on the blog!  I can't believe that Valentine's Day is less then a month away!!  I am finishing up my Valentines and I also have 2 birthdays in the month of February.  My sister was born on Ground Hogs day and my brother-in-law's is just a few days later.  So on to making today's card!
Design Steps:

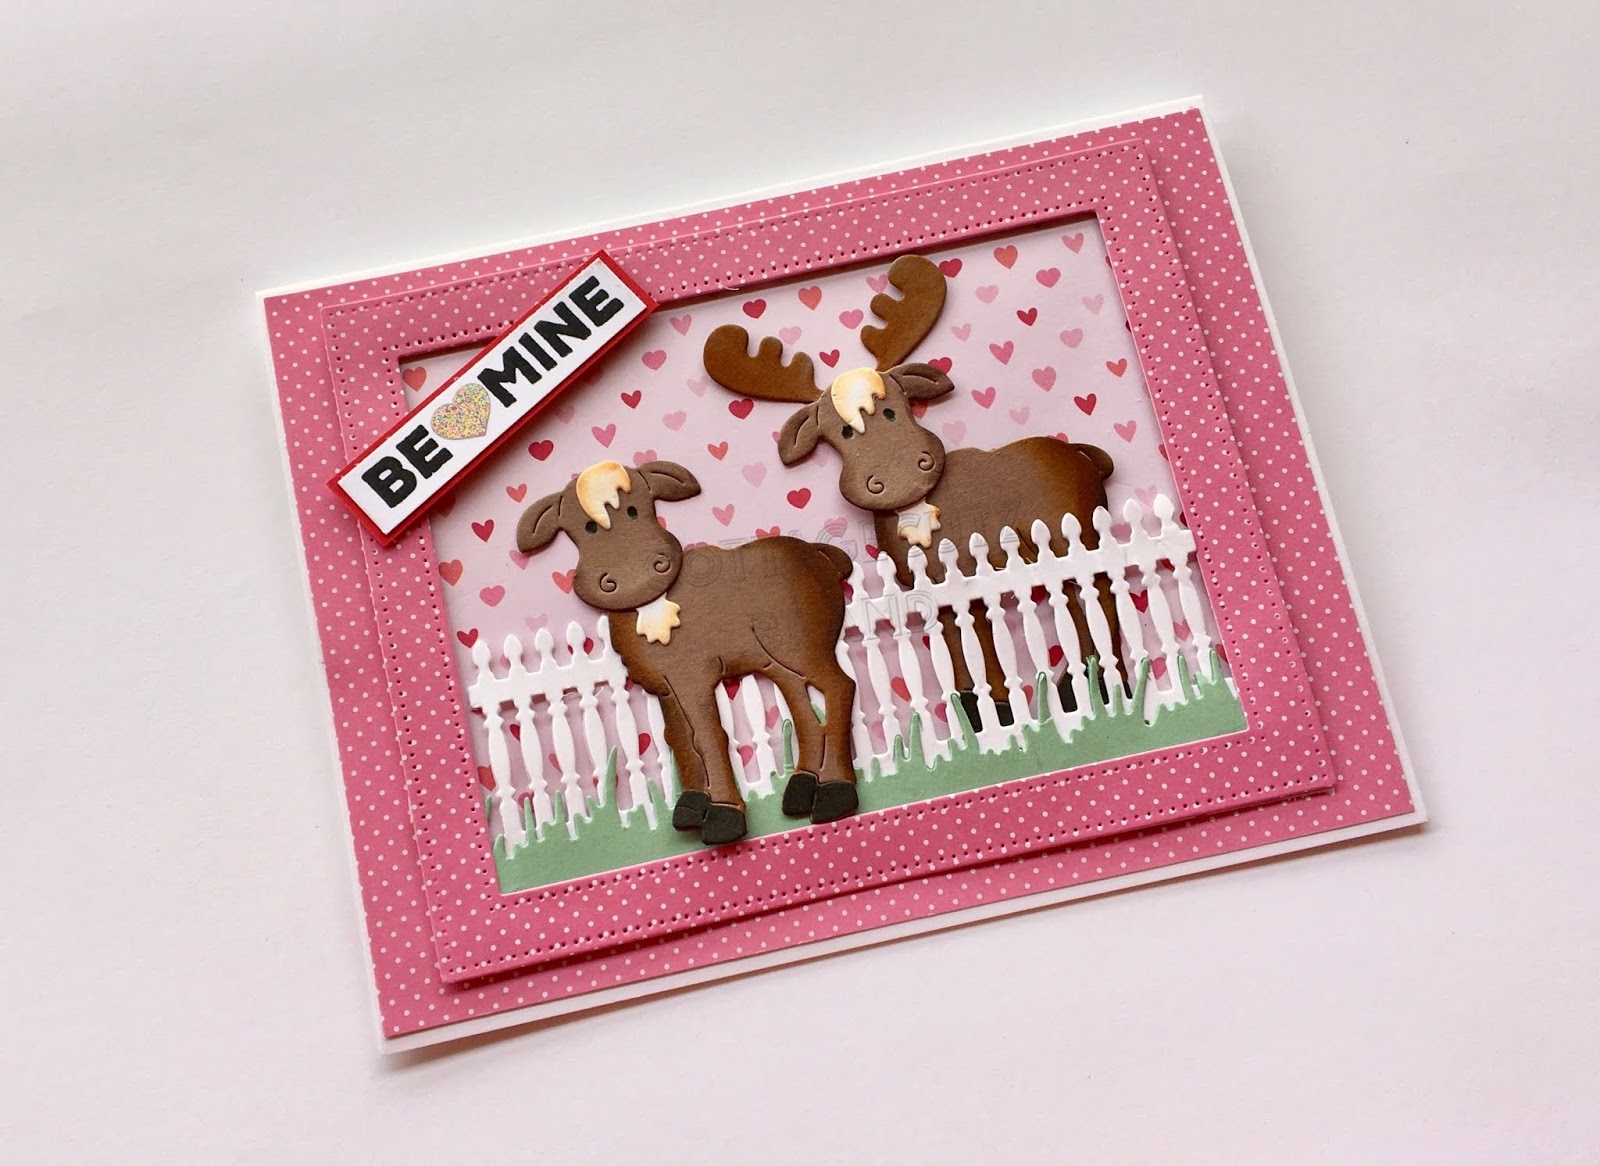
1.  Using the Arctic Moose and Polar Bear die cut out the moose in brown twice.  Then using white card stock cut out the fur under the chin and and fur on the head twice
2.  Using a dark brown and rust colored inks shade the two moose.  Add black marker to the hooves and eyes.  Then assemble the moose leaving the antlers off of the female moose
 3.  Using the Victorian Fence die cut it out of white card stock.  Using the Spring Grass die cut it out of light green card stock.  Last using some polka dot DP cut out the frame using the Stitched Wide Rectangle Frame
 4.  Behind the frame first glue the grass and then behind the grass glue down the fence

 5.  Flip the frame over and add strips of dimension tape to pop it up on the card front
6.  Glue a piece of polka dot DP to a white A2 card base.  The DP will be just slightly smaller then the card base front.  Next glue down a piece of heart DP which is the slightly smaller then the frame
7.  Next pop the frame to the card front as shown.  Add the moose the male behind the fence and the female in front of the fence.  Add the sentiment and your card is complete


CottageCutz Products


Thanks so much for stopping by today!  Hope you have fun making Valentines for your friends and family!  I love being crafty and creating new cards!
Blessings
Pam

Thursday, February 08, 2018

Bunny Love

Good Morning Scrapping Cottage Family!

It is Pam sharing with you today! Cottage Cutz has a brand new release of two collections of dies.  They are In Stitches and Spring Designs in all there are 33 new dies.  And for a limited time the new dies are 25% off!
Today, I am really excited to be sharing one of our brand new Easter dies! The die is Some Bunny Loves You!  This die is just adorable!


Design Steps:

 1.  Using the Some Bunny Loves You die cut out the bunnies in gray and the phrase and tails in white
 2.  Use TH Distress ink to add some shadows to the bunnies
 3.  Use the Spring Grass die and the Victorian Fence die to cut out the grass in green and the fence in white
 4.  Use an A2 white card base and a slightly smaller piece of green, a piece of designer paper 4 x 5 1/4 and a piece of pink DP 2 x 5 1/4
5.  Assemble the card as shown. I popped up the bunnies onto the grass

Cottage Cutz Products Used for the Card


Please make sure you stop by our store.  It is just full of awesome dies and stamps!

Blessings
Pam

Thursday, June 08, 2017

Baby Carriage!

Good Morning Scrapping Cottage Fans!

It is Pam sharing with you today!  I am using one of the new release baby dies and it is so sweet! I have been to a number of baby showers this year so it is always good to have a few cards on hand.
Here are the steps to make this adorable little card!

1.  Use an A2 white card base, cut a piece of green card stock 4 x 5 1/4.  Next cut a piece of vellum slightly smaller then the green.  Next use the large Double Stitched Rectangle die and cut a piece of purple card stock.  Then run it through a heart embossing folder
2.  Use the Baby Carriage Mini die and cut out pink, white and grey card stock to form the carriage.  Before you glue the pieces together ink the edges to add depth
3.  Cut the oval Fancy Victorian Frame and ink the edges in pink

 4.  Glue the frame to the center of the purple embossed rectangle
 5.  Attach the vellum to the green card stock.  Use dimension tape and attach the purple rectangle to the vellum

 6.  Attach the green card stock to the white card base then pop up the baby carriage and add the white bow
7.  Finally use a small Double Stitched Square die and cut a piece of white card stock.  Stamp your sentiment and add the heart rhinestones to finish the card

Cottage Cutz Products


We are now on instagram check it out here

As always thanks so much for stopping by and I hope you get crafty today!

Blessings
Pam

Friday, April 14, 2017

Layered Die Cuts Card

Hello !!!!

A very Happy Easter to all !!!
I am Anita here and for today's post , I have a layered die cut card that mainly uses different types of oval designs. You can check them out here at the store. There is a whole new range of new baby dies also now available and shipping at 25 % discount so do not miss it.

Here is my card.


To make this card, just follow the picture tutorial below.


Cut two pieces of die cut in white card stock using these dies.


Adhere each die cut together to add a little thickness to the die cut. Distress with Oxide inks


Cut a card panel 5.5 inches by 4.25 inches and emboss in an embossing folder.


Adhere the base oval die cut after distressing the embossed card panel with worn lipstick oxide ink. Distress the oval lightly with Peeled Paint  Oxide ink.


Distress more die cuts and layer them as shown using Foam tape.


Add glitter to the Songbird Die cut


Score a card base 5 inches by 6.5 inches at 1/4 inch interval on the scoring board.  Add the green ribbon. Distress with oxide ink. Add the layered card panel. Insert  a CottageCutz Victorian corner die cut at the two corners. Add the best wishes sentiment die cut. Add a bow and pearl stick pins.


I hope you liked this card. See you next Friday. Have a good day.