Showing posts with label Cottage Cutz Stitched Square set. Show all posts

Wednesday, October 25, 2023

Let Us Give Thanks

Hello CottageCutz friends! Thanks for taking the time to stop and visit with us today. It's Mary Marsh here bringing you the Wednesday edition of the Blog.

It's new release time!!! We have our Christmas 2023 release in the online store that has 40 designs. It's an old-fashioned Christmas theme. You can pick up the individual dies at 30% off for a limited time.

We also have a new Fall 2023 release in the online store with 15 designs. You can also pick up these individual dies at 30% off for a limited time.

Today for your viewing pleasure, I am featuring the new Fall Wagon Wheel, Autumn Friends (Fox) and the Fall Barrel (Sunflowers) dies and I created a Thanksgiving card. So, let's get started with some details of how I created my card. 

Design Steps:

I started my card this week using the colors from the Splitcoaststampers color challenge #791. We are to use pretty peacock, crushed curry and cajun craze for the color trio. As a plus neutrals are always allowed. 
crushed curry, pretty peacock, cajun craze

I cut my images in the challenge colors and some neutral shades. . 
I had designer paper in the pretty peacock color so I used that for my background. It's from the Stampin' Up "come to gather" collection. I stamped my Thanksgiving sentiment on the image panel in the cajun craze ink color.

Pretty Peacock card base: 4 1/4" x 5 1/2"
Designer Paper Layer: 4 1/8" x 5 3/8"
Espresso Panel: Largest Stitched Square die - 3 1/2" x 3 1/2"
Image Panel: Largest Square Set die - 3 3/8" x 3 3/8"

I am now ready to start card assembly. I attached the images to the kraft panel with clear drying glue and dimensional adhesive. 
Attached the designer paper to the card base with double sided tape.
 
To complete my card, I attached the image panel with double sided tape. I also added a pair of acorns from the Autumn friends die. I didn't like the green stem that's holding the sunflowers so very carefully I was able to lift the images and add a new stem cut in pretty peacock. I placed it over top of the green one. I like it better.
Well, that's it for me for this post. See you again next week.


Saturday, April 09, 2022

Protea for Mother's Day (new die)

                           New CottageCutz 
                   Australian Friends Release

14 New CottageCutz Designs


They are currently in the store and on sale at 30% off the individual dies. 
Hello CottageCutz friends! Thanks for taking the time to stop and visit with us today. It's Mary Marsh here bringing you the Saturday edition of the Blog.

Today for your viewing pleasure, I am featuring the new Protea die. I created a Mother's Day card for a friend. I usually send a lot of cards to my friends for Mother's Day, so this is my first one for this holiday. So, let's get started on some details of how I created my card.

Design Steps: 

I started my card by cutting the protea images. I used different shades of bright cardstock. I somewhat followed the coloring on the packaging. That's always a big help if you're undecided on what colors to use. I attached the protea image to a white square. It's the largest (3 1/2") of the Stitched Square dies.  
The card layout I used is an older sketch I had saved on my Pinterest page. Having a layout in mind is a big assist for me with cardmaking.  
Next, I selected the card colors and designer paper. I wanted something with stripes, and I found this blue pattern. I thought it works well with the shades of pink I used for the protea. I decided to use a blue ribbon to act as a divider between the panels. 

White Card Base: 4 1/4" x 5 1/2"
Designer Paper Layer: 4" x 2 1/2"
I stamped my Mother's Day sentiment directly on the flower vase. 
Now that my elements are prepared, I am ready to start card assembly. I attached the designer paper and the ribbon with double sided tape. I took the ribbon to the inside of the card, and I will add another layer of cardstock inside to cover the ribbon. 
I attached the image panel with double sided tape. I layered this panel with a bright pink cardstock. It measures 3 5/8" square.  I also scattered a few bright pink enamel dots.
I decided to add another sentiment to finish off my card. I used the Wishes w/Shadow sentiment and cut it in 2 shades of pink. I decided to rotate the enamel dots from squares to diamond shapes. I moved them around and added to additional to highlight the wishes phrase. 
  
Well, that's it for me for this week. I hope I have given you an idea for a way to use this new die. See you next Saturday. 

dies I used to create card:


Saturday, September 04, 2021

Pet Sympathy Card

Hello Scrapping Cottage friends! Thanks for taking the time to stop and visit with us today. It's Mary Marsh here bringing you the Saturday edition of the Blog.

IT'S NEW RELEASE TIME! The Scrapping Cottage has just added a new brand to the company line. Lil' Bluebird Designs is being introduced with 16 new Photopolymer Clear Stamp Sets and 16 coordinating dies. There are stamps for so many of your card making occasions and then some. The coordinating dies just make it a perfect fit for your card making designs.

They are currently on sale at  25% off.

And speaking of new releases, we have just introduced new CottageCutz Sentiments with Shadows. There are 12 phrases in this new release and you can pick these up at a 25% off price as well.
The shadow dies are so popular right now and they coordinate so well with the new Lil' Bluebird Stamps and dies.

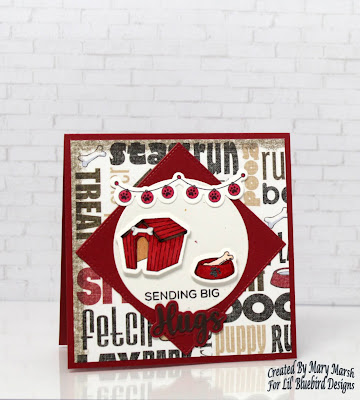
Today for your viewing pleasure I am featuring the new Puppy Love Stamp & Die Set + Hugs w/Shadow die. I used the set to create a pet sympathy card. I never seem to have one of these cards on hand when a friend or family member loses a pet. So let's get started with some details on how I created my card. 

Design Steps:
Having a layout in mind at the card start is always a big boost for me. That way I can just choose the card colors and designer paper, and I am good to go. I liked this week's Sketch #869 from Splitcoaststampers. I thought it was a great layout to use several of the stamps.
I found this dog themed paper in my collection. I liked all the "dog" words and the distressed appeal of the paper. Even with the diamond shape you can still read though a lot of the words. 

Maraschino red card base: 4 3/4" square
Designer Paper Layer: 4 1/2" square
Diamond Layer (Element 2) - 2nd largest Stitched Square die 
Circle Layer: 3rd largest Circle Set 
Next, I stamped and colored the images from the set that I was using for my card.
I cut my Hugs sentiment from the maraschino & a dark brown cardstock.
I used the following Copic markers and Prismacolor pencils for my color medium. 

I used a stamp that had the words "sending big" and stamped that in the circle. Used my MISTI just in case a double inking was required and it was. 
Now I am ready to start card assembly. I attached the card layers with double sided tape. 
To finish off my card front, I attached the images with dimensional adhesive. The "hugs" phrase is attached with glue dots. 

To complete the inside, I stamped a pet sympathy sentiment. I used the paw print from this stamp set just for a little added interest. 
And that's my card for this week. I hope I have given you another idea of a different way to use these new stamps and dies. Sometimes you just have to think "out of the box". See you next Saturday. 


Stamps & Dies I used to create card:


Saturday, July 31, 2021

Whisking You a Happy Day (new stamps & die)

Hello Scrapping Cottage friends! Thanks for taking the time to stop and visit with us today. It's Mary Marsh here bringing you the Saturday edition of the Blog.

IT'S NEW RELEASE TIME! The Scrapping Cottage has just added a new brand to the company line. Lil' Bluebird Designs is being introduced with 16 new Photopolymer Clear Stamp Sets and 16 coordinating dies. There are stamps for so many of your card making occasions and then some. The coordinating dies just make it a perfect fit for your card making designs. 

Today for your viewing pleasure I am featuring the new In the Kitchen stamp & Coordinating die set. I created a birthday card for my next door neighbor who is an avid baker and shares many of her creations with my hubby and I. A card using these new stamps would be perfect for her. So let's get started with some details on how I created my card.

Design Steps:

I started my card by stamping and coloring the images. The coordinating dies made it so easy to cut the images.  
I used a combination of alcohol markers and Prismacolor pencils as my coloring medium. The photo below shows the markers and pencils I used. 
Before I started card assembly, I stamped the sentiment from the stamp set. I used my MISTI just in case a double inking was needed. 
Once that was done I put together my card layout. I wanted to use designer paper for the background images but I didn't have paper that wasn't overpowering the images. Then I happened to notice some washi tape that I had. So I covered a panel of white cardstock with the tape. I used the 3rd largest Double Stitched Rectangle die and the 4th largest Stitched Square die and cut from the washi tape panel I created. 
Now I am ready to start card assembly. I attached the images to the washi tape panels with glue dots and the panels to the image base with double sided tape. The vanilla image panel is 4 1/8" x 5 3/8".
To complete my card, I added a mint green card base 4 1/4" x 5 1/2" and scattered a few mint green enamel dots. 
And that's it for me for this post. I hope I have given you an idea for this new stamp & die set. Many more samples coming from the DT next week. See you again next Saturday. 

Stamps & Dies I used to create card: