Showing posts with label Clown with Balloons. Show all posts

Sunday, May 23, 2021

Happy Birthday

Hi!

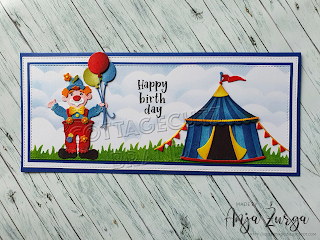
It's Anja here. I have a circus themed card for you today. 

For this card I used:

- Cottage Cutz dies (Clown with Balloons, Circus Tent, Nested Stitched Rectangles Slimline, Grass Slimline, Clouds Slimline),

- Distress Inks,

- dark blue card stock for card base (9,5x22 cm) and background (8x20,5 cm),

- white card stock for die cuts, 

- black pigment ink,

- sentiment stamp,

- acrylic block,

- paper glue. 


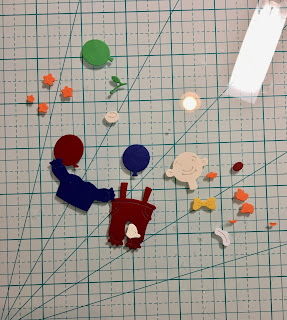
First I cut and colored the tent and the clown.

Next I cut background paper and made paper stencils for the grass and the clouds. I colored the background paper with Distress Inks. 

I cut additional papers for the background. I made the card base from dark blue card stock.

I added the sentiment to the middle of the background.


I adhered all the layers to the card base and my card was done. 


That's all form me for today. Have a nice Sunday and see you again on next week. 

Anja Z.


Cottage Cutz dies I used:


Saturday, May 22, 2021

Happy Birthday from the Circus Animals

Hello Scrapping Cottage friends! Thanks for taking the time to stop and visit with us today. It's Mary Marsh here bringing you the Saturday edition of the Blog.

We have a brand new release of dies in the online store. Your slimline cardmaking is going to get a lot easier. We have 9 Slimline designs and they are on a 25% off sale. These are wonderful, basic dies that should be a part of every card maker's collection especially if you are liking the new slimline style.

Today for your viewing pleasure I have a slimline birthday card using the Circus Train Animal dies + the Scalloped Stitched Rectangle Slimline die. 
I have a lot of nieces and nephews with young ones and I always seem to need a kids birthday card. These animals are perfect for a kids card. So let's get started on some details of how I created my card.

Design Steps:
I started my card this week with the layout. I saw this sketch #854 on Splitcoaststampers and I thought the layout would work well for the dies I am using. 
Next, I selected the background designer paper. I wanted something fun and found this bright dotted paper.
I cut it with the largest Scalloped Stitched Rectangle Slimline (3 1/4" x 8 1/4") die. The card base is at 6 1/2" x 8 1/4" and then scored at 3 1/4". I used pacific point cardstock (royal blue) cardstock. 
Then, I cut my animal images. The designer paper colors of blue, rose red and yellow would work for the hats and neck scarves the circus animals are wearing. I used different colors of cardstock to cut the animals. You could also cut in white and color with any medium you like i.e. Copic markers, Prismacolors pencils or distress inks. I forgot to take a photo of this step (lol)!

For element 3 of the sketch I used the largest Scalloped Circle die and then cut a portion off the bottom to give it a straight edge. I stamped my sentiment in pacific point ink. It's a long one line sentiment but with the help of my MISTI, I stamped on 2 lines. 
I started the assembly of my card. For element 2 of the sketch I cut another piece of pacific point designer paper 1" x 8", I attached the circle with double sided tape and then secured to the designer paper panel.  
Then I attached three of the Circus Animals in the circle using dimensional adhesive. The seal is attached in the corner for element 4 of the sketch. Instead of him balancing a ball, I have him holding a balloon. It's cut from the Clown with Balloons die. 
To finish off my card, I attached the image panel to the card base with double sided tape. For the 2nd  instance of element 4, I cut a spray of stars from the Circus Side Show die and attached to the right corner. I thought the middle looked empty so I added some rose red enamel dots. 

And that's it for me for this week. I will be back on Tuesday for our Throwback Tuesday post. See you then.

Dies I used to create card:


Wednesday, February 03, 2021

Big Top Wishes!

Hello!  This is Sukie and I have a fun and festive project to share.  I'm using the new Circus dies on this birthday card!  

I went with a bold color palette for this card using the packaging of the die sets as a guide.  I put together the Clown with Car using card stock and added a bouquet of balloons in his hand from the Clown with Balloons.  I also cut out a Stitched Wide Rectangle Frame in lime green card stock.
I found the bright and cheery paper in my stash, it added an extra pop of color to my card. The sentiment was such a fun play on words I couldn't resist using it for my card.
A coordinating strip of card stock was adhered in the center of my card base to break up the patterned paper.
Next, I created the frame for my card by simply layering the sentiment panel underneath the rectangle die cut.
The frame was adhered on my card base leaving just a few areas of the patterned paper to peak through.
The adorable clown car was nestled inside the frame.  I used the bottom of the frame as a guide to align the car.
The adorable card will be perfect for my little nieces birthday, I know it will bring a smile to her face!
Here are the die sets used on my card, available in the store:

Thursday, January 21, 2021

Birthday Clown

Hello Friends

Today,  I am continuing to make my 2021 cards.  And I wanted to do a shaker so I decided to use the happy little clown with the handful of balloons to create a fun birthday card.


Design Steps:
1.  Use a white A2 card base cut a piece of white card stock 4 x 5 1/4 and then use the second from the largest Scallop Circle die to cut out the opening for the shaker.  After cutting out the hole run it through a star embossing folder.  Line the hole with double sided tape and then place a 4 x 4 piece of acetate on the tape
2.  Circle the hole with double sided foam tape add the sequins and little stars.  Add additional foam around the bottom of the card also 
3.  Cut another piece of white card stock 4 x 5 /4 and place it directly over the piece with the shaker window and then mount it to the card base
4.  Use the Clown with the Balloons die and cut out the pieces in red, blue, green, yellow, tan, white and orange card stock
5.  Using a fine tip glue and tweezers assemble the little clown with his balloons
5.  Using Happy Birthday Expressions cut out Happy Birthday twice and glue together.  Then adhere the sentiment to the front of the card
6.  Pop up the clown to the card front and the Birthday card is complete

CottageCutz Products


Thanks so much for stopping by today!  I hope you get a chance to pop into our online store and check out this latest release!  It is super fun!!

Blessings
Pam