Showing posts with label Calendar Months. Show all posts

Tuesday, March 21, 2017

Happy Easter

Hi, Janja here!

Today I share with you two Easter cards created with Spring CottageCutz collection of dies.


Supplies:
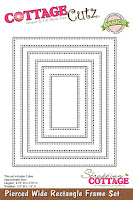
- CottageCutz dies: Easter bunny & chicks, spring bunny with flowers, build an Easter egg, stitched circle set
- white cardstock for card base
- patterned paper
- white and colored cardstock
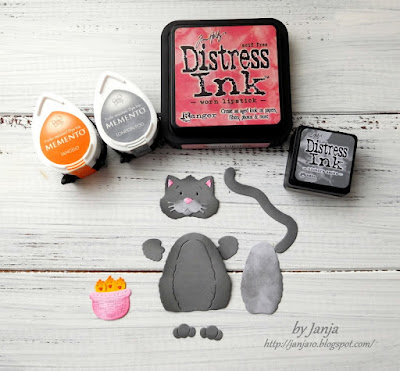
- Distress ink pad Spiced Marmalade
- Color Box pigment ink pad Frost White

Cut a circle with the largest die from the stitched circle set.
For card base, fold cardstock in half. Mount the die on cardstock, so that the upper part is slightly sticking out over the edge and cut. Glue circles to each other to obtain an easel card base.


From patterned paper also cut out two circles. Use eighth die in a row from the middle of the set. Stamp sentiment Happy Easter.


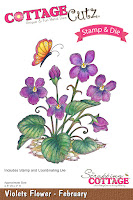
Cut out Easter bunny with chicks. Shadow all elements and compose them.


Attach patterned paper on white card base. To finish the card, attach all the elements as shown to a card base using foam pads.


On another card with kitty I added some Easter eggs. 


Supplies:
- white card base: 4.25 x 5.5" (10,8 x 14 cm), folded
- patterned paper: 4 x 5 " (10,2 x 13,2 cm) 
- white and colored cardstock 

Shadow cutouts. 


Completed card.


Thank you for coming over. Have a nice day.


Tuesday, February 21, 2017

Happy Spring

Hi, Janja here!

Winter has not said its last word, but the sun is already showing its charm.
Today I share with you two cards with the spring flowers.


Supplies:
- CottageCutz set of stamps and dies: Daffodil Flower - March, Daisies Fower - April, Calendar Months, Pillow Box Plus (ladybugs), Fancy Pocket Plus (button), Stitched Square Set, Stitched Wide Square Frame Set,  Stitched Wide Rectangle Frame Set
- white and kraft card base: 5.3 x 5.3" (13,5 x 13,5 cm), folded
- patterned paper: 4.9 x 4.9" (12,5 x 12,5 cm)
- white cardstock: 4.3 x 4.3" (11 x 11 cm)
- patterned paper: 4.8 x 2.2" (12,1 x 5,6 cm)
- white and colored cardstock
- watercolor paper
- Distress ink: Antique Linen, Mustard Seed, Scattered Straw, Wild Honey, Rusty Hinge, Tumbled Glass, Broken China, Twisted Citron, Mowed Lawn, Peeled Paint
- Memento ink: Desert Sand
- liquid pearls: buttercup
- string

Stamp flowers on watercolor paper and color them. Mine are colored with Distress inks.


When coloring is completed, shadow both backgrounds with Antique Linen Distress ink and stamp partly old letter writing.


Cut out the part of frame with a die. Color it with Distress inks.


Cut out March sign with calendar months die. Also, cut out a square frame from kraft cardstock, and another square of white cardstock.


Start by assembling the card. Add a white square on the card front. On the remainding card base add small buttercup dots.


Fix frame and tape, which is cut with scissors to the half.


When the card is completed, it seemed to me that something is missing. I added a button and a bow.


For another card I used a patterned paper.


Add a sentiment and cut out two ladybugs.


That's all for today. Thank you for coming over. 


Saturday, February 11, 2017

February Violets + Colored Pencil technique


Hello Scrapping Cottage friends! Thanks for taking the time to stop and visit today. It's Mary Marsh here bringing you the Saturday edition of the Blog.

We have some fabulous new stamp & die combo sets released. Today for your viewing pleasure I am featuring one of the new Birthday Flowers sets. This one is the Violets Flower - February.  Not only is it a stamp but it has a matching die. So let's get started on how I created my card.

Purple Card Base: 5 1/8" x 4"
Wide Rectangle Frame: 4 3/4" x 3 3/4"
Kraft Image Panel: 4 5/8" x 3 5/8"

For this week's card, I wanted to use Prismacolor pencils to color my image on Kraft cardstock. I  stamped the Violet's image with white pigment ink. I set it aside to dry for a few hours or you could speed up the process with your heat tool.

For my next step I gathered up the Prismacolor pencils I wanted to use. I chose 2 different shades of purple pencils (PC932 & PC1008) for the flowers and 2 shades of green pencils (PC109 & PC989) for the leaves and stems. On the centers I used a yellow (PC916) and an orange pencil (PC1002).
What I like about this technique is that after you color the image the white pigment ink is still there and gives your image that little pop. I used the lighter purple pencil to color the flower and then the darker to add shading. The darker pencils give it depth and define the flower. I did the same with the leaves.

It really produces a soft look by stamping on the kraft cardstock and then using the colored pencils. You definitely should give this technique a try.
Once the image was colored, I decided to cut a rectangle frame in white cardstock and use the new Calendar Months die to cut out February. I thought this would be a nice card to send to someone special to let them know you are thinking about them. Come February we are getting tired of winter and a handmade card always brightens someone's spirits.

The final step before assembling my card was to step the sentiment. I like to use my MISTI tool with clear stamps in case you don't get a good image the first time. With this tool you just re-ink your stamp and try again.  I used a chocolate ink for my sentiment because the card look is so soft. I thought black was a bit too stark.
 
 
To assemble the card, I used double sided tape to secure the layers together and Ranger multi-matte medium to secure the February die cut at the top of the card. 
 
Well, that's it for me for this week. I hope I have inspired you to pull out your colored pencils and give this technique a try. So until next time.........inky hugs!!!
 
 
http://www.scrappingcottage.com/cottagecutzviolets-februarystampanddie.aspx
 
http://www.scrappingcottage.com/cottagecutzcalendarmonths.aspx
http://www.scrappingcottage.com/search.aspx?find=pierced+wide+rectangle