Showing posts with label Calendar Icons. Show all posts

Monday, September 04, 2017

Haunted Mansion


Hi, Lois here.  I hope you are enjoying this long Labor Day weekend.  Now that September has arrived, Halloween is just around the corner.  CottageCutz has some new, really cute Halloween dies.  My card today uses one of them, as well as a couple of older dies.  The name of the Halloween die brings memories of many trips to Disney World -- Haunted Mansion.


I usually start a card by cutting the card base and mats, but this was Halloween -- why not mix it up!  This die has many small pieces to it.  I first ran the die through my Big Shot using gray cardstock.  I was able to color many of the gray pieces with various Copic markers.  Some pieces, like the ghost and the insides of the windows had to be cut from white cardstock because the gray was too dark.


So now I was ready to gather my card base pieces.  I have an old patterned paper pad made up of photographs.  One of the photos is of a dark night sky.  That's the one I used for my spooky house.


I cut a strip of the green to form the ground and constructed my card base.  You can just about see the outlines of the spooky-looking trees in the background.


I decided  to use the photo on the die packaging as a guide for constructing my house.  And the jack-o-lantern is from the Calendar Icons die.  I placed a small piece of yellow cardstock behind his face.


Now I was ready to complete my card.  The trees are from another CottageCutz die called Campsite Clothesline.   And don't look too closely -- I forgot to include the spider webs on the front of the house.  It was too late when I discovered that!  But I did stamp a small sentiment and placed it on a "sign" in front of my house.


The Haunted Mansion die, as well as other Halloween dies and several new series of Christmas dies, will be available for purchase in the CottageCutz store starting September 20th.  Because of the support of our wonderful customers, it has become necessary to move into a larger warehouse.  Because of the move, the store is temporarily on hold.  But that gives you lots of time to decide what you want next!  LOL!

CottageCutz dies used on my card are:


http://www.scrappingcottage.com/cottagecutzcamptfireclothesline.aspx


http://www.scrappingcottage.com/cottagecutzcalendaricons.aspx


Tuesday, March 28, 2017

Easter basket

Hi everyone, Janja here!

Spring is here, and with it the upcoming Easter holidays, which offer us great opportunities for creativity.
For Easter card I used three CottageCutz dies. Two older and one from this year's release.
Let's see how it is made.


Supplies:
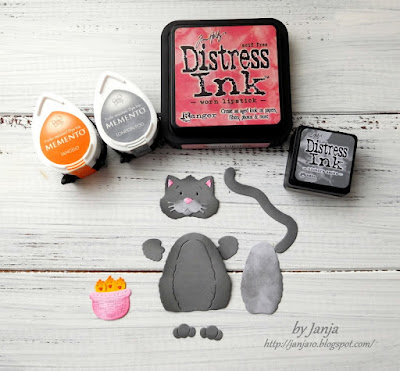
- CottageCutz dies: Calendar Icons (eggs), Sweet Spring Kitty (basket), Fancy Victorian Frame
- white card base: 5.3 x 5.3" (13,5 x 13,5cm), folded
- corrugated cardstock: 5 x 5" (12,7 x 12,7 cm)
- patterned paper: 4.5 x 4.5" (11,4 x 11,4 cm)
- white and colored cardstock
- Distress ink pads: Worn Lipstick, Dusty Concord, Mowed Lawn, Vintage Photo
- Memento ink pads: Dandelion, London Fog
- ColorBox Frost White

First, we prepare cutouts: basket, Easter eggs and flowers. Shadow all the elements, and shape them.


Trim corrugated cardstock. Here and there apply white paint with a sponge.


Mount patterned paper on corrugated cardstock with double-sided adhesive tape.


Cut out a part of frame that will be used for decoration in the upper right corner.


With glue and self-adhesive foam pads fasten basket on the background and arrange flowers.


Thank you for joining me today. See you again next Tuesday.


Tuesday, March 21, 2017

Happy Easter

Hi, Janja here!

Today I share with you two Easter cards created with Spring CottageCutz collection of dies.


Supplies:
- CottageCutz dies: Easter bunny & chicks, spring bunny with flowers, build an Easter egg, stitched circle set
- white cardstock for card base
- patterned paper
- white and colored cardstock
- Distress ink pad Spiced Marmalade
- Color Box pigment ink pad Frost White

Cut a circle with the largest die from the stitched circle set.
For card base, fold cardstock in half. Mount the die on cardstock, so that the upper part is slightly sticking out over the edge and cut. Glue circles to each other to obtain an easel card base.


From patterned paper also cut out two circles. Use eighth die in a row from the middle of the set. Stamp sentiment Happy Easter.


Cut out Easter bunny with chicks. Shadow all elements and compose them.


Attach patterned paper on white card base. To finish the card, attach all the elements as shown to a card base using foam pads.


On another card with kitty I added some Easter eggs. 


Supplies:
- white card base: 4.25 x 5.5" (10,8 x 14 cm), folded
- patterned paper: 4 x 5 " (10,2 x 13,2 cm) 
- white and colored cardstock 

Shadow cutouts. 


Completed card.


Thank you for coming over. Have a nice day.


Monday, February 20, 2017

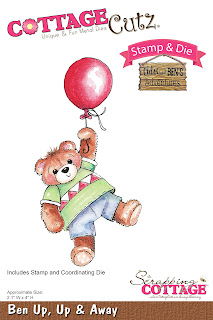
Ben Up, Up and Away

Lois here today with a card I made using one of the new Chloe and Ben die/stamp sets.  I decided that I wanted to make another card using the layout from last week's Sketch Challenge on Splitcoaststampers, using Ben Up, Up and Away.

Here is the layout from the challenge. . .


. . . and here is my card:


Supplies for my card are:

Red cardstock - 5 1/2" x 8 1/2", folded in half at 4 1/4", three small panels 1" x 1 1/4", scrap for label
White cardstock - three small panels 7/8" x 1 1/8", scraps for Ben and label
Red/white polka dot patterned paper - 5 1/4" x 4"
Scraps of blue, red, green cardstock for balloons
Ink - Memento Tuxedo Black and Lady Bug
Copic markers and White gel pen
Copic Colorless Blender
Word Window punch and Modern Label punch
Foam pop dots, tape runner
CottageCutz dies - Ben Up, Up and Away; Calendar Icons

To begin my card, I die-cut three balloons from the Calendar Icons die, coloring the strings with a black Copic marker.  I then stamped, colored and die-cut Ben.  A little hint for getting the "fuzzy" look to Ben's fur.  After coloring his fur (but before coloring anything else), squeeze a little bit of Colorless Blender onto a piece of terrycloth.  Gently dab it onto the fur.  This will remove some of the color in places, giving it an uneven look.  Should the ink bleed into the white areas, you can "repair" that by dabbing on the white gel pen after the ink is completely dry.  I had to do that around his feet.


After cutting the small red and white panels, I assembled them by gluing the white panels to the red panels and popping the balloons in the centers with the foam pop dots.


I stamped the sentiment onto the white scrap, punched it out with the Word Window punch (as well as punching out the Modern Label from red cardstock) then assembled my card, using the layout as my guide.  It went together quite quickly.  Here again is my completed card.


The CottageCutz dies used on my card are:


Tuesday, January 31, 2017

Flip Calendar - Part 1

Hi, Lois here today.  I was really excited when I saw that CottageCutz was making dies with coordinating stamps.  I've created a project that will cover my next three blog posts.  As you may or may not know, I love making 3-D projects as well as cards.  When I saw two of the dies from the CottageCutz Valentines 2017 release (Calendar Months and Calendar Icons), I immediately knew that I wanted to make a calendar of some sort.  My idea solidified itself after I saw the new stamp/die sets being released.  Here is a photo of my finished project.  My follow-up posts will explain how I made it.


Supplies for today’s post:
Cardstock – white, various colors based on choice of patterned paper
Patterned Paper – DCWV All Seasons 12” x 12” pack
Small monthly calendars or Excel spreadsheet software
CottageCutz dies – Calendar Months, Calendar Icons, Double StitchedRectangles


To start my calendar, I die-cut the months of the year and the icons.  I cut the icons from white cardstock and colored them appropriately with markers.  In addition, I cut a white panel using the largest Double Stitched Rectangles die.


I created a calendar for each month using Excel, cut it out as well as the background cardstock and appropriate patterned paper for each month.  The color scheme of the patterned paper determined the color of the base cardstock.  The photo here is for the month of January.  Each page of the calendar was created in a similar manner.


After adhering the panels onto the blue background panel, I adhered it to a 5 ½” x 7 ¼” white panel.  Each calendar page is two-sided so that the final calendar has six panels (January/December, February/November, March/October, April/September, May/August, June/July).


In my next post, I'll show how I made the scenes on the individual months.

Dies used on today's post are: