Showing posts with label Busy Bee. Show all posts

Sunday, April 19, 2020

Hello Tags

Hi!

It's Anja here. For today's post I made cute little hello tags. I used different "bugs" dies to make a trio of Spring tags.


For this project I used:
- Cottage Cutz dies (Busy Bee, Doodle Bugs, Mail Tag Set, Dogwood Branch),
- patterned, colored (black, red, yellow, green, turquoise) and white card stock for die cuts, 
- black pen,
- Wink of Stella glitter brush,
- liquid pearls (black and yellow),
- pieces of ribbon,
- embossing mat,
- embossing tool,
- paper glue.

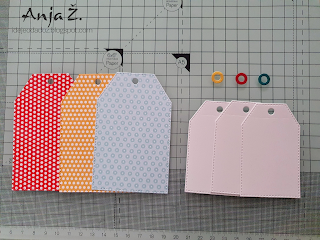
First I cut the tags. I used white cardstock for smaller tags and patterned card stock for bigger tags.


Next I cut hello phrases and the bugs.


I used black pen for the eyes and glitter brush for the wings to add more interest.


Then I cut the branches and the flowers. I cut two bigger and two smaller flowers of each color.


Then I embossed the leaves and the flowers using the embossing tool and mat.


When I had all the pieces ready I assembled the tags together. When flowers were on its place, I added a bit of liquid pearls in the center of each flower. I let it dry.


When the tags were finished I just added the ribbon. I used two types of ribbon for each tag.


Before I go, I just want to invite you to the store to check out all the new dies from the Gardening release. Can't wait to start using them.

Have a nice Sunday and see you again next week.

Anja Z.


Cottage Cutz dies I used:


Thursday, March 19, 2020

Buzzzzy Bee!

Hello Scrapping Cottage Friends

It is Pam sharing with you on the blog today.
In South Carolina all the Azaleas are beginning to bloom!  The pink, white and red flowers are gorgeous.  Along with the flowers comes the bees.  So with that being said this wonderful time of the year is my inspiration for this cute card.

Design Steps:
1.   Using the Busy Bee die cut out the pieces in white,  yellow, and black card stock

2.  Use a clear Wink of Stella to give the wings some shimmer
 3.  Shade the bee parts and then assemble.  Use tiny rhinestones for the bee's eyes
 4.  Cut out a black oval using the Scalloped Oval second from the largest.  Cut out a DP oval using the Pierced Oval die.  Use an A2 white card stock base, a piece of yellow card stock just slightly smaller then the card front by an 1/8 inch,  next cut a striped black and white piece of DP 4 x 5 1/4
 5.  Using the Spring Blooms die cut out 3 yellow flowers and 2 green leaves. Shade the flowers
6.  Glue the striped black and white DP to the yellow card stock.  Glue the black oval down and then the DP oval. Next add the black ribbon and then mount to the card base

7.    Pop up the bee and the flowers and add the rhinestones

CottageCutz


Hope things are going well for you and just think Spring is almost here!!
Blessings
Pam

Wednesday, February 12, 2020

You Are My Honey

Hello! This is Sukie and today I'm sharing this adorable card for my design team post. My card was created with the Busy Bee die from the new release of Spring dies which are currently on sale.
This card was inspired by a selection of fun papers in my stash.  Once I selected my papers I went with a sweet card which can be used for Valentine's Day or as an anniversary card.
The Busy Bee die was used for the 2 bees and then I went with a few of the basic dies (Nested Stitched Scallop Rectangle, Nested Stitched Scallop Circle and Stitched Circle) for my card background.
In preparation of my card pieces, I stamped the sentiment inside the circle.  I also hand cut a little flag to use as an embellishment on my card.
I layered a solid black card base with the patterned paper background.  Next I added the 2 pieces cut with the Nested Stitched Scallop Rectangle die set on top.
The white circle was nested inside the scallop circle and the set of circles were adhered on my card base.
I popped up the bees on some foam dots for added dimension.  The two bees surrounded the sentiment circle and the flag was added as a finishing touch.
Here are the dies used on my card, available in the store:

Saturday, February 01, 2020

Bee My Valentine (new die)

Hello Scrapping Cottage friends! Thanks for taking the time to stop and visit with us today. It's Mary Marsh here bringing you the Saturday day edition of the Blog. 

We have a new release of Spring dies, and they are in the online store and 25% off for a limited time. There are 27 new dies in the release and each one is cuter than the next. They will be perfect for your Easter and Spring card making. The DT will be showing more samples in the weeks to come.  Today, I am featuring the new Busy Bee die. I made a Valentine card with it.

So let's get started with some details on how I created this card.

Design Steps:

I started off by choosing my designer paper. I decided to stick with traditional Valentine colors for this card and I wanted some heart paper. I found this one in my collection that I thought would work. The hearts are small enough and once I added my die cut hearts it wouldn't overpower the image.

Red Card Base: 4 1/4" x 5 1/2"
Designer Paper Layer: 4 1/8" x 5 3/8"

Next, I cut the bee image in normal bee colors- black and yellow. I used vellum for the wings and sponged them with tumbled glass distress inks.
The large red heart is from the Be My Valentine Puppies and the white heart from the Stitched Heart set.

I wanted a "punny" sentiment for my card. I had this "bee happy" stamp. So I masked off the happy word and with the help of my stamp-a-ma-jig I stamped just the "bee" word in the corner of my heart with black ink. To make it stand out I stamped in black onyx ink and then embossed with a black embossing powder.
To finish off my sentiment, I used just the "my valentine" phrase from the Be My Valentine Puppies die and cut in black cardstock. When I started card assembly I decided to recut this phrase in a shiny black foil to make it stand out like the stamped sentiment.
I also cut a 1 1/2" wide strip of black cardstock and embossed it with a heart folder. Just wanted to get some other color on the card besides the red and white.

I am now ready to start card assembly.  I attached the black embossed strip to the designer paper with double sided tape. For the red heart I used dimensional adhesive and the white heart is attached with double sided tape. This photo shows the strip cut at 1" but it wasn't wide enough when I started card assembly.
Next, I added the bee using dimensional adhesive. The "my valentine" phrase is attached with Ranger multi medium matte. My camera wasn't cooperating on this photo. The "bee" word is embossed but it looks light and faded in this photo. IRL it's a solid black. 
To finish off my card. I added the image panel to the red card base and then scattered a few red hearts for added interest.

Well, that's it for me for this post. See you next Saturday.

dies I used to create card: