Showing posts with label Bunny with Butterfly. Show all posts

Monday, February 06, 2023

So BLOOMIN' Sweet

Hello sweet friends!

Kris here with a Springy card for someone 'So Bloomin' Sweet'!

My card today uses 3 brand new dies from the "Flowers & More" Release!  For a limited time, the whole bundle is 50% OFF!!  Or, if you want to choose individual dies, they are 30% off!  ☺ 

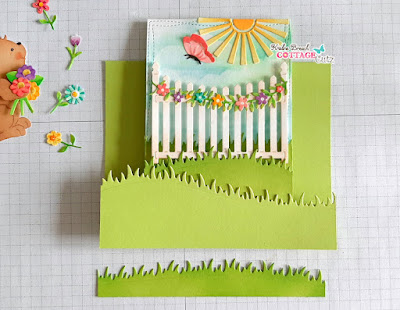
Center Step Fold Card
When folded, this card will be a 5-1/2" square


How to Make It

Photo reference for cutting/scoring your base.  
BLACK lines = CUT  \  RED dashes = SCORING
You can click on the pic to see it larger.


• Cut base at 5-1/2 x 11".  

• Put cardstock in paper trimmer VERTICALLY and line the right side up on the 1" line.  Position the blade at 1" and cut down to 6-1/2".

• We need the same cut on the parallel edge.  To do so, you can flip it over (side to side, not bottom to top) and repeat that step.  

• Turn card horizontally and score from the outside edge to the cut lines at 1", 2" and 6-1/2"

• Score between the 2 cut lines at 5-1/2"

The 2" score lines are both valley folds.  All other score lines are mountain folds ☺


• Die cut the largest die from the Nested Wacky Stitched Rectangles set from white cardstock.   If you don't have these or similar, you can cut a rectangle that is 3-1/2" x 4-1/2" - I then sponged it with clouds.

•  Die cut 4 grass borders using the Grass Slimline set from lime green cardstock.  Trim 2 of them to 3-1/2" wide, and 2 of them to 5-1/2" wide.  I sponged Mowed Lawn Distress Oxide ink to 3 of them, leaving one of the 5-1/2" wide ones a lighter green.

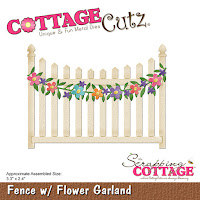
• Die cut Bunny with Butterfly |  Little Flowers |  Fence w/ Flower Garland | Arch Sun - then  color and assemble them. 


Glue the sun to the top of the cloud layer, and one of the grassy layers to the lower part.

• Add foam strips to the back of the other shorter grassy layers and pop it to the bottom of the cloud layer, overlapping the glued grass.

• Add foam strips to the back of the fence and attach it between the 2 grassy layers.

• Pop the butterfly up with a foam dot.

•  Glue that whole layer to the middle section of  card base, aligning top edges.

• Add foam strips to the bottom 1" x 5-1/2" section and attach the lightest widest grassy layer.

• Add foam strips to the bottom only of the shorter grassy section and attach to the front bottom of card. You will want to leave the top part non-glued so you can tuck flowers behind it.  

•  Glue the lower half of the bunny between the 2 bottom layers of grass and the little flowers behind each layer of grass.

-- I added some Wink of Stella to the butterfly, bunny's bouquet, and the garland flowers for some shine!


• Cut 2 patterned paper strips to 7/8" x 4-1/4" and tape to each side panel.

• Die cut sentiments and glue to bottom front of card.   -  The "Bloomin" is pieced together from the Garden Phrases.  The "SO" is from Berry Phrases.  And "Sweet" is from Sweet w/ Shadow die.


Hope your week is BLOOMIN' with creativity! 
Kristine


Products I used:


Friday, March 05, 2021

Welcome Spring!

Happy Friday!  Are you ready for the weekend?  I know I am; I think I was ready for the weekend on Tuesday!  I have a card using the Bunny with Butterfly die from the new Spring release.  This release features some adorable dies that are perfect to welcome in the sunnier days ahead.

 This card is very simple to create.  I started with a sketch from Splitcoaststampers.
 This always makes creating go a little faster.
 I cut a 5 1/2 x 4 1/4 inch panel for my card base from the bright green card stock, a 4 x 5 1/4 inch panel from a coordinating paper and a white panel using the third largest of the Stitched Rectangle Dies.

I glued the paper to the base panel and added a ribbon.  Tying that bow was the most difficult part of the card for me!  LOL!  (Confession - I'm not good at tying bows.)

I cut the bunny, flowers and butterfly from various colors of coordinating scraps using the Bunny with Butterfly die.  For the bunny I used a sponge dauber and Distress Oxide Vintage Photo to edge her a bit - just enough to give some depth.

I adhered her to the white rectangle and popped that up from the base using foam strips.

For my sentiment I used an older die - Hello Spring Bloom.  The purple that matched my ribbon seemed too dark and the white was a bit light and blended in too much with the background, so I decided to stack them.  I used two layers of the purple below the white.

That gave just enough "shadow" to make the sentiment visible but not overpowering.

I hope you have enjoyed my card today.  It was quick to put together (other than that bow!) and the bunny is adorable and so ready for spring.  Be sure to visit the online store where the new Spring release is on sale for a limited time!

Products used:


Thanks for visiting today.  I hope you have a fun and creative weekend!