Showing posts with label Bunny w/ Butterfly. Show all posts

Monday, March 20, 2023

Hexagon Pop Up Easter Card


Welcome CottageCutz peeps!

Kris here with some Monday inspiration for you.  My card today is an easy Hexagon Pop Up card featuring some cute Easter dies and more!  This style of card was a li'l harder to photograph, but it's pretty cute when displayed and squishes flat-ish to fit into an envelope.  

I will share my design steps below, but if it's easier to watch a video, you can watch Sam's here.


I used heavy 100 lb cardstock for my springy mechanism that makes it pop out to its hexagon shape, and if you do not burnish the folds, it pops out even more!  However, this also causes the front panel to lean backwards more.  If I had used a lighter weight like an 80 lb. it might stand up more, but then the hexagon would be more wide than deep.  You'll get that idea once you make one.


I've listed & linked all products at end of post.

DESIGN STEPS:

1)   I began with the base of my card that forms the hexagon shape by cutting (2) strips of 2" x 6-1/2" white cardstock and scored at 2", 4", and 6". Mitered the corners of the li'l 1/2" tab on the end. Then I added (3) 1-3/4" squares of patterned paper onto just one of the strips as shown.


2)  I added glue to both 1/2" tabs and glued one tab to a non-tabbed end of the other piece to form a hexagon as pictured.


3) I cut a piece of white cardstock to 2" x 8" and scored at 2", 4", and 6" - fold and burnish score lines. I don't have a photo of this, but add glue to the 2 end sections (the first 2" and then between 6-8") and with it folded in half, insert into base so that it's attached to the center panel of the FRONT of hexagon base and to the center BACK of hexagon base.

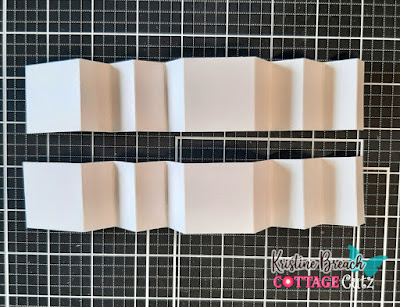
4)  Next, I cut the pieces for the springy mechanism.  Cut (2) strips of 1-1/2" x 9-1/2" and score both strips at 1/2", 1-1/4", 2", 2-3/4", 3-1/2", 5" 5-3/4", 6-1/2", 7-1/4", 8" - Accordion fold as pictured below, but DO NOT BURNISH the folds as it won't pop out as much if you do.  


5)  I glued the small tabs to the opposite end of each strip to make this shape...


6)  Then glue the two together.


7)  Add glue to each of the square ends and insert into the base of the hexagon piece.

8)  I cut my pieces for my main image panel....
--- 4" square from white cardstock.
--- purple patterned paper using the 2nd largest Nested Wacky Stitched Rectangles
--- 2 pieces of green patterned paper using the Grass Slimline die in varying heights
--- die cut the Bunny w/ Butterfly, Spring Bowl w/ Eggs (just eggs), Fence and Grass (just fence) and Stitched Sun, Clouds & Umbrella (just sun)


9)  I glued my purple layer to white square, then the tallest green grass, leaving the very top unattached. Then I glued and tucked the fence and an egg behind that grass.

10)  I popped up the shorter grass with foam strip and glued in the rest of the eggs.  I popped up bunny with foam tape.  I stamped my sentiment in top left corner, then glued my butterfly and sun.


11)  I added glue to the front white mechanism piece sticking up (from the hexagon base) and attached my bunny piece.  I then stamped a 2nd sentiment and attached it to the center of card base.


Here's how it looks from the side...


There's room on the back to write your message. 
 Or you can choose to add patterned paper ☺


Thank you for taking a peek!  

I hope you get crafty with your favorite CottageCutz dies!


PRODUCTS I USED:


And be sure to check out the beautiful 
NEW EASTER RELEASE 
as it's all on SALE!!


Wednesday, April 07, 2021

Blowing Wishes Your Way!

Hello!  This is Sukie and today I have a sweet card to share. The bunny dies worked perfectly for this card which I plan to use for a friend's birthday!  

Two of the die sets used on my card are from the Springtime die release; Bunny w/Butterfly and Bunnies in Pots.  I shaded the die cuts with some Oxide Inks for a soft appearance.  I also cut out a Nested Stitched Eyelet Rectangle.

I selected a patterned pink card base and cut out a rectangle with my paper trimmer and created a stenciled cloud background.  A whimsical sentiment was stamped on the rectangle.

The 2 card panels were layered for a perfect fit and then affixed to my card base.
Next, the adorable bunny was nestled inside the double rectangles.
The tiny bunny inside the pot was adhered in the empty space next to the larger bunny with the butterfly fluttering above.
Here are the die sets used on my card, available in the store:

Saturday, March 20, 2021

Some Bunny Loves You

Hello Scrapping Cottage friends! Thanks for taking the time to stop and visit with us today. It's Mary Marsh here bringing you the Saturday edition of the Blog.

We have a brand new release of dies in the online store. It's our Spring Release with 22 new designs. Everything you need to create Spring, Easter, Birthday, Mother's Day, Father's Day, Thinking of you cards and so much more.

The Design Team has been showing samples using these new dies. So if you haven't seen them check back on the blog for lots of great ideas. The dies are currently on sale at 25% off so check all the new designs in the online store for some great selections. The Safari & Circus releases are still available at 25% off as well.

Now onto my card for today. I am featuring the new Bunny w/Butterfly die and created an Easter card for the two little ones that live next door to me. So let's get started with some details on how I created my card. 

Design Steps:
 I started my card this week with my layout. I found this sketch #845 over on Splitcoaststampers and decided to use it. The layers would allow me to use designer paper to create a festive Spring card. 
I looked through my designer papers and decided on these two coordinating patterns. I used the largest Stitched Square die for layer #2 and the largest Square die for layer # 3. For the background layer #1 I found this piece of light card patterned paper. I cut it to 4 1/4" x 5 1/2" and secured it to a white card base. 
For layer # 4, I used the 3rd largest stitched rectangle die. The width was fine but the height needed to be re-sized to 1 3/4".  I forgot to take a photo during the cutting process of the designer paper. So I repeated the process for you to see with cardstock. I cut the shape first 
and then measured at the 1 3/4" mark 
and placed it back in the die and ran it through my BigShot.
Here is the finished size. 
For layer #5 I used this piece of light purple cardstock and resized it to 3/4" x 3 1/2"using the same method.  I stamped my sentiment in a grape ink on this panel using my Stamp-a-ma-jig to get the placement.  
Next, I cut the bunny and butterfly images. I used colors that complimented my designer paper.
Now that all the card elements are prepared I am ready to start assembly. I secured the gray patterned paper to the card base first with double sided tape. Next, I attached layers 2, 3 and 4 secured to the card base. 
Added the sentiment strip with double sided tape.
I attached the bunny image using dimensional adhesive. I scattered a few enamel dots to finish off this card. 
I hope I have given you an idea with the image + the sketch for this new die.  See you next Saturday!

dies I used to create card: 


Monday, March 08, 2021

You Are Awesome!

Hi!

It's Anja here. I'm back for my Monday post. I have a simple and clean card for you today to tell someone how awesome she or he is. 

For this card I used:

- Cottage Cutz dies (Cat w/ Spring Bird, Bunny w/ Butterfly),

- Distress Inks,

- white card base (15x15 cm),

- white card stock for die cuts,

- black pen,

- white pen,

- plastic stencil,

- sentiment stamp,

- acrylic block,

- paper glue. 


First I cut and colored the cat. Next I did the background. I used a plastic stencil and two shades of blue ink. I used darker shade on the bottom and lighter shade on top. I placed the cat on the colored part. Last I added the sentiment. I stamped it on another white piece of paper, cut it out and then placed it on the card base. And my card was done. Quick and easy.


Happy International Women's Day to all the women stopping by. Hope you had a lovely day. 

See you again on Sunday.

Anja Z. 


Cottage Cutz dies I used for this card: