Showing posts with label Be My Valentine Puppies. Show all posts

Monday, February 12, 2024

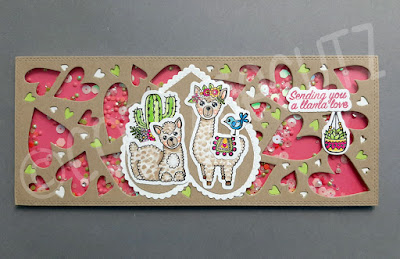
Llama Love Slimline Shaker

Happy Monday friends!

Kris here, sharing one more Valentine card idea for you!  It's a cute & punny SHAKER card!  Who doesn't love a shaker, right?!  

For this one I used the Whimsical Hearts Slimline die and the Llama Love stamps and coordinating dies from Little Bluebird Designs.  I also used the scalloped heart from Be My Valentine Puppies die.


Slimline cards can be hard to photograph, but I just had to sneak in my llama plant stand for this one!  ☺ Also, you may notice my heart focal point is upside down... but I think it totally works with the random whimsical hearts and the placement of my llamas.  However if that bothers you, feel free to turn the heart right side up.

CUTTING & SCORING:

CUT white card base at 7" x 8-1/2" and SCORE along the 7" side at 3-1/2".

CUT a backing from dark pink cardstock cut at 3-1/2" x 8-1/2" and cut a sheet of acetate the same size.

Die cut Whimsical Hearts Slimline die from Kraft c.s., // *Optional:  cut it out of White, and Lime Green c.s.. as well if you want to piece some of hearts back into the die cut front.  Set the white and green ones aside.

Die cut just the scalloped heart from Be My Valentine Puppies die from white and Kraft c.s.

DESIGN STEPS:

1.  Create a shaker by adhering the acetate to back of Kraft heart layer, then add 1/8" foam strips on top of acetate all around the outside border and a few tiny pieces in center.  Add shaker elements inside the foam strips then carefully place the dark pink backing on top, lining up the outer edges.

*Optional:  I inserted some of the white and green tiny hearts back into the die cuts, (adding glue directly to the acetate then inserting hearts.)


2.  Stamp, color and die cut as pictured using the Llama Love stamps and coordinating dies

3.  Using scissors, trim the Kraft heart on the inner stitched line as shown. 


4.  Glue the Kraft heart onto the White scalloped heart.  Turn it upside down (if you wish) and adhere the llamas and other elements as shown below. 


5.  This next part is *Optional... but I wanted a scalloped border but didn't have one larger than my Whimsical Hearts card front, so I die cut (3) of the 2nd largest Scalloped Rectangles dies (currently out of stock). 


As you can see in the finished photo, this size rectangle will leave gaps in between, so I adhered the 2 outer ones first so I could get equal amount of border around the sides, and then I added the middle one. 

*Tip:   I placed it on wax paper below because I put tape all over the back of shaker and didn't want it to stick to my table.  

6.  Adhere to card base and done!  


I hope you liked this tutorial and are inspired to create something FUN with your favorite stamps and CottageCutz dies!  

Hope you have a wonderful Valentine's or Galentine's Day friends!

~Kris


Friday, January 05, 2024

M - Fold Cat Sympathy

Hi crafters!

Kris here sharing with you a fun fold sympathy card I made for a friend who recently lost her beloved cat after a long battle of health issues.  I've used the Loyal Pets die along with the Love My Dog, Love My Cat die and the hearts are from the Be My Valentine Puppies and the Stitched Heart Set to create this Marvelous Fold card which got its name because it has an "M" shape when displayed.  


*Please pardon my bad lighting and tint of my process photos below.  Using a purple mat is not idea for photos as it changes so much and messes with the colors of my papers etc.  I've used Doodle Bug Designs 6" paper pad called Fairy Garden because I thought the rainbows go with a pet who has "crossed over the rainbow bridge."

CUTTING & SCORING:

White Card Base = 4-1/4" x 10-1/2" scored at 2-1/4", 2-1/2", 5", 5-1/2", 8" and 8-1/4"

Cloud patterned paper = 4" x 2-1/4" (x2)

Rainbow patterned paper = 4"h  x 2"w (x4)

Pink cardstock = 4" x 1/4"


DESIGN STEPS:

1.  Fold and burnish all score lines on card base as follows:

  • the 5" and 5-1/2" score lines are mountain folds and all others are valley folds

2.  Tape or glue the center strip between center score lines.  Adhere the 2-1/4" wide (cloud papers) to the middle panels, and the 2" wide (rainbow papers) to the outside panels. 


3.  Fold the outside panels in (like a gate-fold)  and attach the other 2" wide (rainbow papers) to the front panels


4.  Die cut the decorative elements as shown below and assemble.


5.  Add some foam tape in the center of pink strip and attach the heart.


6.  Top open, bend side panels back until the flaps open and stand up as shown.


A hand written message and/or stamped sentiment can be added to the back of card.


Check out our YouTube channel for more inspiration and giveaways!

Happy Crafting!

~Kristine


Wednesday, December 27, 2023

Time for Valentines

 Hello Friends 

I hope you all had a blessed time with family and friends this past Christmas. And I would like to wish you all a very Happy New Year.  We are running an after Christmas Sale in the online store right now.  So use your Christmas money and save big! Click here to see what great values we have.

I am getting a jump start on my Valentines.  I am using the Garden Butterflies and Bee die from our Black Friday release for this fun little block card.


Design Steps: (Here is a link to a video that I used to make the base https://www.pinterest.com/pin/443534263317816376/ )

1.  Start with a piece of white card stock measuring 10 x 6 3/4.  Score at 3, 4 1/2, 6, 7 1/2
2.   Fold the flap back along the 6 inch score. Place a ruler at the bottom along the fold and use a pencil to mark small dots at 1/2, 1 3/4, 2, 3 1/4, 3 1/2, 4 3/4, 5, 6 1/2
3.  Place your card into a paper cutter and cut from the dots to the closest score line as shown above
4.  When you have completed the cuts fold as shown below

5. Using the Honeycomb Background Slimline cut 2 pieces in white: 6 1/2 x 2 3/4 and 6 1/2 x 2 1/4.  Using a blending brush and a pink ink to add some color to both pieces.
6.   Using the same pink ink place some of the ink onto a acrylic block and then add a little water.  Pick up the ink with a brush.  Hold the brush over the place you want splattered and gently tap the brush with your finger
7.  Cut 6 pieces of pink card stock 1 1/4 x 1.  Glue the pink rectangles to the card as shown above
8.  Using the following dies and card stock colors: Garden Butterflies and Bee black and yellow,  Fancy Heart pink, Be My Valentine Puppies red glitter card stock and Stitched Alphabet black
9.  Arrange your pieces as shown above and add a few silver sequins and your card is complete


We have more inspiration on our YouTube Channel check it out HERE

Thanks so much for stopping by!  And I will see you next Thursday.

Blessings and Take Care


Thursday, February 02, 2023

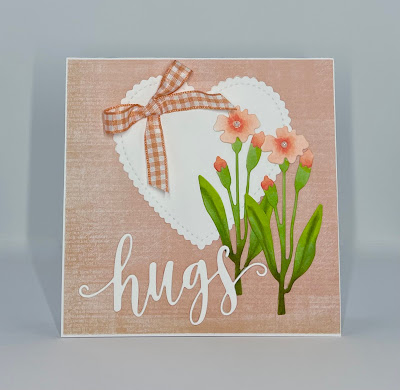
Valentine Hug - New Release

 Hello Friends

IT'S NEW RELEASE TIME!  The collection is called Flowers and More.  The whole set is on sale at a bundle price of 50% off and individual dies are at 30% off.  The unique thing about this release is that there are not as many pieces in each of the dies.  So they go together really quick and easy!

I am making one last Valentine with one of the beautiful flowers.  The flower is called Flower 4.  To me it looks like a carnation which I love.


Design Steps:

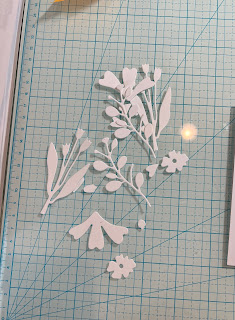
1.  I cut a couple of the flowers in white trying to decide which to use and I decided on Flower 4.
2.  Using my Copic makers I colored the flowers: G99, G94, G21, YG63 for the stems R22, R02, R01 for the flowers.  I glued them together with a fine tip glue

3.  The card base is white 5 x 5
  • cut a piece of DP 4 7/8 x 4 7/8  
  • using the Hug Phrase die cut it out of white twice then glue together
  • using the Be My Valentine Puppies die cut out the heart in white

4.  Glue the DP to the white card base.  Glue the heart to the center of the card slight toward the top as shown.  Last glue down hugs leaving the letter s with no glue until you slip in the flowers or you can glue the hugs down last

5.  Place your flowers and glue to the card as shown above

6.  Add the ribbon to the top left of the heart and add the pearls in the center of the flowers.  Your card is now complete

CottageCutz Products


Here is just a peek at the new release to see it all click HERE


We have more inspiration on our YouTube Channel check it out HERE

Thanks so much for stopping by!  And I will see you next Thursday.

Blessings and Take Care