Saturday, December 10, 2022
Baking Mice Slimline Christmas Card
Thursday, December 24, 2020
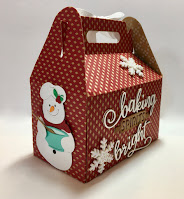
Gift Box
Hi Everyone!
It is Pam sharing on the blog today!
I am giving a few gift cards to friends this year. So I have created a little box that I can put the gift card in and add a few homemade lemon drop cookies. This little box is also perfect for any other small gift you may have in mind such as jewelry or candies. I decorated the box to make it extra special using the Baking Spirits Bright die.
Design Steps:
1. Using Baking Spirits Bright cut kraft and white card stock. Glue the white on top of the baking and bright. I used a little brown ink on the rolling pin2. Also cut out all of the little snowmen using white, green, blue, tan, orange and red card stock
3. Assemble the snowmen using a fine tip glue
4. You can either buy or create your little box
5. Glue you snowmen to the front and sides of the box
6. Glue you baking spirits bright to the back of the box. Add your snowflakes and ribbon
Monday, November 09, 2020
Sweet Christmas Wishes
Hello! This is Sukie and I have a slime line Christmas card to share. Today's card features several of the new dies from the 3 Christmas die releases in the store.
Here are the die sets used on my card, available in the store:
Friday, October 23, 2020
Baking Spirits Bright
Happy Friday! It's Jeanne today with a card that was very hard to make - but only because it made me hungry while making it. All I could think about were freshly baked cookies!
Gingerbread is one of my favorite Christmas themes and although these are snowmen in this die they fit that general idea. I had some gingerbread themed patterned paper and knew that combined with this die it would make the perfect stand up card!
To begin I cut my pieces from white, red, crumb cake and a small patterned paper and cardstock.
I used Copic markers to color the nose and holly leaves and I shaded the snowman, cookies and cupcake with Distress Oxide inks.
Next, I cut a piece of crumb cake cardstock to 4 1/4 x 11 inches, then scored and folded it at the 5 1/2 mark (in half, top folding). On the top flap I scored at the 2 3/4 mark and folded this, essentially folding the top of the card in half. This will become my easel for the image. I cut a piece of patterned paper to 4 x 5 1/4 inches and folded it in half at the 2 5/8 inch mark.
I cut two white rectangles using the 2nd largest of the Stitched Scalloped Rectangle dies, one red rectangle using the 3rd largest of the Stitched Rectangles, one white oval using the 2nd largest of the Stitched Scalloped Ovals and one crumb cake oval using the 4th largest Stitched Oval. I like the Stitched dies but the plain, pierced or double stitched dies work too!
To build the easel, I glued the patterned paper to the top of my card matching up the folds.
I stacked the two white rectangles and adhered the red to the top. The two pieces of cardstock allow the folded front to have a barrier to stand against when you open the card.
Using a fine tipped glue pen, I glued down my sentiment and a few extra sweets and baking tools.
I glued my completed sentiment to the inside of the card, about 1/8 inch from the bottom.
I assembled the medallion for the front of the card...
and glued the bottom of it to the lower half of the front of the card. I left the top free to pop up when the card is opened as an easel.Finally, I tied a narrow ribbon behind the medallion on the upper part of the card for a little bit of interest when the card is closed.
I hope you enjoyed my card today! This card would be perfect for someone who loves baking! Be sure to visit the online store where the new Christmas Release (Parts 1, 2 and 3) and the new Halloween release are on sale for a limited time!
Dies:
Thanks for stopping by. I hope you have a fun and creative weekend!


.jpg)


