Also - be sure to check out our NEW CHRISTMAS RELEASE which is also on SALE!
2. I cut a piece of blue cardstock at 3-1/4" x 4-7/8" and mounted my cloud layer on top. *If you didn't want to cut the bottom off of your cloud layer in step #1, then you would cut your blue piece at 3-3/4" x 4-7/8" ☺
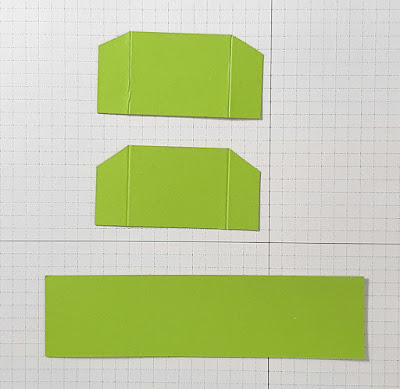
3. I cut (2) pieces of green at 2-1/2" x 1-1/4" - then scored 1/2" from each end and mitered the top of flaps. These are my side pieces.
5. I cut a couple different colors of green (can be all one shade) into strips at 5-3/4" x 1-1/2" and scored 3/8" in from each end. These are the inside "shelves" that we will attach our cows to later.
6. I then used various dies from the Hills Slimline set to cut the very tops off of each shelf piece.
8. Next, with my 2 side pieces, I glued the left flap to the bottom left edge of my cloud piece, and the right flap to the bottom right edge of same piece as shown below.
11. Fold that hill over to the right and add glue to just the left flap of your middle hill. Then attach it up to the scored line of the back hill as shown below.
15. Die cut a fence using the Farm Fence Slimline die. Add glue to the back leaving the top horizontal beam w/out glue as it will be sticking above your green front piece a li'l bit. Attach to the front panel.
16. Die cut, color and piece together Savanna trees, Country Farm Cows, and Happy Birthday w/ Shadow.
17. I added glue just to the lower portion of my sentiment and attached it to the top of my card base as shown below.
18. I attached my die cuts to the various hills as shown.

I purchased these adorable Country Farm Cows at last year's Labor Day Sale & right now ALL of the dies I have used on my card today are 40-60% OFF (except the balloon on the back as it's retired.) I have listed and linked all the products I've used on my card at the end of this post! ☺
This next one is of the BACK of my card - empty space to write a personal message.
And yes it does fold flat to fit into an envelope!
Design Steps:
1. I cut a white rectangle using the largest die from the Nested Wacky Stitched Rectangles - then stenciled some clouds with Tumbled Glass Distress Oxide ink. *Optional: I then cut off 5/8" from the bottom of my rectangle to fit the size card I was wanting to make, but it's not necessary.
4. I cut a piece of green for the front of box at 1-1/4" x 5"
7. I then cut the side flaps down along the score line as shown below:
* For the next few steps, we're not going to do anything with that right flap. Just going to work on the left side.
9. I added glue to the left flap of my side piece and attached the left side of my front piece.
10. Decide which hill you want to be furthest back and add glue just to the left flap and bump it up to the score line of your side piece as shown below, making sure the flap is below the top edge of your side piece.
14. Add glue to the flap of your right side piece and attach your front panel onto it.
19. For the back of card, I cut a white piece as in step 1, cutting off 5/8" from bottom. Then I cut a piece of green cardstock cutting the top with a Hills die and the bottom portion with the same Nested Wacky Stitched Rectangle die. I also cut a cute balloon and done!
Here are the Products I Used:
THANK YOU for taking time to visit today! I hope I inspired you to make a box card with your favorite CotageCutz dies!
I'll be back tomorrow with a card from the NEW CHRISTMAS RELEASE!
~Kristine


This little box card is so adorable love those cows!
ReplyDeleteI thank you Pam, I do too... they're super cute!
DeleteThis is a great box card and thanks for the tutorial- now I can make one 😊
ReplyDeleteThis comment has been removed by a blog administrator.
ReplyDeleteSuper cute card! I love the tutorial too! Thank you for sharing!
ReplyDelete