Hello Scrapping Cottage friends! Thanks for taking the time to stop and visit with us today. It's Mary Marsh here bringing you the Saturday edition of the Blog.
IT'S NEW RELEASE TIME! We have a new collection of Slimline Designs. Your slimline cardmaking is going to get a lot easier. We have 20 new designs and they are on sale. You can get each individual die for a limited time 25% off. The dies have appeal for all styles and occasions of cardmaking. So check them out and make your selections.
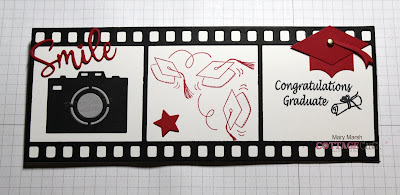
Today for your viewing pleasure, I am featuring the new Filmstrip Slimline die. There are lots of cute accessories that come with this die and I am using a few of them on my card.
Today for your viewing pleasure, I am featuring the new Filmstrip Slimline die. There are lots of cute accessories that come with this die and I am using a few of them on my card.
I needed a graduation card for my nephew and this die worked out perfectly for my idea. He graduated magna cum laude from high school and plans to go onto to college in an engineering major. So proud of him. Now let's get started with some details on how I created my card.
Design Steps:
I cut the filmstrip from black cardstock. My white card base is 8 1/4" x 3 1/4". It's the same size as the filmstrip.
Next, I cut the Smile phrase and the Camera. These images are both part of the Filmstrip die. I used cardstock to cut the images. I cut another white panel 3 1/4" x 8 1/4" to stamp my sentiment and grad cap images. I just thought it would be easier this way rather than stamping directly on the card base. I laid the filmstrip down for placement of the stamps. These are wood stamps so I used my Stamp-a-ma-jig for exact placement.
I am ready to start card assembly. I attached the filmstrip to the white background panel with Ranger multi medium matte. When I use this die again I will definitely use an adhesive sheet. It will be easier that way.
Next, I placed the camera image and smile phrase in the left opening. I used double sided tape and liquid adhesive to attach these images. Notice the graduation cap in the corner. It's not a die. I cut it out and in the next photos I will tell you how I did it.Grad Cap Steps:
I started with a piece of red cardstock 2" x 1". I penciled a line at 1" and then turned it and penciled another line at 1/2".
Then I started making my cuts. I went from point to point so it would form the top of the graduation cap. The next photo shows the start of my cutting.I went around and made 3 additional cuts going from point to point to form the shape. I believe it's called a parallelogram. I flipped it over since my pencil marks were still there. Now to make the piece that fits on the grad's head, I used the 2nd largest stitched die heart and placed just a portion of it on red cardstock.
This is what the cut looks like. I am using the negative part of cut. I just trimmed until I got the size that would work for the cap.
Here is the finished piece. And then I attached it to the head part. I was happy with how it turned out. Then I started thinking about a tassel but I didn't want to fuss with twine. So I looked through my dies and found a ribbon that I thought would work. It's from the Penguins with Presents die. I cut just the ribbon portion and then used the longest loop of the ribbon. I think it works for the tassel. I punched a 1/8" hole and added a gold brad. Before I attached the white card base to the image panel, I stamped my inside sentiment. I also added a few stars that are part of this Film Strip die. I thought this sentiment is a perfect companion to the front of my non-traditional graduation card.
To finish off my card I attached the image panel to the card base using double sided adhesive.
And that's it for me for this week. I hope I have given you an idea for this new Slimline die. Sometimes you just have to do some out of the box thinking! See you on Monday with another sample using these new Slimline dies.


Such a fun graduation card thanks for directions to make the hat
ReplyDeleteAwesome card! I love the creative way to make the graduation cap, it looks awesome!
ReplyDeleteSuch a fun graduation card! I love how you created the cap - thanks for sharing1
ReplyDelete