Hello Scrapping Cottage friends! Thanks for taking the time to stop and visit with us today. It's Mary Marsh here bringing you the Saturday edition of the Blog.
We have a new release of 36 Spring dies in the online store. There are a variety of designs so perfect for Easter or Spring cardmaking. Take a look in the store you definitely won't be disappointed.
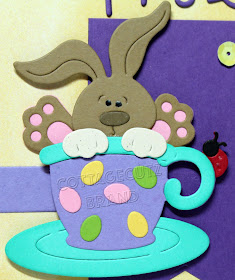
For my card today I am using the new Teacup Bunny and Bunny Kisses and Easter Wishes dies. The sweet little bunny sitting in the teacup is just too cute. I knew I had to make a card showing him off. This could definitely be used for Easter but, I am going to give it as a birthday card for a 6 year old. The birthday sentiment will be on the inside of the card.
I apologize, but I don't have a full tutorial for you today. I woke up yesterday feeling under the weather with a sore throat, earache and no energy. I slept a good portion of the day. So I have card details but no photos. Thanks for understanding Blogger friends and followers.
Step 1: I started my card this week with the layout. I am using the weekly sketch from Splitcoaststampers. I liked the simplicity of the layout and it would allow my sentiment and bunny image to be the star of the show. I used lots of bright Spring like colors on my card.
Yellow Card Base: 4 1/4" x 5 1/2"
Yellow Designer Paper: 4 1/8" x 5 3/8"
Light Purple Rectangle Panel: 1/2" x 4 1/8" (Element 2 in sketch)
Dark Purple Banner: 2 1/8" x 3 3/8" (Element 3 in sketch)
Step 2: I cut my Teacup Bunny image in the cardstock colors shown. I like to use cardstock but this image could certainly be cut from all white cardstock and colored with Markers or the medium of your choice. For the smaller flag banner (Element 4), I decided to use my bunny image. Just a little creative idea for this sketch. Notice the cute little ladybug crawling up the cup!
For the Bunny Kisses sentiment, I used the same dark purple cardstock that I used for my banner. I thought it was a nice contrast against the yellow designer paper background. Notice the different font styles in the part of the sentiment I am using on my card. It really highlights the phrase.
Step 3: I assembled card using double sided tape for all the layers. On the bunny kisses sentiment, I used Ranger multi medium matte. The bunny image is popped up with dimensional tape.
To complete my card and for added interest, I scattered a few yellow sequins on the flag banner.
Well that's it for me for this week. See you next Saturday. Happy Valentine's Day!!!
dies I used to create card:


This is a wonderful card!
ReplyDeleteAdorable card! I love the bright and cheery colors you used! I hope you feel better soon!
ReplyDeleteFun sketch perfect for that sweet bunny! Feel better soon!
ReplyDeleteSuch great cards and the dies are super cute!!
ReplyDeleteSweet card Mary! And a great way to use the sketch.
ReplyDelete