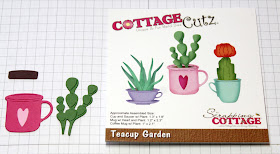
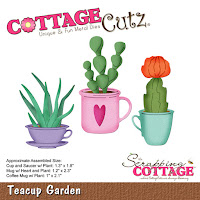
Today for your viewing pleasure, I am featuring the new Teacup Garden die. I thought it would be a good one to use for a Mother's Day card. So let's get started with the details on how I created this card.
Step 1: This week I started my card with a sketch I found online. I thought it would work perfectly to showcase the Teacup Garden image as well as add layers to my card. Since I like to use patterned paper, the addition of layers to my cards always works for me. This one already had the layer panels and shapes sized out. I usually just estimate sizes but this worked for me this week.
Step 2: I looked through my pattern paper and found this design that had cups on it. Even a cup with a heart - how perfect!. I just had to decide on my other card colors. For my card base, I used melon mambo cardstock that matched the patterned paper.
The center square layer is patterned paper from the same collection. I used the 2nd largest stitched rounded square die to cut it and then a corner rounder.
On the long gray panel I used an embossing folder that somewhat matched the patterned paper underneath it.
Card Measurements:
Melon Mambo Card Base: 4 1/4" x 5 1/2"
Patterned Paper Background Layer: 4 1/8" x 5 3/8"
Gray Circle: 4th largest Stitched Circle die
White Circle: 4th largest Circle die
Step 3: Once the card colors and papers were selected, I was ready to cut the teacup and succulent image. For the cup I used melon mambo cardstock, a garden green for the succulent and a pink for my heart, This die even includes a piece to simulate dirt. For that, I used chocolate chip cardstock.
Step 4: I started some of the card assembly. Attached all of the panels except the image panel. I wanted to stamp my sentiment first so I would have the placement I wanted before I attached the image.
Since I was using a photopolymer stamp set, I pulled out my MISTI just in case I didn't get a good image the first time around. I thought the first stamping was a bit light so I inked and stamped a 2nd time.
I attached the cup to the white circle with dimensional adhesive and then attached it to the gray circle.
Step 5: Instead of another circle that is in the sketch, I decided to use a Stitched Heart and stamp the "Mother Phrase' on it. With a sketch you don't always have to use the shape called for. As long as your finished product looks like the sketch layout, you're good.
The stamp I am using is a cling stamp so I used my stamp-a-ma-jig for placement. With this tool you are stamping on plastic, and in the photo it looks like its not a good image. But, you are only using the plastic for a straight alignment. Once it's stamped, it's fine and usually with the cling stamps I get a good impression the first time. I haven't figured out how to use the MISTI with these stamps.
To complete my card, I attached the heart. I thought about adding some sequins or enamel dots. But with the background paper pattern being a bit busy I thought they would be lost. So it's complete as is and now I have another card for Mother's Day.
I hope I have given you another idea on a way to use these new dies. For additional samples, look back on the blog. the DT has been showing them all week. I will see you next Saturday.
dies I used to create card:


Great card for Mom Mary! Very creative.
ReplyDeleteSo cute I love the color combo and that background paper is adorable!
ReplyDeleteThis would make a great birthday, Mother's Day, or just I love you, Mom, card> How fortunate that you had the perfect patterned paper> Lovely card, Mary!
ReplyDeleteSuch a great layout! The card is beautiful.
ReplyDeleteThat paper is just perfect. I can't believe how well it matches the cup with the heart.I've never used sketches and love the way layered cards look but struggle on how to do them myself. I may have to give the sketches a try and see if that works for me. ~ Sherry
ReplyDeleteLove how you used the sketch! Beautiful card!
ReplyDeleteBeautiful card! How cute is this little garden in a cup.
ReplyDelete