Pages

Wednesday, May 31, 2017

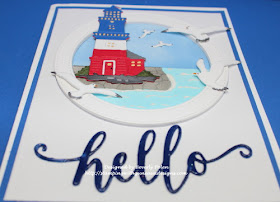
Hello from the CottageCutz Lighthouse

Hello, and welcome to the Scrapping Cottage Blog!  This is Beverly Polen from Guneaux Designs, and I am a guest designer today.  Before I share information about my "Hello from the CottageCutz Lighthouse" card, let me remind you that the Scrapping Cottage Memorial Day Sale ends at 9:00 p.m. PDT tonight!  Dies are on sale for up to 40% off, so don't miss out on getting dies you have been wanting!

My card share with you today features the CottageCutz Hello Phrase die, which is a newly released word die from the CottageCutz Expressions Plus collection.  There are 35 of these new word dies and they are on sale for 25% off until tonight!  Here is my card:


My "Hello from the CottageCutz Lighthouse" card also features other CottageCutz dies:  the CotttageCutz Lighthouse die, Stitched Wide Circle Frame Set dies, Cottage Cutz Lighthouse w/ Clouds die, and CottageCutz Seagulls in Flight Die.

These are the steps I followed to make this "Hello from the CottageCutz Lighthouse" card.

  • Using the CottageCutz Lighthouse die, I cut out the lighthouse in white, red, blue, green, gray, and yellow card stock and assembled the pieces.
  • I used the CottageCutz Stitched Wide Circle Frame Set dies to cut several circle frames and a circle from a 4-1/4" x 5-1/2" piece of white card stock.
  • I glued the circle frames together to create dimension.
  • Using the circle that was cut out from the 4-1/4" x 5-1/2" piece of card stock, I colored a sky, rock cliff, and ocean on it.  I added Liquid Applique in selected area and heat set it.

  • I cut out three "hello" sentiments using the CottageCutz Hello Phrase die and blue card stock. I glued them together, covered the sentiment with VersaMark Ink and Clear Embossing Powder, and heat set it.
  • I began assembling my card by cutting a 4-1/2" x 5-3/4" piece of blue card stock to which I glued the 4-1/4" x 5-1/2" piece of white card stock with the circle cut out.
  • To this piece I attached both the circle frames and colored circle piece inside the cut out circle.
  • Lastly, I added the lighthouse, seagulls, and hello sentiment to the above piece.  Then I attached that to a 4-3/4" x 6" white card base.

These are additional photos of the card:


CottageCutz is now on Instagram!  Click here to see our Posts and follow us!

These are the CottageCutz Dies used to create the card:


Tuesday, May 30, 2017

Sunflowers

Hi, Janja here!

Tuesday is already here and my time for post on the Scrapping Cottage blog.
Beautiful sunflower heads are proudly displaying their beauty and invite our eyes to admire. This inflorescence composed of hundreds or thousands of tiny flowers simply deserve our admiration.

Today on a thank you card.


Supplies:
- CottageCutz dies: Thanks Phrase, Sunflowers, Wheat Stalks, Pilow Box Plus (ladybug)
- white card base: 5.3 x 5.3" (13,5 x 13,5 cm), folded
- kraft cardstock: 5 x 5" (12,7 x 12,7 cm)
- watercolor paper
- Distress oxide pads: Fossilized Amber, Peeled Paint, Vintage Photo
- Distress ink pads: Wild Honey, Vintage Photo, Twisted Citron
- ColorBox pigment ink pad Frost White
- stamp with handwriting for background
- glue

From watercolor paper cut out elements for sunflowers. Color them with Distress oxide pads. Sprinkle with water and shape with a flower shaping tool.


Cut out Thanks phrase, some wheat stalks and ladybug.
Trim kraft cardstock. Stamp on it handwriting with a white pigment ink pad. Nothing serious if we cannot evenly cover the entire background as the focus is on sunflowers. 


Use only the sunflower leaves. Cut off the stems with scissors. Glue each flower separately on the background and arrange them with leaves and wheat stalks. 
Finally glue Thanks phrase and attach a ladybug for luck on it.


Memorial Day Sale going on now at the


Also, CottageCutz now has an Instagram account
Follow us on Instagram.

Thank you for coming over and have a lovely day. 


Monday, May 29, 2017

Bluebell Shadows

Hi, Lois here again with another card using one of the new Expressions Plus dies.   In case you haven't seen them, be sure to check all 35 of the words in the CottageCutz store.   And by the way, there is a Memorial Day sale going on until Wednesday.  You can save up to 40%.   My card today uses one of the new Expressions Plus dies - thanks, as well as a couple of other dies.


To start my card, I cut a panel of heavyweight white cardstock 8 1/2" x 5 1/2" and scored it at 4 1/4".  Then I cut a piece of navy cardstock 4" x 5 1/4" and a piece of patterned paper 3 7/8" x 5 1/8".


I learned  a little trick on Facebook several weeks ago.  If you are cutting a sentiment die-cut, just run a strip of your cardstock through your Xyron sticker maker . . .


. . . and then cut your sentiment.  It will now have glue on the back of it and be much easier to adhere to your card.


I then cut all the rest of my die-cuts for the card.  I planned to make a shadow for my CottageCutz Springtime Bluebell Flowers, so I cut two of them -- one in pale blue and one in navy.


I took  the inner oval from the CottageCutz Oval Doily and Frame die and sponged on some pale blue ink.  This gave a little more dimension to the center section.


Then I was ready to construct my card.  I glued down the doily pieces and adhered the sentiment at the top.  I then glued down the navy bluebells and offset the pale blue ones on top, creating a "shadow" effect.


CottageCutz dies used on this card are:


http://www.scrappingcottage.com/cottagecutzovaldoilyandframe4x6.aspx

http://www.scrappingcottage.com/cottagecutzspringtimebluebellflowerselites.aspx


http://www.scrappingcottage.com/cottagecutzexpressionsplusthanksphrase.aspx

Another bit of news,  just to let you all know, we are now on Instagram. Click here to see our Posts and also to follow us on Instagram.

Sunday, May 28, 2017

Hello Sweet Baby

Hi!

It's Anja here and I have a cute baby card for you today. I used a few baby animal dies and combined them with the new expressions dies. It's such a fun to play with them :)


I used:
- CottageCutz dies (Hello Phrase, Sweet Phrase, Baby Koala w/ Blanket, Spring Bunny w/ Flowers, Stork, Sweet Baby Lamb, Grass, Trees & Vines),
- Distress Inks and Oxides (Pumice Stone, Black Soot, Peeled Paint, Vintage Photo, Walnut Stain, Faded Jeans, Broken China, Fossilized Amber, Spiced Marmalade),
- white card base (10 x 21 cm),
- blue card stock (20,6 x 9,6 cm),
- white card stock (for die cuts),
- white paper and patterned paper (9,2 x 20,2 cm),
- black pen,
- glue,
- Versafine Onyx black stamp pad,
- alphabet stamp set.

First I die cut all the pieces from white card stock, colored them with Distress Inks and Oxides and glued them together. 


Then I cut blue and colored paper (the measurements are written above).


And then I just put all the pieces together using paper glue. To finish the sentiment I stamped "baby" to the inside of the card. I used silicone alphabet stamps.


I also decorated the envelope. I used sentiment stamp that seemed just perfect to go with the stork. 


And this is the finished card from the inside ...


... and the outside. 


The new expressions dies go so well with all the cute Scrapping Cottage images. I am really looking forward to show you all the other projects where I paired them. And to see all the new dies check out these video made by Janet where she showcases them all.


And also go check The Scrapping Cottage store for the Memorial Day Sale and get all the new dies for a lower price.


Thank you for stopping by. Have a wonderful sunday.
Anja Ž.