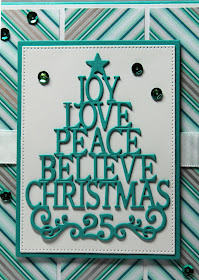
Hello Scrapping Cottage friends! Thanks for taking the time to stop and visit today. It's Mary Marsh here bringing you the Saturday edition of the Blog.
It's a rainy day here in the Eastern U.S. and a slight chill is in the air. One of those perfect days for staying indoors and doing some crafting. And, it's also World Card Making Day. So there is a 2nd reason to get crafty on this first Saturday in October
.
Today for your viewing pleasure I am featuring another of the new Christmas 2016 dies. This one is the Wisdom Tree. The words are a wonderful description of what Christmas represents.
So let's get started with some details on how I created my card. I wanted the words to be the focal point so I kept the embellishments minimal and dressed the card up with some patterned paper, ribbon and a few sequins.
Teal Card Base: 4 1/4" x 5 1/2"
White Layering Panel: 4 1/8" x 5 3/8"
Patterned Paper Panels: 1 1/4" x 5 1/4", 1 1/2" x 5 1/4", 1" x 5 1/4"
I found some odd sized pieces of this patterned paper in my stash but nothing big enough to cover the size panel I was using. So I decided to cut 3 different size panels for my background. That solved my problem. You know how it is when you want to use something on a card. Nothing else you look at works (lol)!!
My next step was to cut the words from the Wisdom Tree die. I cut it twice just for some added dimension. I decided to stay with the teal color theme. I used the rectangle and stitched rectangle dies to cut the panels for the words.
I started the assembly process with the background designer paper. I decided to add some white satin ribbon on this panel. Again just for added interest. I used some Ranger multi-matte medium and attached the words to the white panel.
Secured the image panel to my card with some dimensional adhesive. I wanted this panel raised up from the striped background just a bit. I finished it off with a few teal sequins.
Here is a close-up photo of the image panel. I love the beautiful font and die shape and of course the bottom layer with the flourish and "25" finishes the tree perfectly.
I hope my card has given you an idea for using this new die. Well, that's it for me for this post. So until next time.......inky hugs!


Such a pretty card . Simple but elegant
ReplyDeleteI like the color combination. It is very beautiful.
ReplyDeleteAmazing card Mary!
ReplyDeleteVery pretty. Love the colors and that die cut.
ReplyDeleteI love this card! So simple and elegant!
ReplyDeleteDeb
Your card is so harmonious and beautiful.
ReplyDeleteLove your card and your layout.
ReplyDelete