Pages

Sunday, May 29, 2016

Wedding card

Hello friends!
Yuliya here. Today I share with you my new wedding card. I will be sharing how to make this card using the CottageCutz 3 D Flower dies! 


For the card we need:
- ivory card base: 17 cm х 24 cm, folded
CottageCutz Plumeria & Leaves (4x4)
- CottageCutz 3D Flower 1
- CottageCutz Stitched Wide Oval Frame Set (Basics)
CottageCutz Expressions Congratulations

1. Prepare the details for our card: 1 pc ivory card base: 17 cm х 24 cm, folded, 1 pc patterned paper 16,7 cm х 11,7 cm and 1 pc patterned paper 10,5 cm х 15,5 cm
2. With  CottageCutz Stitched Wide Oval Frame Set (Basics) cut the frame out with patterned paper
3. Glued the die-cuts as it is shown on the picture with help glue tape

4. Cut out many pieces from CottageCutz 3D Flower 1 die on patterned paper
Cut out many pieces from CottageCutz Plumeria & Leaves (4x4)
5. I used my special tool to curl the edges to get the fibers lose.
6. Add the Expression  from the CottageCutz Expressions Congratulations

 So! I love my card!)
Have fun and thank you!
Before I go, I just want to remind you on our second CottageCutz challenge with theme Hello Spring. Link button can be found here!


Saturday, May 28, 2016

Hello

Hello everyone,

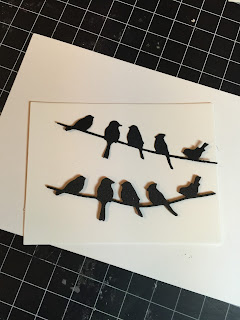
It's Donna here with another clean and simple card to share with you! I am using the new release "Bird on a Wire" and "Hello Spring" die sets.  These stamps are so adorable, there are so many possiblities. The "Hello Spring" die set has three different flowers and a cute little chick and the "Hello" word that I used on my card.  Please stop by the store and check out the new releases for May, they all beautiful dies!


closer view of the birds

Here is how I put my card together.  I die cut the birds, then I die cut some black foam so when I put the birds on my card it would have some dimension.


I used my Koi watercolors to make the watercolor background.  I love the bright colors.


For the frame around the birds, I cut the frame from the largest rectangle die and then I put foam tape around it, so the birds would sit under the frame.


Also, if you have not had a chance to play along with the newest challenge you still have time. The theme is Spring and you have until May 31st to enter. Get all the details here.

Thank you so much for stopping by, please come back again soon.

Dies used for this project:


\


Floral Tag with Anita Kejriwal

Hello friends !!!

Happy Saturday!! I am really amazed to see how time flies. It's the last week of the month and almost half the year is gone. Sometimes, I want to hold on to time and go on creating the best of my projects. But as it's said that we must go on doing our work, I too forget everything when it comes to crafting !!! How many hours do you craft everyday ? Just a question !!!! I try to spend every waking minute in my craft room.

So let me show you what I have for you today. By now, everyone knows about my passion for flower making . With so many beautiful 3D flower dies from CottageCutz, I want to give shape to a variety of flowers using these dies. I have made sweet roses this time using the CottageCutz 3D flower #5
along with the new release die from This and That Collection-Butterfly tag
Its all about gardens and spring.
So do have a look and follow the photo tutorial below to see how I made this tag.


 Dies used for making the tag

CottageCutz Butterfly tag
CottageCutz 3D flower # 5
CottageCutz greenery die


I have cut all the die cuts in white 160 gsm card stock


Distress the tags with Distress inks


Cut a corrugated piece which is 1/4 inch bigger than the tag on all sides and paint it black.

  
I added some design with stencils on one of the tag.

Cut out the butterfly from one of the tag that has no stencil design and apply Glossy Accents. Then sprinkle some glitter. Let it dry.

Add colours to flowers and leaves using  Distress inks.


To make the rose, choose 5 large flowers and cup on the opposite side.

Roll one petal like a cone and secure with adhesive.


Bring the rest of the petals together like this.


Add another layer bring the petals together.


Add all five layers as shown and curl the petals outwards with a tweezer,


The rose is ready.

Stick the two tags together with the butterfly one on top. Adhere the glitter butterfly on the tag below as shown. Arrange the flowers as shown. 


Do stop by the CottageCutz blog for the new challenge. /the theme is spring and you can win wonderful prizes.


Friday, May 27, 2016

Branch, Bird and Heart


Hi, is Vladka and today is time for CAS card.


Basics:
White card base: 4 1/4 x 6 inches (cut 4 1/4 x 12 inches, fold in half)
Additional piece of white cardstock (3 3/4 x 5 1/2 inches)
Additional piece of white watercolor paper

Other Supplies:
CottageCutz Dies: Listed Below
Distres markers: Tumbled Glass, Mermaid Lagoon, Peeled Paint, Brushed Corduroy, Gathered Twigs
Other: paint brush, water, acrylic block, paper trimmer, Sizzix machine, Scor-buddy, scissors


Let's prepare background first.

1. Apply some Tumbled Glass and Mermaid Lagoon ink directly to the acrylic block. Use thick brush and apply just water on the left middle part of the watercolor piece of paper. Now apply also some Tumbled Glass with the brush on the same place as water. Repeat this also with Mermaid Lagoon ink.
Let it dry or speed the dry process with a heat gun. Background is prepared.


2. With Tree Tag Topper die, cut the tree out from white or kraft cardstock and with the scissors cut off the circle around the tree:


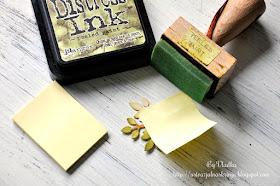
3. Color the Leaves and branches with Peeled Paint, Brushed Corduroy and Gathered Twigs distress inks. Use post-it notes to mask branches when coloring the leaves and the opposite.


4. Now turn the die cut so, that you get branch instead of the tree and glue it on the watercolor paper. With the biggest stitched rectangle die cut the rectangle out of whatercolor paper with a branch.


5. With Whimsical Deer and Bird die cut the bird out with white cardstock and colored his beak yellow. Glue it on the branch.

6. Cut the smallest heart from red cardstock, using die from Heart Set and glue it on the card. With the ruler draw a line from the bird to the heart.

7. Stamp desired sentiment  and card is finished.

I hope you like my card and that will inspire you to try this. You can use watercolor paint set instead of distress inks, if you wish.


Have fun and thank you!

Before I go, I just want to remind you on our second CottageCutz challenge with theme Hello Spring. Link button can be found here!