Pages

Monday, March 31, 2014

Home Mini Album

Hello everyone,today I have a CottageCutz Home Mini Album and Video to share. For my Mini Album I used tons of CottageCutz Dies and Really Reasonable Ribbon 

I used the CottageCutz dies throughout this album too. The Confectionery pockets,Picket fence Border,bunny, and flowers are all CottageCutz dies and can be found here

On these 2 pages I used more gingham ribbon, in Yellow, Green and Blue. Also more of the darling Sweetheart Blossoms were used here :)
The design paper I used is Family Ties Paper Pack, its Pebbles from American Crafts.

In my video I show all tags, and pages. This album was super fun to make, and pretty easy too. Its been a long time since Ive done a video and album. 
CottageCutz Dies Used
Small Confectionery Bag
Medium Confectionery Bag
Mini Butterfly
Garden Butterfly Vine

Really Reasonable Ribbon Supplies:
Sweetheart Blossoms/Turquoise , 2 tone blue, 2 tone yellow
Gingham Ribbon /Turquoise, Yellow and green
Pom Pom Mini Trim/ Green and Blue

My Video

Thank you for looking and have a lovely day!
Hugs to all,
Cheryl

Saturday, March 29, 2014

CottageCutz Spring Mini Page 3 & 4

 Greetings CottageCutz Lover and Friends.  Today is my project share of Page 3 and 4 of my Cottage Cutz Spring Mini Album.  The tutorial for this mini can be found here.   It was a lot of fun to create this.  It has lots of room for pictures and journaling.
 For the third page in the series I used the Springtime Bunny, Bella Flora Frame, andd the Fancy Floral Scroll.  The frame has a Martha Stewart Punch around the Page design and the flowers are Prima.
 For page four again we have the Fancy Floral Scroll, Fancy Daisy Vine, and the Bumble Bee Mini.  The tag in the pocket uses the same Martha Stewart Punch around the page, another Prima flower, a acrylic butterfly and a Some Bunny Loves You stamp from the $1 bin at Michael's.
The pocket insert used the bird from the Spring Tweetie die and the Spring Birdhouse Branch.  It looks like spring has sprung on these pages doesn't it?   Thank you so much for stopping by today to view another edition to this CottageCutz Spring Mini Album.  Happy Crafting and have a wonderful day!  Here are the dies used:

Friday, March 28, 2014

Blossom Branch

Hi all. Vladka here! 
I have another spring card for you. Trees are so beautiful with all blossoms at this time of the year. I tried to imitate this with beautiful Blossom Branch die. 
To add some dimension, I cut out the bigger circle from white cardstock and smaller one from green cardstock which is used also as decorative edge. After long time I also added some stitches. I hope you like it. 
Blossoming weekend to all! 

Wednesday, March 26, 2014

Slice Of Cake


Hello crafters!

Today I have a Birthday card for you with
Slice of Cake. For this card I also used
CottageCutz Expressions Happy and Birthday


The Slice of Cake die was cut out of white card stock
and colored with Distress Ink pads. Magnolia Doily
was cut out of some Wedding DP from my stash.
Expressions Happy and Birthday were cut out
of red polka dot Bearly Mine Designs.


I added two red buttons, a white pearl to one of the
buttons and some twine to another.


Hope you like today's card with gorgeous and so 
simple to use Expressions dies.

For more inspiration see more beautiful work from 
talented CottageCutz designers.

Happy crafting everyone!

Hugs,

The dies used:


CottageCutz Expressions Happy             


Sunday, March 23, 2014

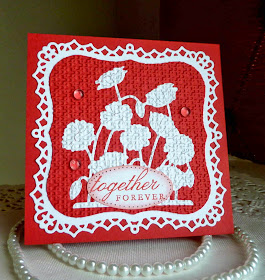
Together Forever

Hello Everyone from Olena!!!
  Today I am sharing with you my Wedding card I created with beautiful CottageCutz Collections of dies.

For my project I used beautiful Garden Poppies die. 

First, I cut flowers out using white card stock. Than, I make a background using Label dies, cut out image and embossing folder. I glued the image to the red card stock and then embossed with an embossing folder. Added sentiment and decorated card with Dew Drops.

For this project I used:


Saturday, March 22, 2014

Happy Together

Happy Saturday!

Hope you are having a wonderful weekend!  Today I have a side-step card to show you using a bunch of CottageCutz Dies!


The last time I did a side-step card it was with crows, this time it's deer!  This is a fun card shape when you want to create a scene.  As soon as I saw these dies, I thought it would be fun to put them all together!  Here's a bit of a side view for you.  You can also click on the photos for a closer view.


The back fold has the pine trees from the Woodland Cabin and the Woodland Pine Trees Dies.  The middle fold has the rest of the Woodland Cabin Dies.  The front has the Woodland FawnsGarden Birdhouse Tree, and the grass from the Canadian Goose Die.

I used brown, yellow, and salmon pink card stock for the cabin and white card stock, colored with chalk inks, for the rest.  The brown card stock is Brownie from Coredinations which I also used to make the card base.  To create the base, I used the Side Step Card tutorial on Split Coast Stampers that you can find here.

The sentiment is from Happy Together by Stampin Up, stamped on the salmon pink colored card stock with Rich Cocoa by Memento.  I then punched it with the Word Window punch and added it over the grass with pop dots.

The ribbon embellishment is made with Salmon Pink Seam Binding, Cocoa Jute String (both from Really Reasonable Ribbon), fibers from my stash and a button.  I did separate triple loop bows, glued them together with glue dots, then add the button with a fiber bow in it on top.

These are the dies I used:


Friday, March 21, 2014

Sweet Filigree Cupcake


Hello everyone and beautiful Friday to you all...

Here is a new post for the Scrapping Cottage Blog.
I made a Birthday Gift Pocket for a gift card.
For the Pocket I used Petite Eyelet Pocket die
and to decorate it I used Sweet Filigree Cupcake
and Tiered Cupcakes dies.


This was so easy to make. I cut Petite Eyelet Pocket
out of DP and glued the sides together.
Then I cut the Sweet Filigree Cupcake and
Tiered Cupcakes also out of different DP and
sponged the edges with Vintage Photo Distress Ink.


Here is the back of the gift card pocket.


Here is another photo to see the real size of the project.

Hope you like it... :)

Hugs,

The dies used: