Showing posts with label hummingbird. Show all posts

Tuesday, May 16, 2017

Hummingbird Hugs (new die)

Hello Scrapping Cottage friends! Thanks for taking the time to stop and visit today. It's Mary Marsh here bringing you the Tuesday edition of the Blog. Hope your Mother's Day celebration was a great one whatever you did.

There is another great release of new dies over in the online store. The Expressions Plus (word dies) with 35 designs are currently on  promotional pricing and are 25% off. The font is so beautiful and you will definitely want these in your collection.

For your viewing pleasure today, I am featuring one of the new dies. It's the hugs phrase along with the hummingbird die.  So let's get started with some details on this card.

I started my card this week with the card colors. I am using the colors from the Splitcoaststampers color challenge #636. They are Peach, Coral and Artichoke. Once that was decided, I started thinking about my layout. I am using the MojoMonday #497 sketch.
Peach, Coral, Artichoke
Card Sizes:
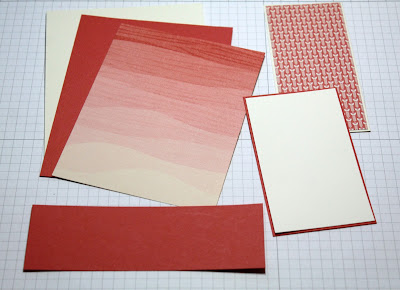
Card base: 4 3/8" x 5 5/8"
Coral Layer: 4 1/4" x 5 1/2"
Coral Patterned Paper Layer: 4 1/8" x 5 3/8"
Vanilla Rectangle Layer: 2 1/4" x 4 3/4"
Coral Flower Paper: 2 1/8" x 4 5/8"
Image Layer: 2 3/8" x 4 1/8"
Coral Layering Panel: 2 1/2" x 4 1/4"

Step 1: I first figured out all the card panel sizes. Since I had the card colors, I looked through my patterned papers and found these ones in the coral shade. I decided I would go after a more monochrome look. I liked the gradient look on the background panel. I ended up putting the lighter shade at the top.
Step 2: I cut the flowers in peach and coral cardstocks and the leaves in artichoke. The hummingbird I cut in white cardstock and then sponged in coral, peach and a bit of artichoke.
Step 3:  I am now ready to start the card assembly. I wanted to show how I did my angled panel. I attached it onto the patterned paper panel at an angle with double sided tape . I used my craft knife and trimmed off the excess.


Step 4: The Hugs Phrase is cut with both artichoke and coral cardstocks. I did a slight offset for added interest. Here is a close-up shot of the hugs phrase as well as the hummingbird.
 
Well, that's it for me for this post. See you again on Saturday. The team will be showcasing some of the new Expressions Phrases so check back each day for more inspiration.

Dies I used to create card:
http://www.scrappingcottage.com/cottagecutzhummingbird4x4pre-order.aspx

http://www.scrappingcottage.com/cottagecutzexpressionsplushugsphrase.aspx


Monday, March 20, 2017

Framed Hummingbird

Lois here with a very simple card for you today.  I just got a few new-to-me CottageCutz dies and was anxious to play with them.   I was intrigued by the Pierced Wide Frames and wanted to give them a try -- today I used the Ovals -- along with a sweet Hummingbird die.


Supplies used on this card are:

Heavyweight white cardstock 8 1/2" x 5 1/2", folded in half, and a piece 4 1/4" x 5 1/2" to cut the frame
Colored cardstock - Blue, Green, Pale Plum, Yellow, Pale Blue
Patterned paper - Shades of Plum
Ink - Memento Tuxedo Black; Ranger Distress Tumbled Glass, Mowed Lawn, Victorian Violet
Copic marker
Black ink pen
Liquid glue
Roll of foam adhesive tape
Sponge daubers

To start my card I cut out the various pieces of cardstock for the hummingbird and frame.


I then added some depth to the pieces by sponging on some ink to the bird and flower pieces and added a bit of color to the bird's beak with a dark yellow marker.  Using the black ink pen I emphasized the eye of the hummingbird (not shown in photo).


I cut a strip of foam adhesive tape, cut it into narrower strips, and adhered it in pieces to the back of the oval frame.


To make the background for my "picture," I cut an oval from the pale blue cardstock.  You could use any oval die which would fit -- I used the double-stitched oval because it was close at hand.  The stitches were not going to show, so it didn't really matter.


I then constructed my card using the die-cut pieces and stamped the sentiment.   Here it is again.


CottageCutz dies used on this card are:


Saturday, April 13, 2013

CottageCutz post - Hummingbird card

Hi Everyone! 


It's Olena here today to share with you a Beautiful Hummingbird card! I made this card using the Super CUTE CottageCutz dies- Hummingbird.


On this card I used the gorgeous CottageCutz Hummingbird die to create my card. I cut out  couple times flowers, leaves and bird using different colors of card stock, and then I sponge them with craft ink. Next, I used Zip Dry paper glue to give them a 3-D look. Inside flowers I put glitter glue.

 
I added  flower and leaves to card front as shown in picture above.
I also used Martha Stewart punches, EK Success punch and white gel pen.

 
For this card I used:


Monday, July 26, 2010

Good Morning Friends!


For today's post I have used The Cottage Cutz Hummingbird die. I love birds and this hummingbird die is a beauty!

I have been enjoying Lorie's technique of using white cardstock and then coloring the images. I colored my die cuts with copics and used a white gel pen for highlights. I hope you like it. Have a great week! I will be back next Monday with a new project.