Showing posts with label Cross Stitched Oval Set. Show all posts

Saturday, March 18, 2023

Cross with Spring Lilies


Hello Scrapping Cottage friends! Thanks for taking the time to stop and visit with us today. It's Mary Marsh here bringing you the Saturday edition of the Blog.

Our Flowers & More release is still available in the online store at 30% off the individual dies. This release has what we are calling "simple cuts". Meaning not as many pieces to put together so they assemble quickly.

They are so perfect for the many card making occasions that we all have. Easter, Birthdays, Thank You, Sympathy, Mother's Day, Thinking of You or even a scrapbook layout just to name a few. 

Today for your viewing pleasure I am revisiting an older die -  Cross with Spring Lilies die (2019 release). This is a perfect die to reflect on why we celebrate Easter. It's retired but still available and on sale right now. Let's get started on some details of how I created this card.  

Step 1: I started my card this week with the layout. I am using a sketch that I had saved on one of my Pinterest boards. I thought it would work great to show off the cross and allow me also to use some background designer paper. This particular sketch gave all the dimensions for the layers so it made creating the card a bit easier.
I just had to select my card colors and I decided on shades of purples since purple is the color of royalty.
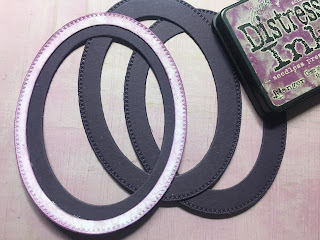
For the center panel I used a white dotted tulle and an olive satin ribbon. The olive picks up the stem of the lilies.  For the oval panel, I used the 3rd largest oval and stitched oval dies.
I cut my cross using 2 shades of purple cardstock. The lilies are cut in a paler shade of purple with olive for the stem. I thought that color would look better against the white background. 
Next, I stamped my sentiment in the heather shade of ink. It's the top layer of the cross color. Attached to the ovals with dimensional adhesive. 
Now that all the panels, card base and cross are cut, I am ready to start card assembly. I used double sided tape for all the panels. I secured the ribbons with glue dots.
To complete my card, I secured the oval image panel with dimensional adhesive and attached to the card base with double sided tape. 
Well, that's it for me for this week. See you next Saturday. 

Reminder: Our YouTube Channel has a new video from Jen Hartsgrove. There is a giveaway for being a subscriber, liking the video and leaving a comment. Click here.

dies I used to create card:


Saturday, December 08, 2018

Rufus Says I'm Sorry (new die)

Hello Scrapping Cottage friends! Thanks for taking the time to stop and visit with us today. It's Mary Marsh here bringing you the Saturday edition of the Blog. 
The Pet release from Black Friday is still on sale at 30% off so you still have a chance to pick up some really cute dies. The team sampled cards using these dies here, here, here and here. Just in case you missed them.

And, today I have another card to show you using the Rufus the Hound die. When I saw this die and those sweet puppy eyes, I immediately thought of a card to say "I'm sorry". So that's the direction I took with my card today. Let's get started with some details on how I created it.

Step 1: I cut Rufus out using 2 different shades of brown cardstock. I used a black Copic multiliner and a white gel pen for his eyes. I also cut 2 of the dog bones with a confetti white and a brown cardstock.
I looked for some fun papers to go along with this cute little hound. I decided on this circle patterned paper, and I coordinated it a soft yellow and a teal to pick up the colors in the paper.

card base: 4 1/4" x 5 1/2"
patterned paper layer: 4 1/8" x 5 3/8"
teal layer: 1" x 5 3/8"
For the oval frames I used the 3rd largest CottageCutz cross stitched oval die and the 3rd largest oval from the basic set.
On the oval where Rufus is laying I stamped my first sentiment. Since it's a cling stamp I used my Stamp-a-ma-jig to get the placement straight and where I wanted it. I did the same for the smaller oval where I stamped "I'm Sorry". This oval is the smallest from the cross stitched set. I used a teal ink.
I thought some background splatters would add interest on the image panel.
Now that everything is cut and stamped, I am ready to start card assembly. I started with the card base and patterned paper.
Attached the ovals with double sided tape and with Rufus I used dimensional adhesive. To complete my card, I laid his dog bones on the card just for some added interest. 
Well, that's it for me for this week. I hope I have give you an idea for a way to use this new die. See you next Saturday!

dies I used to create card:


Friday, July 14, 2017

Lace card with Foam Flowers


Hello to all !!!

This is Anita here!!!! I have not been around for some time and miss all the action here!!! I have been travelling and also due to some family emergencies, life has not been very normal to me . But now everything is coming back to place so here I am with another creation of mine. This time I tried working with foam flowers . And you can see the results.


This is my first attempt with Foamiran and its very easy to use with Dies from Cottage Cutz.
To make this card......

1. Cut a pattern paper to size 5.5 inches x 5.5 inches.
2. Mat it on white card stock that is slightly bigger than the pattern paper.
3. Adhere the card panel on a card base 6 x 6 inches.
4. Cut out the flowers from the flower die using a foam sheet.
5. Add colours using the Archival ink/pan pastel/distress inks/crayons.
6. Switch on the heat tool and apply heat on the flower die cut just for 3-4 seconds. You will see the flower curl up. Mold a little on a foam pad.
7. Cut out leaves from the Leafy foliage die and colour with Forest Moss Distress ink.
8. Cut out three oval die  cuts from Cross- stitched Oval die and lay on top of each other with glue. Stamp the sentiment on top.
9. Cut two die cuts from Victorian Frame die and adhere together. Adhere this on the oval.
10. Cut one Lace envelope die cut and adhere on the card front. Add the oval and the flowers and leaves as shown.

CottageCutz dies used.


Do stop by at the CottageCutz store to get a huge range of beautiful die and stamps.

Friday, March 17, 2017

Watercolour on Diecuts-floral card


Hello dear friends

Happy Friday to all !!!
Spring is in full bloom and flowers are spreading their beauty all over. It's Anita once again, sharing with you the beauty of spring flowers.

Many times we are all short of time and also some people are not fond of making 3D flowers . They want quick beautiful cards .
So here is a cool technique where colouring die cuts with water colour can really make them look beautiful and layering them together gives a lovely floral card like this.


To make this card,
Cut all the die cuts with white card stock and emboss a card panel 6" x 4"


Using distress inks , colour all the die cuts. Use the negative of the wild flower to create subtle stamping on the oval label. Distress ink names are mentioned below.


Layer the ovals like this and adhere on the embossed panel as shown.

Adhere all the die cuts layering them together like this.
Add a sentiment.

Adhere the card panel on card base measuring 7" x 5".

CottageCutz products used.

Wildflowers 2

Springtime Bluebell flowers


Cross-stitched Oval set

Distress inks used -- Peeled Paint, Mowed Lawn, Chipped Sapphire, Candied Apple, Fossilised Amber, Carved Pumpkin
I hope you will try this technique. Do share your work. I hope you have a good crafty weekend. 

Friday, February 03, 2017

FLOWER OF THE MONTH-FEBRUARY


Hello !!!!
This is Anita here!!! First let me apologize for not posting last week as I was on vacation and was out of all internet connections. Now I am back, refereshed and recharged and rearing to go with new projects.
CottageCutz has come up with amazing line of stamps and die combos that are too adorable. I have loved each one of them and you too I am sure will like them. You can check these HERE and HERE and HERE

Today I am going to feature one of my favourite floral stamp-Violets-February


This is a beautiful floral stamp with matching die and colouring this is so much fun. I have made two cards here which inspite of being simple are yet very pretty.
So have a look.


To make this, I gathered my stamp and die set, some water colour paper and Zig real brush pens. I stamped the image on a white card stockcut with Memento Black ink and cut it with coordinating die.


Colour the image as shown.


Adhere the image on Cross stitched Oval die with 3d Foam tape.


Cut oval frames using the Cross stitch Oval set. You will need three broad frames and one narrow frame.


Adhere all together and distress the narrow frame as shown.

For the backing , place the oval die cut on a pattern paper and cut out the oval shape. Adhere to the back.

Score a card front on the score board. Add some quick water colour. Adhere the oval panel.


  The finished card


 CottageCutz Products used
CottageCutz Violets - February (Stamp & Die)

I have another card that I wanted to share with you. It is showing the same Violet flower set. I liked the finished result with both the soft water colour and the bold colour. I have stamped and coloured the image on water colour paper using zig brush pens to colour. The colouring has a washed effect which adds to the beauty of these flowers.


Here I have used CottageCutz Double stitched Rectangle die to create the frames of my card.

I hope you liked my cards. There are many more floral stamp and die sets for each month and all of them are so beautiful. Do try them . 
Hope you had a good time here.