Showing posts with label CottageCutz stitched oval Set. Show all posts

Friday, March 18, 2022

Bunny Baker

Hello CottageCutz friends! Thanks for taking the time to stop and visit with us today. It's Mary Marsh here bringing you the Friday edition of the Blog.

The Spring Release with 20 new designs is in the online store. There is a nice combination of both religious and whimsical designs. So perfect for all card makers out there.

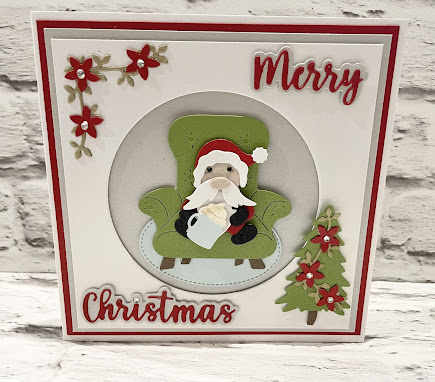
And there is still plenty of time to order and get them for your Easter cardmaking. Today for your viewing pleasure, I have a whimsical card for Easter using the ever so cute Spring Bunny Baker die. I made this one for my neighbor who is an avid baker. I have enjoyed many of her homemade treats, and I thought she would really like this card. 

I used the colors from this week's Splitcoaststamper color challenge #887. The color trio is real red, petal pink and pool party. 
I used the challenge colors to cut the elements of the Spring Bunny Baker die. Plus, some allowed neutral colors for the bunny, her mixing spoon and the card base. I thought the pool party needed a darker shade to make it pop. So, I used a dark gray cardstock.  

My card is a little larger than what I usually make, but I needed that because of the layout I used. 

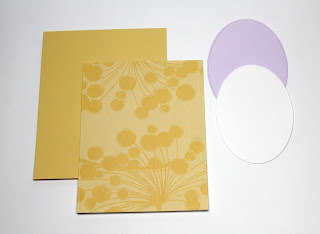
Gray card base: 4 3/4" x 6"
Pool party layer: 4 1/2" x 5 3/4"
Pool party designer paper: 4 3/8" x 5 3/8" 

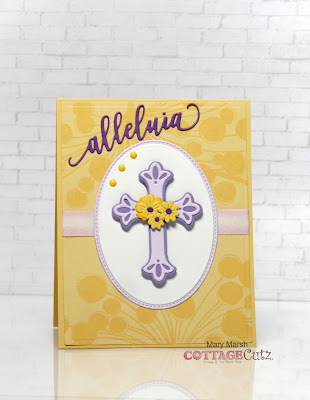
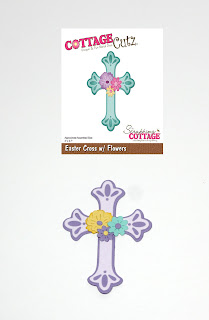
I used the largest of the Stitched Oval die and cut in pink cardstock and then the largest of the Oval Set die and cut in white cardstock. I attached my image to the circle with dimensional adhesive to give it some depth.

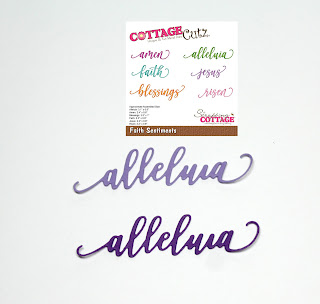
The sentiment is from the 2019 Bunny Kisses & Easter Wishes die. It is still available in the online store. I cut it in pink cardstock and used Art Glitter Glue to attach to the image panel. 

Well, that's it for me for this post. I will be back tomorrow for my regular Saturday post. 

Reminder: Our new YouTube video artist has just made her debut on the CottageCutz YouTube channel. There is a giveaway for being a subscriber, liking the video and leaving a comment. Click here. 

dies I used to create card:


Saturday, January 29, 2022

Easter Cross (new die)

Hello CottageCutz friends! Thanks for taking the time to stop and visit with us today. It's Mary Marsh here bringing you the Saturday edition of the Blog.

IT'S NEW RELEASE TIME! The Spring Release with 20 new designs is in the online store. The individual dies are currently at 30% off.

There is a nice combination of both religious and whimsical designs. So perfect for all card makers out there. I do a combination of both designs for my Easter cards. Today, I have a religious one for you using the Easter Cross w/Flowers die. Which, I believe, is the reason we celebrate Easter. So, let's get started with some details of how I created my card.

Design Steps:

Since I knew what die I was going to use to create my card and I sort of had a layout in mind, I looked for a subtle designer paper that would work. I wanted paper that wouldn't overtake the cross. I found this one with a floral image on it. 

Yellow Card Base: 4 1/2" x 5 1/2"
Designer Paper Layer: 4 1/8" x 5 3/8"
Light Purple Oval: 3rd largest from the Stitched Oval 
White Oval: 3rd largest from the Oval Set. 
Next, I cut the cross and flowers in colors that complemented the yellow papers.
I wanted to use one of the new phrase sentiments that were just released. I chose the alleluia phrase from Faith Sentiments die. I cut it in 2 shades of purple because I wasn't sure which one to use. My cards are always a work in progress. 
Now that all my elements are prepared, I am ready to start card assembly. I decided to use some ribbon on my card that matched one of the shades of purple on the cross. I attached that to the designer paper and then that layer to the card base with double sided tape. 
For the cross, I used dimensional adhesive to slightly lift it off the oval background. At this point I decided to change the flower colors. I made them all yellow, and I liked that better. I added the alleluia phrase. I went with the darker purple one. I thought that made more of a statement on the card. 
To finish off my card, I added a few yellow enamel dots. And that's my card for this week. I hope I have given you an idea for a way to use this new Easter cross. 

Reminder: Our YouTube channel is active again. Check out the latest video and we are having a giveaway for subscribing, liking the video and giving it a thumbs up. Click here. 


Dies I used to create card:


Tuesday, November 02, 2021

Santa Gnome in Throne


Good Morning Cottagecutz fans. I hope you’ve had a wonderful weekend crafting. My usual weekend includes dog walks with my Border Terrier Betty and a whole lot of crafting 

Todays post is a light tutorial as I will be including a full tutorial on my Friday post

I’m including some of the designs from the new release where you can still get 30% off which is amazing. These dies have really inspired me to make some really different cards, not usually my style. Get your dies why the discount is still available.

Top tip from me today, If I know I’m going to repeat a card, tag etc. many times, I always buy more than one of the design. If you have an A4 cutting plate you can load several does at once.

So lets get on to todays project 

I started with a card when folded measured 6” square. The next layer was a piece of red card measuring 
5  3/4”square, followed by a silver piece of card measuring 5 1/2” square. Finally I took a piece of white card measuring 5 1/4” square and in the centre using the largest of the nested stitched circles I cut a hole. With all the other pieces of card stick I stuck them down with glue but the white piece of card I adhered using 1mm foam pads.

Next I cut out the Santa Gnome and the chair in the colours above. I used a small stitched oval coloured in blue to act as a rug and then adhered the design on the top with 1mm foam pads. I took the mug from the new Smores die and gave it to Santa. He needed a hot cup of cocoa after delivering all those presents. I used some brown chalk to look like the marshmallow is toasted

I thought it might be nice to adorn the card with some additional elements so I used the ‘Window Christmas Friends’. From this I took the Christmas tree, the vine and the poinsettia. What I liked about the vine is that you could bend it to fit around the tree and also for the top left hand corner of the card.

Finally I used the new ‘Merry Christmas W/Shadow’ sentiment. I think the red looks really powerful on the silver card. I used a diamanté above the ‘I’ in Christmas to give the card a little more bling. I attached the sentiment with 1mm foam pads

I really hope you like the card. I’ve tried to keep this simple and clean and a card that can be easily repeated for your crafty stash. Have a wonderful week and I really look forward to seeing you Friday with something a little different

Dies I’ve used for the card


Tuesday, February 16, 2021

Stand Out, Stay Awesome!

Good morning Cottage Cutz fans!  It's Jeanne with the Tuesday edition of the blog.  My card for you today features the adorable giraffe from the new Safari release.  Between the Circus and the Safari releases I'm not sure which I'm more excited about since both feature dies which make wonderful cards.  And right now the store is having a President's Day sale so make sure you visit - after viewing my card, of course!

I started this card with a sketch I found on Pinterest, but as often happens with me I diverged so much you would not recognize the sketch.  But the oval and the rectangle are still there!  I just added another rectangle, a sentiment strip, placed things at an angle and changed the layering order.  For me it's about inspiration.

I have some fun, jungle looking patterned paper that goes well with these dies, so I used it here.  I also cut my giraffe from solid cardstock scraps rather than coloring with inks.  Depending on the look I want to achieve, I vary the way I "color" the images. 

I added some foliage from the Safari Adventure Gang dies and some linen thread behind my giraffe.  Then I popped him up on foam dots for a bit of dimension.

I thought this card and sentiment would work for many occasions, so I left the inside blank until I give it out.  I hope you've enjoyed my card today! Don't forget about the President's Day sale - it's for a limited time!

Dies used:


Thanks for visiting today and have a great week!


Friday, February 12, 2021

Big Top Birthday

Happy Friday!  It's Jeanne sharing today and I have a fun-fold birthday card using dies from the new Circus release.  This release has quickly become one of my favorites because the dies make such bright, festive cards.  The card I have today is an easy fun-fold and goes together quickly.

I used the Circus Tent die but any of the Circus dies would work just as well.  I picked three bright colors to use for the card - yellow, blue and red.

 I cut all my pieces from the Circus Tent, Circus Signs, Stitched Ovals and Scalloped Stitched Ovals dies and assembled them.

The fun-fold is called a Front Flap card.  I'll give you instructions here, but you can also find a video on Splitcoaststampers.

I cut a 5 1/2 x 4 1/4 inch base panel from blue and a 5 1/4 x 4 inch panel from striped paper.  Then I cut a 3 1/4 x 8 1/2 inch panel from red cardstock and scored it at 4 1/4 inches so I could fold it in half.  I cut a 3 x 4 inch panel from red dot paper that will be glued to the front of the folded panel.

After gluing the blue paper to the card base, I glued the red folded panel to the card about 1/2 inch from the left.  (Because I used striped paper I just aligned it with a stripe.)  Then I adhered my dotted panel to the flap.

Next I glued  my white oval to the yellow scalloped oval and adhered it to the right side of the front flap.

I had a fun sentiment that I stamped on a 3 x 4 inch piece of white cardstock and glued it to the inside of the front flap.

Finally I adhered my sign and tent.  This front-flap card is very easy to make and really showcases your image.  It's one of those cards that looks like it takes a lot of time and effort, but really doesn't.  For me that is about perfect!

Be sure to visit the online store where this fantastic release is on sale for a limited time!

Dies used:


Thanks for stopping by today! I hope you have a fun and creative weekend!


Saturday, September 26, 2020

Kittie & Jack-o-Lantern

Hello Scrapping Cottage friends! Thanks for taking the time to stop and visit with us today. It's Mary Marsh here bringing you the Saturday edition of the Blog. 

We have three brand new releases in the online store. It's Christmas Part 1 (22 new designs), Christmas Part 2 (21 new designs) and a Halloween release (14 new designs). They are all currently on sale and you can save anywhere from 25% to 60%. 

Today, I am here with a card from the Halloween release. Many of you create cards for Halloween and are looking for ideas to use these new dies. So, I am featuring the new Black Cat w/Jack-o-Lantern die. I think both the pumpkin and the cat have such cute faces. Nothing to scary at all so it would be one you could send to a child. So let's get started with some details on how I created my card.

Design Steps:

I started my card with the colors from the Splitcoaststampers color challenge #810. We were to use terracotta tile, flirty flamingo and soft suede. Plus neutrals are allowed so I was good with the dark green for the pumpkin vine and black and gray for the cat. 
terracotta tile, soft suede, flirty flamingo
I cut the pumpkin from terracotta tile cardstock and the cat's scarf in flirty flamingo. The cat is cut in black and gray cardstock. I used a dark green designer paper for the pumpkin vine. 

I had my card base and designer paper chosen so I just needed a layout. I picked the Splitcoaststampers sketch challenge #819. I thought it would work well with the pumpkin and cat image. 
For layer #1 I used a soft suede designer paper. I thought the circles worked well with this image. For layer #2 I used a woodgrain designer paper and cut it with the 2nd largest Rectangle die. For layer #3 I used soft suede cardstock and the 2nd largest Square die. 
Next, I stamped the sentiment with Versamark ink and then embossed it with black embossing powder. I wanted it to stand out on the card. I cut it out with the Stitched Oval die.
I am ready to start card assembly. I attached the image to the square panel with dimensional adhesive. 
Attached the designer paper to the card base and layer #2 and the image panel with double sided tape. 

The sentiment panel is also secured with double sided tape. I added another layer to the panel. It's cut from  terracotta tile cardstock with the Oval die.  
I finished off my card by scattering a few terracotta tile enamel dots and to the sentiment panel a couple of leaves. 
That's it for me for this week. I hope I have given you an idea for this new die. See you next Saturday!

Dies I used to create card: